Quick Answer
How to Reheat Leftovers Properly is easiest to handle when you make one clear kitchen decision at a time. Use the table and steps below to identify the likely cause, choose the safest next move, and avoid changing several variables at once.
CookBuddy Kitchen Note
For How to Reheat Leftovers Properly, this guide centers on best way to reheat different foods, microwave safe containers, oven-safe dish. Those are the checkpoints we would use first in a normal home kitchen before making a bigger change.
Decision table
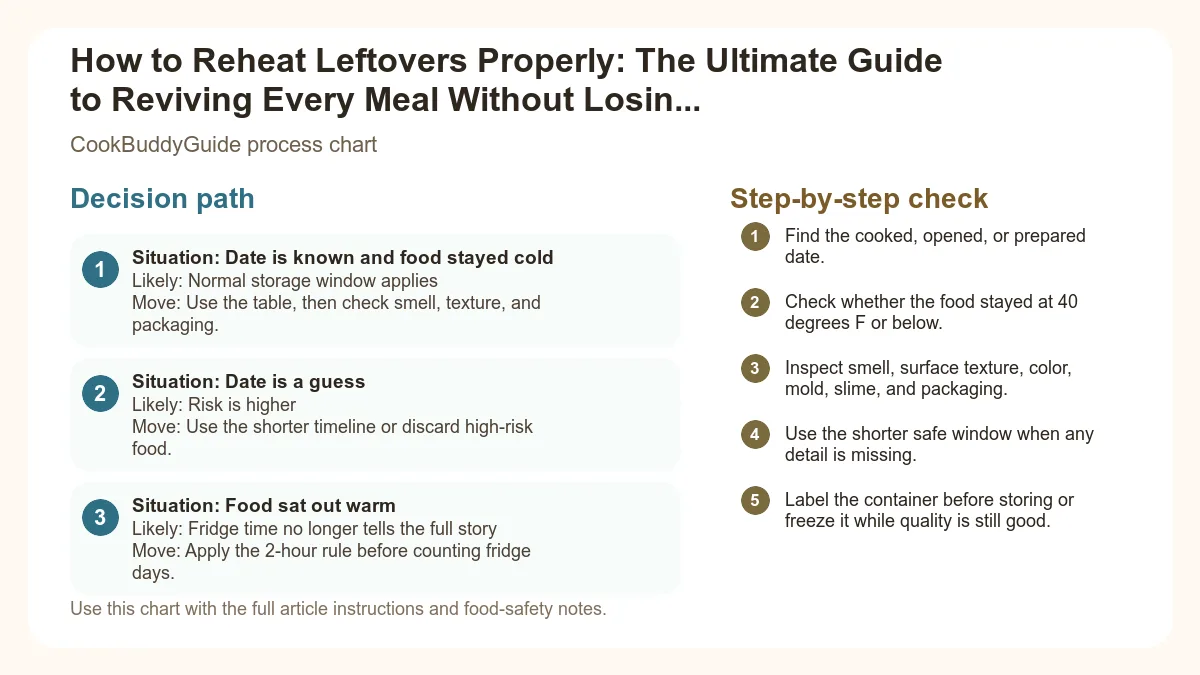
| Situation | Likely cause or meaning | Best move |
|---|---|---|
| Date is known and food stayed cold | Normal storage window applies | Use the table, then check smell, texture, and packaging. |
| Date is a guess | Risk is higher | Use the shorter timeline or discard high-risk food. |
| Food sat out warm | Fridge time no longer tells the full story | Apply the 2-hour rule before counting fridge days. |
Step-by-step fix
- Find the cooked, opened, or prepared date.
- Check whether the food stayed at 40 degrees F or below.
- Inspect smell, surface texture, color, mold, slime, and packaging.
- Use the shorter safe window when any detail is missing.
- Label the container before storing or freeze it while quality is still good.
Common mistakes
- Counting fridge days from the day you noticed the container instead of the day it was made.
- Ignoring time spent on the counter, in a lunch bag, or on a serving table.
- Trusting smell alone when the date or temperature history is unknown.
- Putting warm food into a deep container that cools slowly.
Useful next reads
Helpful tools for this guide
- instant-read thermometer
- digital kitchen scale
- cutting board
- airtight storage containers
Related topic hubs
How to Reheat Leftovers Properly: The Ultimate Guide to Reviving Every Meal Without Losing Flavor
It’s 6:00 PM on a Tuesday. You’re exhausted, the fridge is full of plastic containers from the last three nights, and the thought of cooking a fresh meal feels like climbing Everest. We’ve all been there. But then comes the hesitation: the last time you reheated that leftover chicken, it turned into a piece of rubberized luggage. That expensive pepperoni pizza? It became a soggy, sad triangle of disappointment in the microwave.
In my 15 years of testing recipes and managing a busy home kitchen, I’ve discovered that how to reheat leftovers properly is just as important as how you cook them the first time. Reheating isn't just about adding heat; it’s about managing moisture, texture, and chemistry. When done right, leftovers shouldn't just be "edible"—they should be a second chance at a fantastic meal. In this guide, I’m going to share the professional techniques I use at CookBuddyGuide.com to ensure your healthy lunch ideas for work actually taste like food, not cardboard.
Table of Contents
- Why Most People Fail at Reheating Leftovers
- Essential Food Safety: Reheating Temperatures
- The Best Way to Reheat Different Foods: A Category Guide
- Mastering Your Kitchen Tools for Reheating
- Common Reheating Mistakes and How to Avoid Them
- Advanced Tips for Specific Cuisines
- Frequently Asked Questions
Why Most People Fail at Reheating Leftovers
Most home cooks treat the microwave like a magic "undo" button for coldness. Unfortunately, physics doesn't work that way. To understand the best way to reheat different foods, we first have to understand why they degrade in the fridge.
The Science of Texture: Why Food Gets Rubbery
In my testing, the biggest culprit for "rubbery" food is the over-agitation of protein molecules. When you blast a piece of meat in the microwave, the water molecules inside vibrate so violently that they steam the protein from the inside out, tightening the muscle fibers. This is particularly true for lean proteins like chicken breast or pork chops. By the time the center is warm, the exterior has been hammered into a state of structural integrity that could rival a car tire.
The Moisture Problem: Evaporation and Starch Retrogradation
Have you ever noticed how cold rice turns into tiny, hard pebbles? That is a process called starch retrogradation. As cooked starches cool, the amylose molecules realign into a crystalline structure, expelling water. If you simply heat it up without replacing that lost moisture, the rice remains hard. Similarly, bread and pizza crusts suffer from moisture migration—the water moves from the starch to the crust, making the bread stale and the crust tough.
The "Low and Slow" philosophy is the cornerstone of professional reheating. By applying heat gradually, you allow the internal temperature to rise without evaporating all the surface moisture. This is the secret to reviving a meal so it tastes exactly as it did when it first left the pan.
Essential Food Safety: Reheating Temperatures You Need to Know
Before we talk about flavor, we must talk about leftovers safety. Reheating isn't just about palatability; it's about killing potential pathogens that may have grown while the food was sitting. Foodborne illness is a serious risk if you don't follow basic USDA guidelines.
The 165°F Rule: Why It Matters
According to the USDA, all leftovers should be reheated to an internal temperature of 165°F. This is the "kill zone" for most bacteria, including Salmonella and E. coli. To ensure accuracy, you should always use a digital food thermometer. Don't guess based on steam; I’ve seen many dishes that were piping hot on the outside but still dangerously cold in the middle.
How Many Times Can You Safely Reheat Food?
Technically, you can reheat food multiple times as long as it reaches 165°F each time. However, each cycle of cooling and reheating degrades the quality of the food. My professional recommendation? Only reheat what you plan to eat. This prevents cross-contamination and keeps the texture from turning to mush.
Storage Best Practices Before Reheating
The 2-hour rule is non-negotiable. Food should never sit at room temperature (the "Danger Zone" between 40°F and 140°F) for more than two hours. If it's a hot day (over 90°F), that window drops to one hour. Store your food in airtight, microwave safe containers or oven-safe dish options to prevent odors from the fridge from seeping into your meal.
The Best Way to Reheat Different Foods: A Category Guide
Every food group requires a unique strategy. Here is how I handle the most common leftovers in my own kitchen.
Pizza: Say Goodbye to Soggy Crusts
The microwave is the absolute worst place for pizza. It turns the crust into a sponge. After experimenting with every method under the sun, I’ve found that the skillet is the undisputed champion. It uses the Maillard reaction to re-crisp the bottom while steaming the top.
The Skillet-Steam Method for Pizza
1. Place your cold pizza slice in a non-stick skillet over medium-low heat. No oil is needed; the fat in the crust will do the work.
2. Heat for 2-3 minutes until the bottom is crispy. Check it with a spatula.
3. Add two drops of water (literally a teaspoon) to the corner of the pan—away from the pizza—and immediately cover with a lid.
4. The steam will melt the cheese and refresh the toppings while the pan keeps the crust crunchy. This is widely considered the best way to reheat pizza in a skillet.
Pasta and Grains: Restoring Moisture and Sauce
Pasta and rice are notorious for drying out. For pasta already tossed in sauce, the stovetop is your best friend. Add a splash of water, milk, or cream to the pan to help emulsify the sauce back into its original state.
For rice, the microwave is actually quite effective if you use the "Steam Hack." Place the rice in a bowl, add a teaspoon of water, and cover it with a microwave safe lid or a microwave with a damp towel. The towel traps the steam, reversing the starch retrogradation and making the grains fluffy again.
Meat and Poultry: Preventing the "Warmed-Over" Flavor
Nothing is sadder than dry chicken. To avoid the "warmed-over" flavor—that metallic, stale taste caused by lipid oxidation—you need to protect the meat from direct, harsh heat. My go-to method for reheating chicken without drying out is the oven "Low and Slow" method. Place the meat in an oven-safe dish, add a tablespoon of chicken broth or water, and cover it tightly with aluminum foil. Heat at 300°F until the internal temperature hits 165°F.
Fried Foods: Bringing Back the Crunch
If you have leftover fries or fried chicken, throw the microwave away (metaphorically). The only way to save fried food is to use dry, circulating heat. The air fryer settings should be your first choice. Set it to 350°F and cook for 3-5 minutes. The rapid air movement removes the moisture that caused the soggy crust and reactivates the oils for a fresh-from-the-fryer crunch.
Mastering Your Kitchen Tools for Reheating
Knowing how to reheat leftovers properly requires knowing which tool in your arsenal is right for the job. Not all heat is created equal.
The Oven vs. Toaster Oven
The oven is best for large portions, like a whole lasagna or a tray of roasted vegetables. However, for a single serving, the toaster oven is more efficient. Because the heating elements are closer to the food, it’s excellent for things that need a bit of surface browning. Always use aluminum foil to prevent the top from burning before the middle is warm.
The Microwave: Best Practices for Busy Cooks
I know, I’ve been hard on the microwave. But it’s a tool like any other. The secret is the "Power Level." Most people leave it on 100% power, which is like cooking everything on a blowtorch. For dense foods like casseroles, drop the power to 50% or 60% and increase the time. This allows the heat to conduct toward the center without nuking the edges. Also, use the "Ring Method": arrange your food in a circle on the plate, leaving the center empty. This helps the waves penetrate more evenly.
The Air Fryer: The Modern Reheating Miracle
The air fryer is essentially a high-powered convection oven. It is the best way to reheat different foods that are breaded, fried, or naturally fatty (like steak). I’ve even used it to revive day-old croissants—2 minutes at 320°F and they are better than when they were fresh.
Common Reheating Mistakes and How to Avoid Them
In my 15 years of kitchen experience, I’ve seen these three mistakes happen more than any others. Avoiding them will immediately elevate your leftover game.
1. Overcrowding the Pan
If you’re reheating roasted potatoes or steak tips in a skillet, give them room to breathe. If the pan is too full, the food will steam instead of sear. You’ll end up with grey, mushy meat instead of a beautiful, Maillard-browned crust. Reheat in batches if necessary.
2. Reheating Directly from the Fridge
This is a game-changer: Let your leftovers sit on the counter for 10-15 minutes before reheating (staying within that 2-hour safety window). Taking the "chill" off allows the food to heat more evenly. If you put a block of cold lasagna into a hot oven, the outside will be bubbling and the inside will still be an ice cube.
3. Ignoring the Power of Steam
Whether it’s a splash of water in a pan or a damp paper towel in the microwave, moisture is your best friend. Most leftovers are dry because they’ve lost water in the fridge. Replacing that water is the only way to restore the original mouthfeel. This is especially true when following breakfast meal prep ideas like egg bites or oatmeal.
Advanced Tips for Specific Cuisines
Different cultures use different starches and fats, which means they react differently to heat.
Chinese Takeout and Stir-Fries
Don't microwave your lo mein. Instead, use a wok or a large skillet. Add a tiny bit of neutral oil and a splash of soy sauce or water. High heat for 2 minutes while tossing constantly will refresh the vegetables and keep the noodles from becoming a singular, gelatinous mass.
Mexican Food: Tacos and Enchiladas
For tacos, disassemble them. Reheat the meat in a skillet and the tortillas separately. To keep corn tortillas from cracking, wrap them in a damp paper towel and microwave for 20 seconds, or toast them directly over a low gas flame for 10 seconds per side. For enchiladas, use the oven and add a little extra salsa on top to prevent the cheese from becoming a hard shell.
Casseroles and Lasagna
These are dense. To reheat properly, cut a single slice and place it on its side. This increases the surface area exposed to the heat. Cover with foil to retain moisture, and use a food thermometer to ensure the center reaches 165°F. If you want the cheese to be stretchy again, add a tiny splash of milk to the edges of the dish before covering.
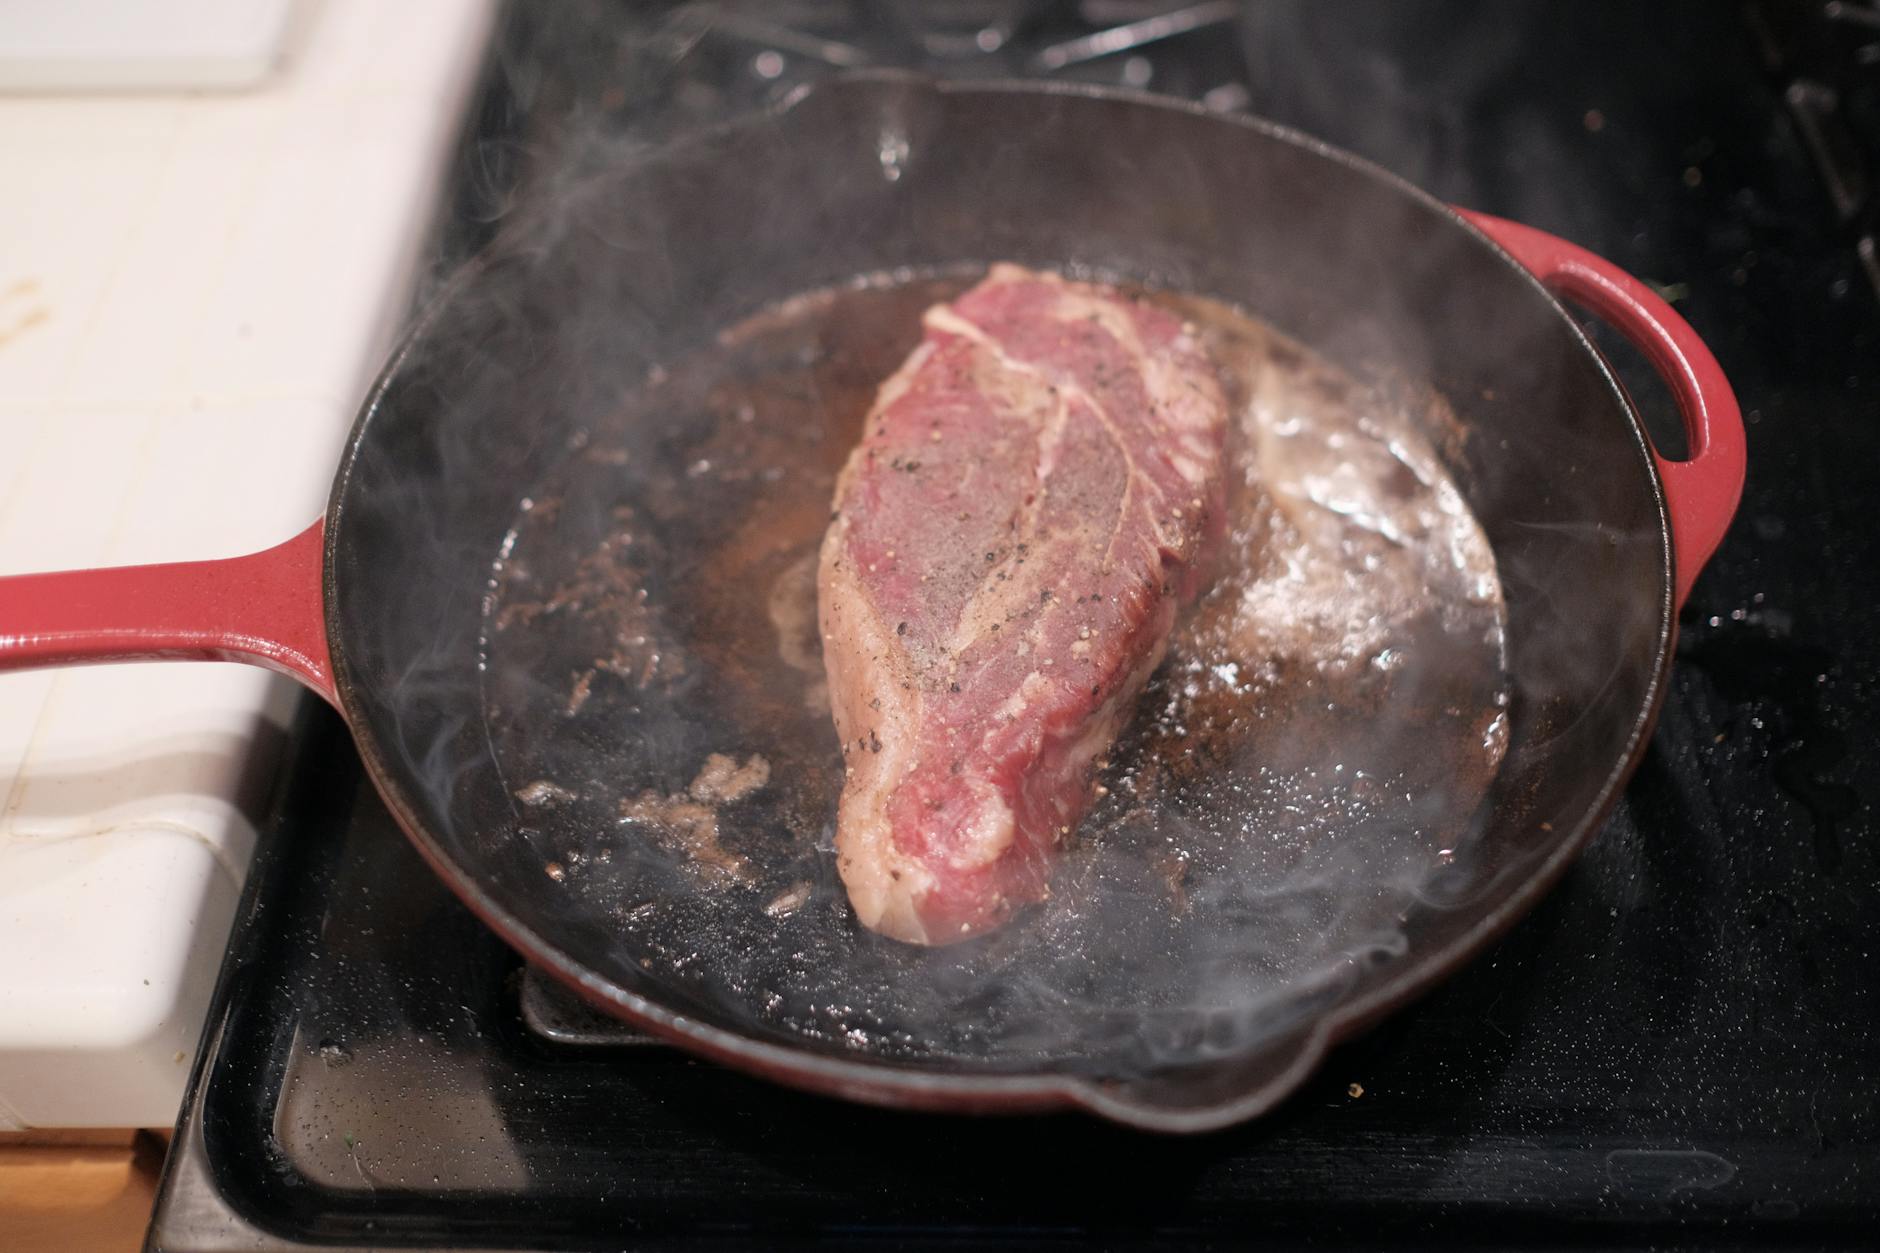
The "Perfect Steak" Reheat Strategy
1. Preheat your oven to 250°F (very low).
2. Place the steak on a wire rack set over a baking sheet. This allows air to circulate around the whole steak.
3. Warm until the internal temperature reaches 110°F (for medium-rare). It will look a bit dull.
4. Flash-sear it in a screaming hot skillet with a teaspoon of butter for 30 seconds per side. This restores the crust without overcooking the inside.
Frequently Asked Questions
A: Only if it is explicitly labeled as microwave safe. Many single-use plastics can leach chemicals like BPA or phthalates into your food when heated. When in doubt, transfer to a glass or ceramic dish.
A: This is called Warmed-Over Flavor (WOF). It's caused by the oxidation of fats. To minimize this, store chicken in the smallest container possible to reduce air exposure, and reheat it using a moist-heat method like steaming or the "low and slow" oven method with broth.
A: Yes, but you must be careful. Rice can harbor Bacillus cereus spores that survive cooking. To stay safe, cool rice quickly after the first cook and reheat it to a full 165°F. Never leave rice at room temperature for more than an hour.
Conclusion: The Art of the Second Meal
Mastering how to reheat leftovers properly is one of the most valuable skills a busy home cook can have. It saves money, reduces food waste, and ensures that your hard work in the kitchen pays off for days to come. Remember the golden rules: Moisture, Temperature, and Tool Selection.
Stop settling for rubbery chicken and soggy pizza. By using the skillet for your slices, the air fryer for your fries, and a food thermometer for your safety, you can turn yesterday's dinner into today's gourmet lunch. For more tips on making the most of your kitchen time, check out our guide on breakfast meal prep ideas and start your day just as strong as you end it. Happy reheating!