Quick Answer
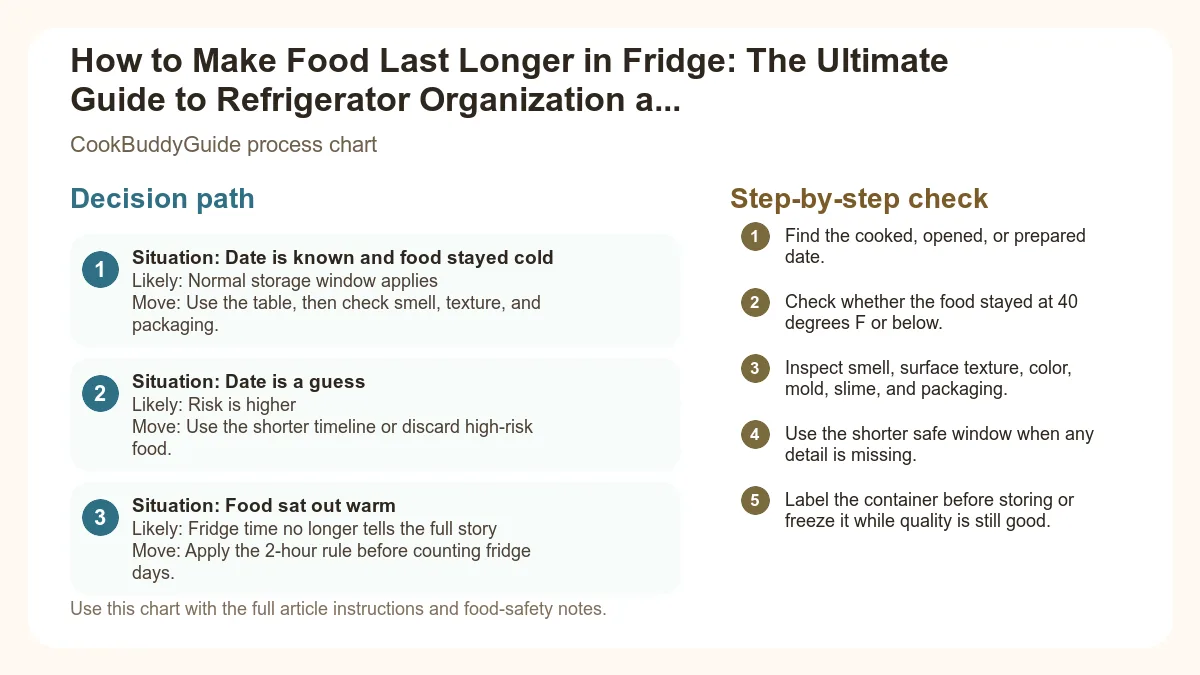
How to Make Food Last Longer in Fridge is easiest to handle when you make one clear kitchen decision at a time. Use the table and steps below to identify the likely cause, choose the safest next move, and avoid changing several variables at once.
CookBuddy Kitchen Note
For How to Make Food Last Longer in Fridge, the home-kitchen check is not only the number of days. We look at the start date, fridge temperature, container seal, serving time, and spoilage signs. If one of those facts is missing, the safer move is to use the shorter window.
Decision table
| Situation | Likely cause or meaning | Best move |
|---|---|---|
| Date is known and food stayed cold | Normal storage window applies | Use the table, then check smell, texture, and packaging. |
| Date is a guess | Risk is higher | Use the shorter timeline or discard high-risk food. |
| Food sat out warm | Fridge time no longer tells the full story | Apply the 2-hour rule before counting fridge days. |
Step-by-step fix
- Find the cooked, opened, or prepared date.
- Check whether the food stayed at 40 degrees F or below.
- Inspect smell, surface texture, color, mold, slime, and packaging.
- Use the shorter safe window when any detail is missing.
- Label the container before storing or freeze it while quality is still good.
Common mistakes
- Counting fridge days from the day you noticed the container instead of the day it was made.
- Ignoring time spent on the counter, in a lunch bag, or on a serving table.
- Trusting smell alone when the date or temperature history is unknown.
- Putting warm food into a deep container that cools slowly.
Useful next reads
Helpful tools for this guide
- airtight food-storage containers
- freezer bags
- date labels
- refrigerator thermometer
Related topic hubs
How to Make Food Last Longer in Fridge: The Ultimate Guide to Refrigerator Organization and Food Safety
Nothing kills the joy of a planned Tuesday night stir-fry faster than reaching for a bell pepper only to find it has turned into a wrinkled, soft shadow of its former self. We have all been there: the "hidden" bag of slimy spinach at the back of the drawer, the fuzzy block of cheddar, or the leftovers that look more like a science experiment than dinner. In my 15 years of testing recipes and managing a busy home kitchen, I have discovered that how to make food last longer in fridge isn't just about luck—it is about mastering the science of the cold chain and strategic refrigerator organization.
Food waste is not just a blow to your grocery budget; it is a missed opportunity for easy, delicious meals. By implementing a few professional food storage tips, you can extend the shelf life of your perishable goods by days or even weeks. In this guide, I will share the exact systems I use at CookBuddyGuide.com to keep our test kitchen ingredients pristine, from the "Paper Towel Trick" for greens to the specific humidity drawer settings that will save your stone fruits.
Table of Contents
- The Science of Freshness: Why Food Spoils
- Mastering Your Fridge Zones: Where Everything Belongs
- Produce Storage: Keeping Fruits and Vegetables Crisp
- Meat, Poultry, and Seafood: Safety and Longevity
- Dairy and Eggs: Maintaining Quality
- Leftovers and Prepared Meals: The 4-Day Rule
- The "Never Together" List: Incompatible Foods
- The Weekly Fridge Audit Routine
- Frequently Asked Questions
The Science of Freshness: Why Food Spoils in the Refrigerator
To understand how to make food last longer in fridge, we first have to understand the enemies of freshness: temperature, moisture, and ethylene gas. When I first started professional cooking, I thought the refrigerator was a "pause button" for decay. In reality, it is just a "slow-motion button."
Temperature Fluctuations and Bacteria Growth
The primary goal of refrigeration is to slow down bacterial growth. Bacteria like Listeria and Salmonella thrive in what food scientists call the "Danger Zone"—between 40°F and 140°F. According to official safe refrigeration and food safety guidelines, your fridge should always be set at or below 40°F (4°C). In my kitchen, I keep a standalone thermometer on the middle shelf because built-in displays are notoriously inaccurate. Even a 3-degree fluctuation can cut the shelf life of your milk by two days.
The Role of Humidity in Produce Longevity
Humidity is a double-edged sword. Too much moisture leads to mold and mushiness; too little leads to dehydration and wilting. This is why humidity drawers (crisper drawers) are vital. They allow you to control the airflow around your produce. I have tested dozens of methods, and I can tell you that "naked" produce—vegetables thrown directly into the drawer without protection—will almost always wilt 30% faster than those stored with proper moisture barriers.
Ethylene Gas: The Silent Ripener
Many fruits, like apples and bananas, emit ethylene gas as they ripen. This gas acts as a ripening hormone. If you store ethylene-sensitive foods (like broccoli or leafy greens) next to high-producers, the greens will yellow and decay prematurely. Understanding this chemical interaction is the "secret sauce" of food waste reduction.
Mastering Your Fridge Zones: Where Everything Actually Belongs
Your refrigerator is not a uniform box of cold air. Because of how air circulates, there are distinct temperature zones that dictate where specific items should live for maximum longevity. Proper how to organize your fridge strategies can prevent your meal prep storage from becoming a safety hazard.
The Upper Shelves: Deli, Drinks, and Ready-to-Eat
The upper shelves have the most consistent temperature. This is the place for "ready-to-eat" foods that don't require cooking to be safe. I store my deli meats, hummus, leftovers, and drinks here. Since heat rises, this area is slightly warmer than the bottom, but it is perfect for items that don't have a high risk of spoilage.
The Lower Shelves: The Coldest Zone for Meat and Dairy
As you move down, the temperature drops. The very bottom shelf is usually the coldest part of the fridge. This is the only place I store raw meat, poultry, and fish. Not only is it the coldest, but placing raw proteins here prevents cross-contamination. If a package of chicken leaks, it won't drip onto your fresh strawberries below.
The Refrigerator Door: Why It’s Not for Milk
This is the biggest mistake I see home cooks make. The door is the warmest part of the fridge because it is exposed to room-temperature air every time you open it. I discovered that milk stored in the door spoils up to 3 days faster than milk stored in the back of the main body. Reserve the door for items with natural preservatives: condiments, jams, pickles, and soda.
Crisper Drawers: High vs. Low Humidity Settings
- High Humidity (Closed Vent): Best for things that wilt, like leafy greens, carrots, and broccoli. The closed vent traps moisture inside.
- Low Humidity (Open Vent): Best for things that rot, like apples, pears, and stone fruits. The open vent allows ethylene gas to escape.
Produce Storage: Keeping Fruits and Vegetables Crisp
Produce is the most expensive category to waste. Over the years, I've developed specific "spa treatments" for different vegetables to ensure they stay crunchy for up to two weeks. Scientific research on storing fruits and vegetables confirms that managing gas and moisture is the key.
The "Berry Spa Day" Method
Berries are notorious for molding within 48 hours. This vinegar wash kills mold spores and keeps them fresh for over a week.
- Prepare a bowl with 3 cups of cold water and 1 cup of white vinegar.
- Submerge berries (strawberries, blueberries, raspberries) for 2 minutes.
- Rinse thoroughly with cold water to remove the vinegar scent.
- Crucial Step: Dry the berries completely. I line a salad spinner with paper towels and spin them gently, then let them air dry on a clean towel for 30 minutes.
- Store in a glass container lined with a dry paper towel, leaving the lid slightly ajar for airflow.
Leafy Greens: The Paper Towel Trick
Moisture is the enemy of greens. Whether you buy bagged salad or whole heads of lettuce, the trick is to add a desiccant. I always transfer greens into a large airtight seal container or a reusable silicone bag and tuck a clean, dry paper towel inside. The towel absorbs the excess condensation that leads to slime. In my testing, this extends the life of spinach from 4 days to nearly 10.
Extending the Life of Herbs: The Bouquet Method
Soft herbs like cilantro and parsley should be treated like fresh flowers. Trim the bottoms of the stems and place them in a glass jar with an inch of water. Cover the tops loosely with a plastic bag and secure it with a rubber band. This keeps them hydrated without suffocating them. Hard herbs like rosemary and thyme, however, prefer to be wrapped in a damp paper towel and tucked into a sealed bag.
Meat, Poultry, and Seafood: Safety and Longevity
When dealing with raw proteins, the stakes are higher. We aren't just worried about flavor; we are worried about FDA guidelines and foodborne illness. I always recommend using a refrigerator and freezer storage chart to track exactly how long meat is safe.
The Bottom Shelf Rule and Secondary Trays
As mentioned, raw meat belongs on the bottom shelf. But I take it a step further: I always place meat packages on a rimmed baking sheet or a dedicated plastic tray. This catches any "purge" (the red liquid in meat packaging) and makes it much easier to sanitize if a leak occurs. This is a non-negotiable step for preventing cross-contamination.
Original Packaging vs. Vacuum Sealing
If you plan to cook the meat within 48 hours, the original grocery store packaging is fine. However, if you are doing meal prep storage for later in the week, I recommend vacuum sealing. Removing the oxygen prevents oxidation (which turns beef gray) and significantly slows bacterial growth. If you don't have a vacuum sealer, wrap the meat tightly in plastic wrap, then a layer of foil to create a pseudo-airtight barrier.
The FIFO Method
I use the "First In, First Out" (FIFO) method. When I come home from the store, the new meat goes to the back, and the older meat moves to the front. I also use a permanent marker to write the "Use By" date clearly on the package so I don't have to squint at the tiny grocery store labels at 6:00 PM when I'm tired.
Dairy and Eggs: Maintaining Creaminess and Quality
Dairy is highly sensitive to light and temperature swings. To keep your morning latte tasting fresh, placement is everything.
Why Eggs Should Stay in Their Original Carton
It is tempting to use those cute built-in egg trays many fridges come with. Don't. Eggshells are porous and easily absorb odors from the fridge (like that half-cut onion). The original carton is designed to protect the eggs from physical damage and odor absorption. Keep them on a middle shelf, not the door.
Keeping Cheese Fresh: Ditch the Plastic Wrap
In my 15 years of cooking, the biggest cheese mistake I've seen is wrapping it tightly in plastic wrap. Cheese is a living thing; it needs to "breathe." Plastic wrap traps moisture and encourages mold. Instead, wrap cheese in parchment paper or beeswax wraps, then place it in a loose-fitting bag. This allows a tiny bit of air circulation while preventing the cheese from drying out.
The "Sweet Spot" for Milk and Yogurt
The back of the middle or bottom shelf is the most stable environment. This is where your milk, yogurt, and sour cream should live. I’ve found that storing yogurt containers upside down can actually create a vacuum seal that keeps them fresh slightly longer, though this is only necessary if you aren't planning to finish the container within a few days.
Leftovers and Prepared Meals: The 4-Day Rule
Leftovers are the ultimate time-saver for busy families. I often integrate them into my weekly breakfast meal prep. However, the safety of leftover food is paramount.
The 2-Hour Window
Bacteria can double in number every 20 minutes at room temperature. You must get your leftovers into the fridge within 2 hours of cooking (or 1 hour if it’s a hot summer day). To speed up cooling, I use shallow glass containers. Large, deep pots trap heat in the center, keeping the food in the "Danger Zone" for too long even after it's in the fridge.
The "Eat Me First" Bin Strategy
This is my favorite organizational hack for busy families. It’s a simple plastic bin placed on the eye-level shelf.
- The Goal: Reduce food waste by highlighting items that need to be eaten within 24 hours.
- What goes inside: The last serving of lasagna, the half-used avocado, or the yogurt that expires tomorrow.
- The Result: When someone is looking for a snack or a quick lunch, they check the bin first, ensuring nothing gets lost at the back of the shelf.
Labeling and Dating
I keep a roll of painter's tape and a Sharpie in my kitchen drawer. Every leftover container gets a label with the name of the dish and the date it was cooked. Most leftovers are safe for 3 to 4 days. If I know I won't eat it by day four, I move it to the freezer. This is especially helpful when I'm storing crockpot freezer meals for later in the month.
The "Never Together" List: Incompatible Foods
Sometimes, the reason your food is spoiling has nothing to do with temperature and everything to do with "bad neighbors." Here are the pairings I avoid at all costs:
- Apples and Leafy Greens: Apples are high ethylene producers; they will turn your kale yellow and bitter in 48 hours.
- Onions and Potatoes: Even though many people store these in a pantry, if you keep them in the fridge, the onions will cause the potatoes to sprout.
- Aromatic Offenders: Never store an open container of onions or garlic near milk or butter. Fats are incredibly efficient at absorbing odors. I once ruined a whole gallon of milk by leaving a pungent onion stir-fry uncovered on the same shelf.
- Tomatoes and... Anything: Honestly, keep tomatoes out of the fridge entirely. The cold temperature breaks down their cellular structure, making them mealy and flavorless.
The Weekly Fridge Audit: A 10-Minute Routine to Reduce Waste
The most effective way to ensure you are following all these food storage tips is to perform a weekly "Sunday Reset." This 10-minute habit has saved me hundreds of dollars over the years.
The Sunday Reset Steps:
- Clear the Decks: Take everything out of the fridge. This sounds daunting, but it only takes 2 minutes.
- Wipe and Sanitize: Use a mixture of water and vinegar to wipe down the shelves. This prevents bacterial growth from spills you might not have noticed.
- Check the Seals: Inspect your fridge gasket (the rubber seal around the door). If it’s cracked or loose, cold air is escaping, and your cold chain is broken. A quick way to test is the "dollar bill trick": close the door on a dollar bill; if it pulls out easily, your seal is weak.
- Inventory Management: Look at what you have left before you go grocery shopping. This prevents you from buying a third jar of mayonnaise when you already have two hidden in the back.
- The "First In, First Out" Check: Move the older items to the front and the "Eat Me First" bin.
Frequently Asked Questions
A: For most vegetables, glass containers with an airtight seal are superior because they don't leach chemicals and they maintain a more consistent temperature. However, for greens, a breathable silicone bag with a paper towel is often better to manage moisture.
A: Trust your senses over the label. If the meat is slimy to the touch, has a sour or ammonia-like smell, or has turned a distinct grayish-green hue, toss it. When in doubt, throw it out.
A: Not exactly. "Use By" is usually the manufacturer's recommendation for peak quality. "Expiration" or "Safety" dates are more critical. However, for perishable goods like infant formula, these dates are strictly regulated by FDA guidelines.
Conclusion: Your Path to a Waste-Free Kitchen
Learning how to make food last longer in fridge is a journey of small, intentional habits. It starts with a thermometer and ends with a weekly audit. When you treat your refrigerator like a precision tool rather than a storage closet, you'll find that your vegetables stay crisp, your meats stay safe, and your grocery bill shrinks.
Start today: move your milk off the door, put a paper towel in your spinach container, and set a 10-minute timer for your first Sunday Reset. Your future self (and your wallet) will thank you. For more ways to streamline your kitchen, check out our guides on meal prep storage and time-saving recipes here at CookBuddyGuide.com. Happy cooking!