Quick Answer
How to Clean a Cast Iron Skillet is easiest to handle when you make one clear kitchen decision at a time. Use the table and steps below to identify the likely cause, choose the safest next move, and avoid changing several variables at once.
CookBuddy Kitchen Note
For How to Clean a Cast Iron Skillet, the practical test is to change one pan variable at a time. Pan temperature, surface moisture, oil timing, and when you move the food are easier to judge separately than all at once.
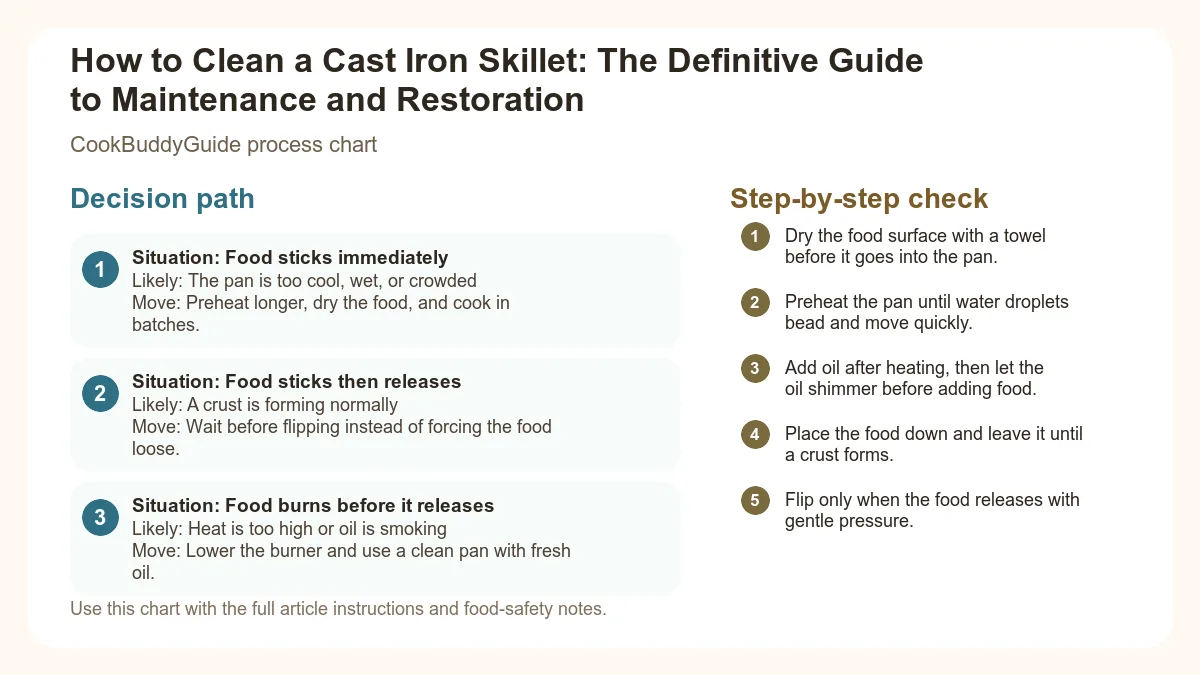
Decision table
| Situation | Likely cause or meaning | Best move |
|---|---|---|
| Food sticks immediately | The pan is too cool, wet, or crowded | Preheat longer, dry the food, and cook in batches. |
| Food sticks then releases | A crust is forming normally | Wait before flipping instead of forcing the food loose. |
| Food burns before it releases | Heat is too high or oil is smoking | Lower the burner and use a clean pan with fresh oil. |
Step-by-step fix
- Dry the food surface with a towel before it goes into the pan.
- Preheat the pan until water droplets bead and move quickly.
- Add oil after heating, then let the oil shimmer before adding food.
- Place the food down and leave it until a crust forms.
- Flip only when the food releases with gentle pressure.
Common mistakes
- Adding food before the pan is fully preheated.
- Putting wet protein or vegetables straight into hot oil.
- Moving food before a crust has time to form.
- Crowding the pan until food steams instead of browns.
Useful next reads
Helpful tools for this guide
- stainless steel spatula
- instant-read thermometer
- neutral cooking oil
- splatter screen
Related topic hubs
How to Clean a Cast Iron Skillet: The Definitive Guide to Maintenance and Restoration
It’s 6:30 PM on a Tuesday. You’ve just finished searing a batch of steaks or perhaps whipping up one of my favorite quick ground beef recipes in your trusty cast iron. The meal was a success, but now you’re staring at a pan covered in charred bits and rendered fat. For many home cooks, this is where the anxiety sets in. There is a persistent, nagging fear that one wrong move—a drop of soap, a soak in the sink—will ruin that beautiful black finish forever.
In my 15+ years of testing recipes and maintaining a kitchen full of vintage and modern cookware, I’ve heard every myth in the book. I’ve seen people treat their cast iron like a fragile Ming vase when, in reality, it is the most resilient tool in your kitchen. Learning how to clean cast iron skillet surfaces isn't about being delicate; it’s about understanding the chemistry of the pan. Once you master the basics of cast iron cleaning, you’ll realize that these pans are nearly indestructible.
In this guide, I’m going to walk you through everything I’ve learned from a decade and a half of trial and error. We will cover daily maintenance, the "great soap debate," how to use a kosher salt scrub for stuck-on food, and how to rescue a rusty pan that looks like it belongs in a scrap yard. By the end, you’ll treat your skillet with the confidence of a professional chef.
Table of Contents
- The Science of Seasoning: What You’re Actually Cleaning
- Daily Maintenance: The 3-Step Cleaning Method
- The Great Soap Debate: Is Dish Soap Actually Safe?
- The Salt Scrub Method for Stubborn Food
- How to Dry Your Skillet to Prevent Flash Rust
- Post-Wash Maintenance: Light Re-Seasoning
- How to Rescue a Rusty or Neglected Skillet
- The Definitive List of Cast Iron Dos and Don’ts
- Essential Tools for Cast Iron Maintenance
The Science of Seasoning: What You’re Actually Cleaning
Before we pick up a kitchen sponge, we need to talk about what makes cast iron special: the seasoning layer. Many people think seasoning is just a layer of grease, but that couldn't be further from the truth. If your pan feels sticky or greasy, it isn't seasoned; it's just dirty.
Polymerization vs. Just Being Greasy
True seasoning is the result of a chemical process called polymerization. When you heat fats or oils in a cast iron pan to their smoke point, they break down and bond to the iron, forming a hard, plastic-like coating. This is what creates that coveted non-stick surface. Companies like Lodge Manufacturing pre-season their pans in the factory using this exact principle, but the seasoning on your pan at home is a living thing—it builds up every time you cook with fat and breaks down if you use improper cleaning techniques.
In my testing, I’ve found that the biggest enemy of a smooth pan isn't actually soap—it's carbon buildup. When bits of food are left behind and "carbonize" (turn into those little black flakes), they create a rough, bumpy surface. This is not seasoning. To get a truly non-stick experience, you must scrub away the carbon while leaving the polymerized oil intact. This is why a clean pan actually performs better than a "well-loved" (read: dirty) one.
Cast Iron vs. Carbon Steel
While this guide focuses on cast iron, it’s worth noting that carbon steel pans require almost identical care. Both rely on polymerization. However, cast iron is more porous, meaning it holds onto that seasoning layer a bit more tenaciously than the smoother surface of carbon steel. Whether you're cooking a delicate fish fillet or a hearty one-pot pasta recipe, the goal remains the same: preserve the polymer, remove the debris.
Daily Maintenance: The 3-Step Cleaning Method
For 90% of your cooking sessions, you won't need anything fancy. My daily routine is fast, efficient, and keeps my pans in peak condition. The secret? Clean the pan while it’s still warm.
The Standard Daily Clean
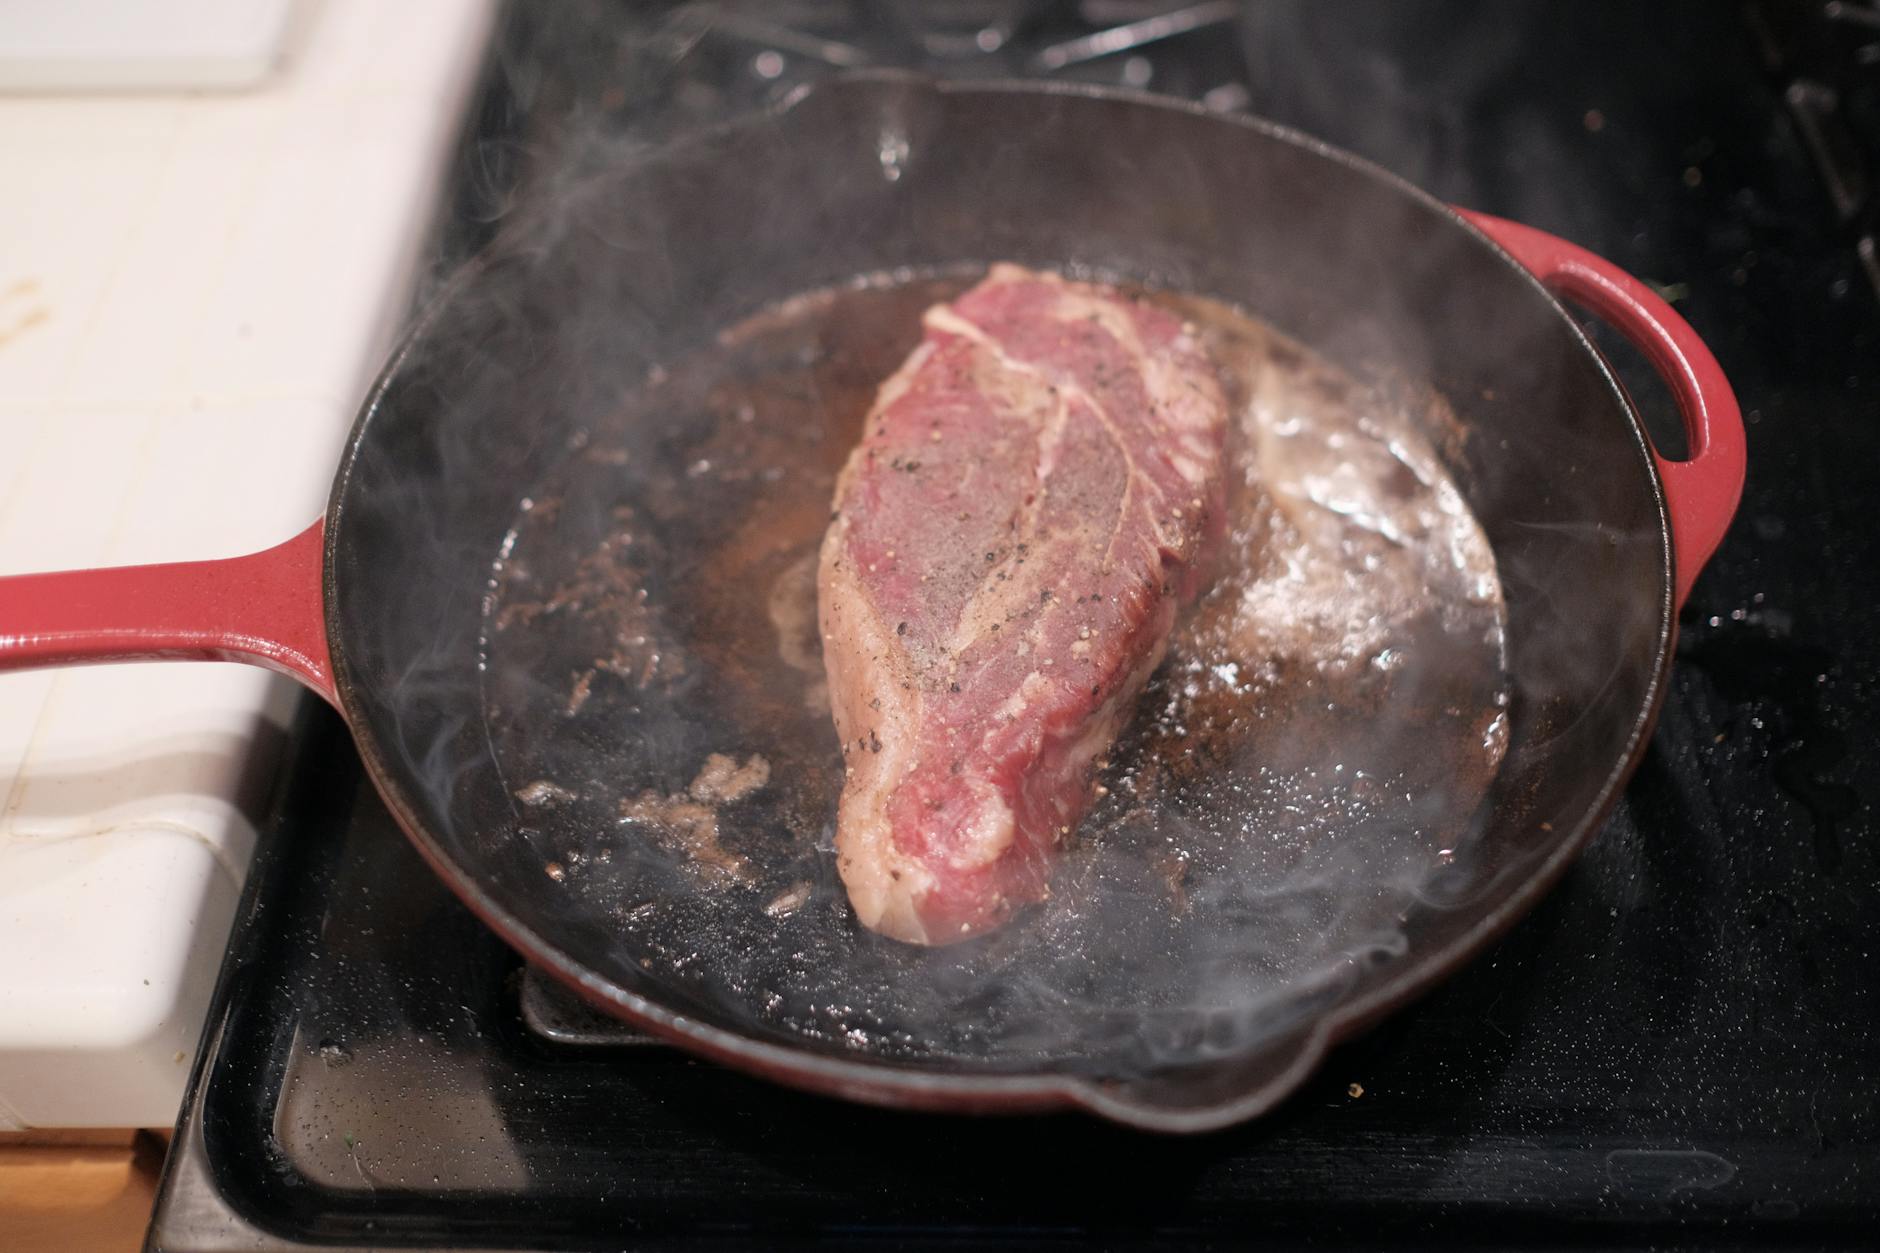
Step 1: The Warm Water Rinse. As soon as the pan is cool enough to handle but still warm to the touch, take it to the sink. Run warm water over the surface. The residual heat helps loosen fats before they have a chance to solidify and "glue" food to the iron.
Step 2: The Gentle Scrub. Use a stiff-bristled kitchen sponge or a dedicated cast iron brush. Scrub the surface vigorously. If you’ve cooked something like bacon or a steak, the water and friction should be enough to remove the debris. Note: Never use a stainless steel scouring pad for daily cleaning as it can be too aggressive on a young seasoning layer.
Step 3: The Immediate Dry. This is the most critical step. Never, ever let a cast iron pan air dry. Use a paper towel or a dedicated "iron towel" (it will get black stains, so don't use your fancy linens) to wipe every inch of the pan, including the bottom and the handle.
I discovered the importance of the "warm clean" the hard way. Early in my career, I left a skillet full of taco meat residue on the stove overnight. By morning, the fats had polymerized into a sticky, stubborn mess that required a full hour of scrubbing. If I had spent 60 seconds cleaning it while warm, I would have saved myself the headache. For more details on the manufacturer's preferred method, check out this guide on cleaning and seasoning cast iron.
The Great Soap Debate: Is Dish Soap Actually Safe?
If you tell your grandmother you used soap on your cast iron, she might gasp in horror. For decades, the "No Soap" rule was the first commandment of cast iron cleaning. But here’s the thing: that rule is outdated.
The History of Lye-Based Soaps
Back in the day, soap was made with lye and vinegar. Lye is incredibly effective at stripping organic compounds—including the polymerized oil on your skillet. If you used old-fashioned soap, you really would strip your pan down to the bare metal. Modern dish soaps, like Dawn or Palmolive, are actually mild detergents. They are designed to cut through surface grease, but they are not strong enough to break the chemical bond of polymerized oil.
When to Use Soap and When to Skip It
In my kitchen, I use a drop of mild dish soap about 50% of the time. I specifically use it after cooking:
- Fish (to remove the lingering odor)
- Pungent aromatics like garlic or curry
- Anything with a high sugar content that might have caramelized
Using soap ensures that you are removing un-polymerized, rancid grease that can spoil the flavor of your next meal. Don't believe me? The experts at Serious Eats have done extensive testing to debunk these myths about cast iron care, proving that a little soap won't hurt a well-seasoned pan.
The Salt Scrub Method for Stubborn Food
Sometimes, a sponge and water just won't cut it. Maybe you seared a roast and have "fond" (browned bits) that refuse to budge. This is where the kosher salt scrub comes in. Salt is the perfect abrasive: it’s hard enough to scrub away stuck-on food, but soft enough that it won't gouge your seasoning.
The Kosher Salt Scrub Technique
- Start with a dry (or slightly damp) pan.
- Pour about 1/4 cup of coarse kosher salt into the center of the skillet.
- Take a folded paper towel and use it to buff the salt into the surface of the pan. Use circular motions and apply significant pressure.
- The salt will begin to turn grey or black as it lifts the burnt food particles.
- Once the surface feels smooth, dump the salt into the trash and give the pan a quick rinse with warm water.
I find this method particularly useful for cleaning the "corners" of the pan where the bottom meets the side walls—a notorious spot for carbon buildup. For a visual guide on this process, refer to this excellent resource on the salt scrub cleaning method.
How to Dry Your Skillet to Prevent Flash Rust
If you take only one thing away from this guide, let it be this: Moisture is the enemy. Even if you towel-dry your pan, there is often microscopic moisture trapped in the pores of the iron. In humid environments, this leads to flash rust—that thin, orange film that appears almost instantly after washing.
The Stovetop Drying Method
After I towel-dry my pan, I always place it back on the burner over medium-low stovetop heat for 2 to 3 minutes. I wait until the pan is hot enough that a drop of water flicked onto it sizzles and evaporates instantly. This ensures that every trace of moisture is gone. Only then is it safe to store.
I once made the mistake of putting a "dry" skillet into a dark, damp cupboard during a humid Tennessee summer. A week later, I pulled out a pan covered in orange spots. Now, the stovetop dry is a non-negotiable part of my routine. The Food Network also highlights this as a critical step in their guide on drying and oiling your skillet.
The Post-Wash Maintenance: Light Re-Seasoning
Once the pan is bone-dry and still warm from the stovetop, it’s time for a "maintenance coat." This isn't a full seasoning session; it’s just a way to protect the iron and keep the surface slick.
The "Buff In, Buff Out" Technique
Apply about a half-teaspoon of vegetable oil, grapeseed oil, or canola oil to the center of the pan. Using a paper towel, spread the oil across the entire interior and exterior of the pan. It should look shiny. Now—and this is the part people miss—take a clean paper towel and buff the oil out until the pan looks matte and dry again. You want a microscopic layer of oil, not a greasy puddle. If you leave too much oil, it will turn sticky and gummy the next time you heat the pan.
Choosing the Right Oil
I prefer oils with high smoke points. While flaxseed oil was trendy for a while because it creates a very hard finish, many home cooks (myself included) have found that flaxseed seasoning tends to flake off over time. I stick to Grapeseed oil or Crisco for my daily maintenance. They are affordable, stable, and create a resilient non-stick surface.
How to Rescue a Rusty or Neglected Skillet
If you find a rusty pan at a yard sale or realize you've neglected your own skillet, don't throw it away. As long as the iron isn't cracked or severely "pitted" (deep holes from corrosion), it can be saved.
The Rust Rescue Protocol
1. The Scour: Use fine steel wool to scrub away the surface rust. If the rust is stubborn, you can use a 50/50 mix of white vinegar and water. Soak the pan for no more than 30 minutes (vinegar will eventually eat the iron itself!), then scrub again.
2. The Deep Clean: Wash the pan with soap and water to remove any remaining rust dust or vinegar. Dry it immediately on the stovetop.
3. The Full Season: Apply a thin coat of oil to the entire pan. Place it upside down in a 450°F oven for one hour. Place a baking sheet on the rack below to catch any drips. Let it cool completely in the oven. Repeat this process 2-3 times for a brand-new finish.
I’ve restored pans that looked like they were beyond hope using this exact method. For a more detailed walkthrough of the science behind rust removal, America's Test Kitchen has a fantastic guide on how to restore rusty cast iron.
The Definitive List of Cast Iron Dos and Don’ts
To keep your skillet in top shape for the next 50 years, follow these hard and fast rules:
The "Never" List
- Never put it in the dishwasher: This is the #1 killer of cast iron. The harsh detergents and long soak times will strip your seasoning and cause immediate rusting.
- Never soak it in the sink: Five minutes is okay; overnight is a death sentence for your seasoning.
- Never put cold water in a screaming hot pan: This can cause "thermal shock," which can actually crack or warp the iron.
The "Always" List
- Always use metal spatulas: Unlike non-stick Teflon pans, cast iron loves metal. A flat-edged metal spatula helps scrape away high spots in the seasoning, making the pan smoother over time.
- Always store in a dry place: If you stack your pans, place a paper towel between them to absorb moisture and prevent scratching.
- Always cook "fatty" foods early on: If your pan is new, cook bacon, sausage, or fried chicken. These help build that initial seasoning layer faster than dry cooking.
Essential Tools for Cast Iron Maintenance
While you can get by with just a sponge and salt, a few specialized tools make how to clean cast iron skillet chores much easier.
- Chainmail Scrubber: This is my favorite tool. It consists of small stainless steel rings linked together. It’s incredibly effective at removing stuck-on food without harming the seasoning. I’ve used the same one for five years, and it’s basically indestructible.
- Plastic Pan Scrapers: These little polycarbonate wedges are great for scraping off burnt-on cheese or sauces without scratching the pan. They are a game changer for busy cooks who don't want to spend time scrubbing.
- Lodge Cast Iron Brush: A stiff-bristled brush with a long handle allows you to scrub the pan while it's still quite hot without burning your hands.
If you're looking for the gold standard in these tools, I highly recommend checking out the maintenance kits from Lodge Manufacturing. They have spent over a century perfecting the art of the skillet.
Frequently Asked Questions
A: Not necessarily. This is usually just carbon buildup or a bit of excess oil. Give it a good scrub with kosher salt and a little soap, then re-oil. It should resolve itself.
A: Yes, but with a caveat. If your pan is well-seasoned, a 30-minute tomato sauce won't hurt it. However, long-simmered acidic foods can eat away at the seasoning and give the food a metallic taste. For long braises, stick to enameled cast iron or stainless steel.
A: Rarely! If you use your pan regularly and follow the "light re-seasoning" step after each wash, you may never need to do a full oven seasoning again. I only do it if the pan has been stripped or rusted.
Conclusion: The Reward of a Well-Cared-For Pan
Cleaning a cast iron skillet doesn't have to be a chore, and it certainly shouldn't be a source of stress. By understanding that seasoning is a resilient polymer and that moisture is your only true enemy, you can maintain a pan that will literally last for generations. In my kitchen, my 12-inch skillet is the workhorse that handles everything from breakfast hash to late-night seared steaks. It’s not perfect—it has some character and some battle scars—but it’s the most reliable tool I own.
Stop worrying about the "rules" and start cooking. If you mess up and the pan rusts, you now have the tools to fix it. If the food sticks, grab the salt. Cast iron is forgiving, durable, and gets better with every single meal you prepare. Happy cooking!