Quick Answer
How to Freeze Leftover Food is easiest to handle when you make one clear kitchen decision at a time. Use the table and steps below to identify the likely cause, choose the safest next move, and avoid changing several variables at once.
CookBuddy Kitchen Note
For How to Freeze Leftover Food, the home-kitchen check is not only the number of days. We look at the start date, fridge temperature, container seal, serving time, and spoilage signs. If one of those facts is missing, the safer move is to use the shorter window.
Decision table
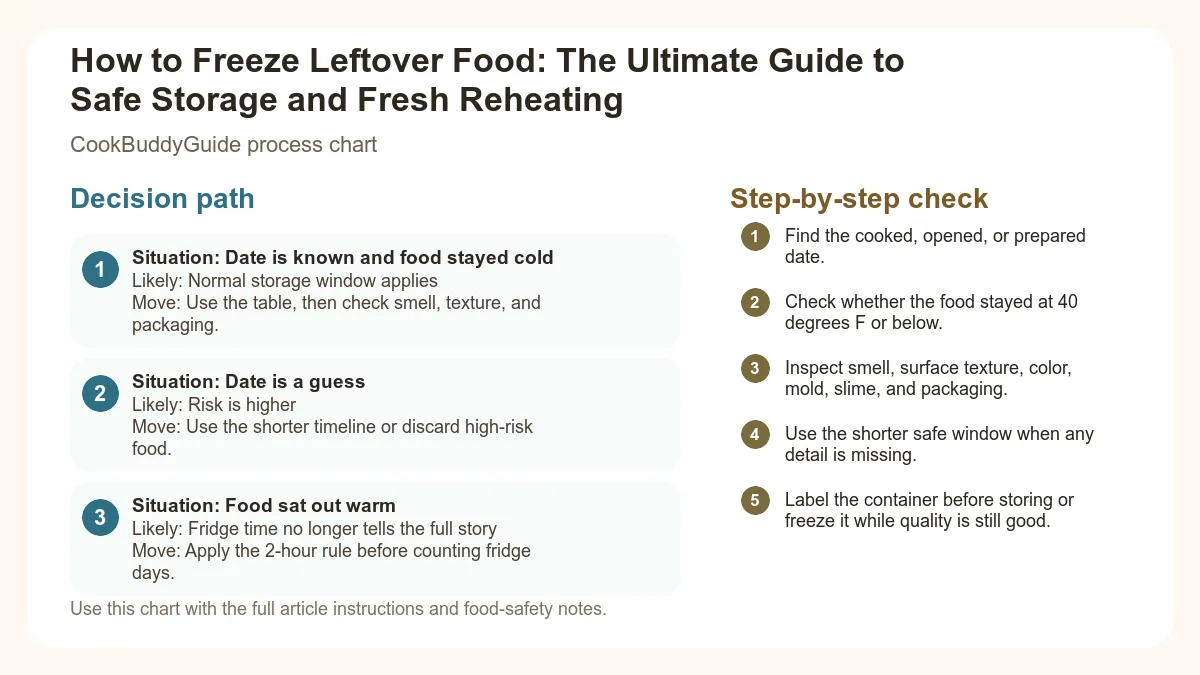
| Situation | Likely cause or meaning | Best move |
|---|---|---|
| Date is known and food stayed cold | Normal storage window applies | Use the table, then check smell, texture, and packaging. |
| Date is a guess | Risk is higher | Use the shorter timeline or discard high-risk food. |
| Food sat out warm | Fridge time no longer tells the full story | Apply the 2-hour rule before counting fridge days. |
Step-by-step fix
- Find the cooked, opened, or prepared date.
- Check whether the food stayed at 40 degrees F or below.
- Inspect smell, surface texture, color, mold, slime, and packaging.
- Use the shorter safe window when any detail is missing.
- Label the container before storing or freeze it while quality is still good.
Common mistakes
- Counting fridge days from the day you noticed the container instead of the day it was made.
- Ignoring time spent on the counter, in a lunch bag, or on a serving table.
- Trusting smell alone when the date or temperature history is unknown.
- Putting warm food into a deep container that cools slowly.
Useful next reads
Helpful tools for this guide
- airtight food-storage containers
- freezer bags
- date labels
- refrigerator thermometer
Related topic hubs
How to Freeze Leftover Food: The Ultimate Guide to Safe Storage and Fresh Reheating
We’ve all been there: It’s 6:00 PM on a Tuesday, you’re exhausted, and the thought of chopping an onion feels like climbing Mount Everest. You open the fridge, hoping for a miracle, only to find a container of chili that has morphed into a fuzzy science experiment. It’s a heartbreaking waste of money and effort. In my 15 years of testing recipes and managing a busy household kitchen, I’ve discovered that the freezer isn't just a place where bread goes to get freezer burn—it is your most powerful tool for food waste reduction and stress-free weeknight dining.
Learning how to freeze leftover food properly is the difference between a "sad desk lunch" and a meal that tastes like it was just pulled off the stove. Most home cooks treat the freezer as a graveyard for things they don't want to eat right now. However, with the right techniques, you can preserve the texture, flavor, and nutritional value of almost anything. In this freezing leftovers guide, I’m going to share the hard-won secrets I’ve gathered from over a decade of trial and error, so you can stop throwing money in the trash and start building a high-quality "frozen grocery store" in your own kitchen.
Table of Contents
- The Golden Rules of Food Safety and Freezing
- Essential Gear: Choosing the Right Containers
- The 'No-Freeze' List: Foods That Don't Survive
- Food-by-Food Freezing Guide
- Labeling and Organization: The FIFO Method
- Freezer Life Chart: How Long is Too Long?
- Thawing and Reheating for Maximum Flavor
- Common Freezing Mistakes and How to Fix Them
The Golden Rules of Food Safety and Freezing
Before we talk about containers or meal prep tips, we have to talk about food safety. The freezer doesn't actually kill bacteria; it simply puts them into a state of suspended animation. If you put "borderline" food into the freezer, you’re just preserving a future stomach ache. According to the USDA guidelines for leftover safety, you must refrigerate or freeze leftovers within two hours of cooking.
The Two-Hour Rule: Cooling Down Safely
In my experience, the biggest mistake home cooks make is letting a giant pot of soup sit on the counter all evening to "cool down naturally." This keeps the food in the "Danger Zone" (between 40°F and 140°F) for far too long, allowing bacteria to multiply rapidly. However, you should never put a piping hot pot directly into the freezer. Not only will this cause steam to turn into ice crystals on your food, but it can also raise the internal temperature of the freezer, potentially thawing the edges of the food nearby and causing cross-contamination risks.
Preventing the Danger Zone with Ice Baths
When I’m batch cooking a large volume of stew or sauce, I use a professional trick: the ice bath. I fill my kitchen sink with ice and a bit of cold water, then set the pot (or smaller containers) into the water. Stirring the food while it sits in the ice bath can bring the temperature down to a safe level in under 15 minutes. Once the food is no longer steaming and feels cool to the touch, it’s ready for the freezer.
Essential Gear: Choosing the Right Containers
If you want to master how to freeze leftover food, you need to invest in the right gear. Air is the enemy of frozen food. When air reaches the surface of your food, it dehydrates it, leading to that grayish, leathery texture we call freezer burn.
Glass vs. Plastic: Which is Better?
I am a huge advocate for freezer-safe glass. It doesn't stain, it’s BPA-free, and you can often go from freezer to oven (if the glass is tempered, like Pyrex). However, you must leave "headspace." Liquids expand when they freeze. If you fill a glass jar to the brim with broth and freeze it, the glass will shatter. I always leave at least an inch of space at the top. For plastic, Ziploc freezer bags are a staple in my kitchen because you can squeeze out every last bit of air before sealing, which is the best way to freeze food for long-term storage.
The Magic of Vacuum Sealing
If you’re serious about food waste reduction, a vacuum sealer is a game-changer. The vacuum sealer benefits are undeniable: by removing 99% of the air, you can extend the freezer life of meats and cooked meals by months, if not years. I’ve pulled out vacuum-sealed pulled pork from 18 months ago that tasted like I’d made it yesterday.
Pro Tip: The "Flat-Freeze" Method for Soups
This is my favorite space-saving hack. Instead of using bulky tubs, pour your cooled soup or sauce into a gallon-sized Ziploc freezer bag. Squeeze out the air, seal it, and lay it flat on a baking sheet in the freezer. Once it’s frozen solid, you can stack these "soup bricks" like books on a shelf. This also allows the food to thaw much faster later on!
The 'No-Freeze' List: Foods That Don't Survive the Cold
As much as I love my freezer, I have to be honest: some things just don't belong there. In my early days of 15+ years ago, I tried freezing a leftover Niçoise salad. It was a disaster. The science is simple: freezing causes water to expand and form ice crystals, which puncture the cell walls of the food. When the food thaws, those punctured cells leak, resulting in mush.
- High-Water Content Vegetables: Lettuce, cucumbers, and radishes will turn into translucent slime.
- Emulsified Sauces: Mayonnaise, sour cream, and some cream-based sauces will break and separate. Your creamy pasta sauce will turn into a grainy, oily mess.
- Fried Foods: The moisture in the freezer ruins the crispy batter. While you can reheat them in an air fryer to save them, they will never be as good as day one.
- Fully Cooked Pasta: If you freeze pasta that is already soft, it will be mushy when reheated. If you know you're making a batch for the freezer, cook the pasta "extra al dente."
Food-by-Food Freezing Guide: Best Practices
Every food group requires a slightly different approach to maintain its integrity. Here is my breakdown of how to freeze common leftovers based on my years of testing.
Cooked Proteins: Steaks, Chops, and Poultry
When freezing cooked meat, the goal is to prevent it from drying out. I discovered that freezing meat in a bit of its own juices or gravy helps immensely. If it's a dry protein, like a grilled chicken breast, wrap it tightly in plastic wrap first, then place it in a Ziploc freezer bag. This double-layer protection is essential for preventing freezer burn.
Grains and Starches: Rice and Bread
Did you know you can freeze cooked rice? It’s a staple of my breakfast meal prep ideas. I freeze rice in individual portions. When you reheat it in the microwave with a damp paper towel, the steam "reactivates" the starch, making it fluffy again. For bread, always slice it before freezing. That way, you can pop a single slice into the toaster without thawing the whole loaf.
How to Flash Freeze Individual Portions
Flash freezing is a technique I use for meatballs, pancakes, or individual cookie dough balls. Place the items on a parchment-lined baking sheet so they aren't touching. Put the whole sheet in the freezer for 1-2 hours until the items are hard. Then, transfer them to an airtight container. This prevents them from sticking together in one giant clump, allowing you to take out exactly what you need.
Labeling and Organization: The FIFO Method
A freezer is only useful if you know what’s inside it. I can't tell you how many "mystery blocks" of frozen brown stuff I've thrown away because I didn't label them. To truly succeed at how to freeze leftover food, you must be disciplined about labeling.
The Essential Labeling Checklist
Every container should have three things written on it:
- Name of the Dish: (e.g., "Turkey Chili")
- Date of Freezing: (e.g., "Oct 12, 2023")
- Reheating Instructions: (e.g., "Thaw in fridge, microwave 3 mins")
I use blue painter's tape and a permanent marker. It stays on in the cold but peels off easily without leaving a sticky residue. To keep things organized, I use the FIFO Method (First In, First Out). When I add new items, I push the older items to the front. I also keep a simple inventory sheet on the side of the fridge so I don't have to dig through the frozen depths to see what's for dinner.
Freezer Life Chart: How Long is Too Long?
While food kept at a constant 0°F is technically safe to eat indefinitely, the quality will eventually degrade. Use this cold food storage chart as a reference for peak quality.
| Food Item | Recommended Freezer Life | Signs of Decline |
|---|---|---|
| Soups and Stews | 2–3 Months | Ice crystals, separation |
| Cooked Poultry/Meat | 2–4 Months | Dryness, graying color |
| Cooked Rice/Grains | 1 Month | Hard, "chalky" texture |
| Casseroles | 2–3 Months | Soggy topping, freezer odor |
| Bread and Pastries | 3 Months | Dryness, loss of flavor |
Thawing and Reheating for Maximum Flavor
You’ve done the work to freeze it safely; don't ruin it in the last mile! There are three safe thawing methods recommended by experts. If you're looking for inspiration on what to cook specifically for the freezer, check out our guide on easy crockpot freezer meals.
The Refrigerator Thaw (The Gold Standard)
This is the safest and best way to preserve texture. By letting food thaw slowly in the fridge overnight, you minimize the "purge" of moisture. It takes planning, but the results are worth it.
The Cold-Water Bath (The Quick Fix)
If you forgot to take out dinner, place your airtight container or Ziploc bag in a bowl of cold tap water. Change the water every 30 minutes. A small bag of soup will usually thaw in about an hour this way. Never use hot water, as this can start "cooking" the outside of the food while the inside is still frozen, creating a food safety risk.
Reheating Instructions for Success
When reheating, I always add a "splash of life." For soups or pasta, add a tablespoon of water or broth to restore the moisture lost during freezing. For things like pizza or bread, the oven or air fryer is much better than the microwave for restoring that original crunch. According to Serious Eats' research on the best way to freeze food, the speed of reheating also matters—getting food through the "danger zone" quickly is key.
Common Freezing Mistakes and How to Fix Them
Even after 15 years, I still make mistakes. Here are the most common pitfalls I see and how I handle them:
- Overcrowding the Freezer: A full freezer is actually more energy-efficient than an empty one, but if you pack it so tightly that air can't circulate, your food won't freeze fast enough. This leads to larger ice crystals and worse texture.
- Ignoring Freezer Burn: If you see those white, dried-out patches, don't throw the whole meal away! You can often just trim off the affected area. The food is still safe to eat; it just might have a slightly "off" flavor in that spot.
- The Power Outage Panic: If the power goes out, keep the freezer door closed! A full freezer will keep its temperature for about 48 hours. If the food still contains ice crystals or is below 40°F when the power comes back, it is generally safe to refreeze.
Frequently Asked Questions
Yes, as long as it was thawed in the refrigerator and hasn't been sitting out for more than two hours. However, the texture may suffer due to the repeated formation of ice crystals.
It is safe as long as the plastic is labeled "freezer-safe." However, standard plastic containers are rarely truly airtight, so use them for short-term storage (under a month) to avoid freezer burn.
This usually happens because the food wasn't sealed in an airtight container. Odors from other foods (like onions or fish) can migrate through thin plastic. Double-bagging or using vacuum sealer benefits can prevent this.
Conclusion: Your Freezer is Your Best Friend
Mastering how to freeze leftover food is one of the most valuable skills you can develop as a home cook. It saves you money, reduces your environmental impact, and ensures that a healthy, home-cooked meal is always just a few minutes away. Remember the basics: cool it fast, seal it tight, label it clearly, and thaw it safely. For more ways to save time in the kitchen, don't miss our favorite breakfast meal prep ideas to start your mornings right.
For further reading on the technical side of preservation, I highly recommend checking out this guide on safely freezing your leftovers. Happy freezing, and here's to a kitchen with zero waste and infinite possibilities!