Quick Answer
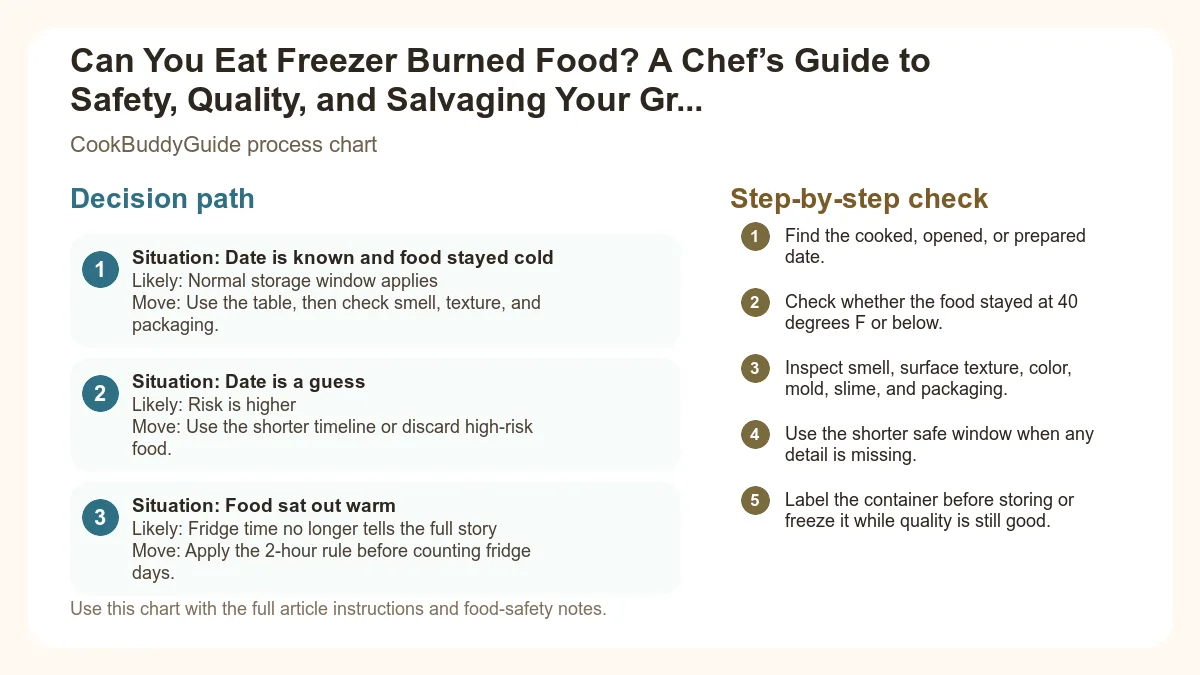
Can You Eat Freezer Burned Food? A Chef’s Guide to Safety, Quality, and Salvaging Your Groceries is easiest to handle when you make one clear kitchen decision at a time. Use the table and steps below to identify the likely cause, choose the safest next move, and avoid changing several variables at once.
CookBuddy Kitchen Note
For Can You Eat Freezer Burned Food? A Chef’s Guide to Safety, Quality, and Salvaging Your Groceries, the home-kitchen check is not only the number of days. We look at the start date, fridge temperature, container seal, serving time, and spoilage signs. If one of those facts is missing, the safer move is to use the shorter window.
Decision table
| Situation | Likely cause or meaning | Best move |
|---|---|---|
| Date is known and food stayed cold | Normal storage window applies | Use the table, then check smell, texture, and packaging. |
| Date is a guess | Risk is higher | Use the shorter timeline or discard high-risk food. |
| Food sat out warm | Fridge time no longer tells the full story | Apply the 2-hour rule before counting fridge days. |
Step-by-step fix
- Find the cooked, opened, or prepared date.
- Check whether the food stayed at 40 degrees F or below.
- Inspect smell, surface texture, color, mold, slime, and packaging.
- Use the shorter safe window when any detail is missing.
- Label the container before storing or freeze it while quality is still good.
Common mistakes
- Counting fridge days from the day you noticed the container instead of the day it was made.
- Ignoring time spent on the counter, in a lunch bag, or on a serving table.
- Trusting smell alone when the date or temperature history is unknown.
- Putting warm food into a deep container that cools slowly.
Useful next reads
Helpful tools for this guide
- airtight food-storage containers
- freezer bags
- date labels
- refrigerator thermometer
Related topic hubs
- The Short Answer: Is Freezer Burned Food Safe to Eat?
- What Exactly is Freezer Burn? The Science of Sublimation
- How to Identify Freezer Burn Like a Pro
- Can You Salvage Freezer Burned Food? (And How to Do It)
- The CookBuddy Guide to Preventing Freezer Burn
- Freezer Storage Cheat Sheet: How Long is Too Long?
The Short Answer: Is Freezer Burned Food Safe to Eat?
Let’s get the most important question out of the way immediately. According to the USDA freezing and food safety guidelines, is freezer burned food safe? Yes, it is perfectly safe to eat.Safety vs. Quality: The Crucial Distinction
As a home cook, it is vital to distinguish between food safety (biological risks) and food quality (physical changes). When food is kept at a consistent freezer burn temperature of 0°F (-18°C) or lower, bacterial growth is essentially paused. Bacteria, yeasts, and molds become dormant in the extreme cold. Freezer burn is not a sign of spoilage, rot, or bacterial contamination. Instead, it is a physical change caused by moisture loss and oxidation. While the food might look unappetizing and the freezer burn taste can be off-puttingly metallic or "stale," it will not make you sick if it has been handled and stored correctly otherwise.Why Freezer Burn Isn't Bacterial Growth
I often hear readers ask if those white patches are a type of mold. They aren't. Freezer burn vs mold is an easy distinction once you know what to look for. Mold requires moisture and a relatively moderate temperature to grow. Freezer burn is the result of the exact opposite: the removal of moisture in a deep-freeze environment. The "ick factor" comes from the change in texture and flavor, but from a health perspective, you are in the clear. However, if your freezer has lost power or the food has thawed and refrozen multiple times, that is a different story entirely. In those cases, the safety risk is real. But if it’s just been sitting in the back of the freezer too long? It’s safe.What Exactly is Freezer Burn? The Science of Sublimation
To understand how to fix it, we have to understand why it happens. In my early years of cooking, I thought freezer burn was just "extra ice." I was wrong. It’s actually the result of a fascinating (and frustrating) process called sublimation.Surface Dehydration Explained
The science of freezer burn reveals that sublimation occurs when water changes from a solid (ice) directly into a gas (vapor) without ever becoming a liquid. When you put food in the freezer, the water molecules inside the food form ice crystals. If the food isn't wrapped in airtight containers, those ice crystals migrate from the interior of the food to the surface and then evaporate into the dry freezer air. This leaves the food's surface parched, resulting in dehydration. This is why freezer burn on chicken or freezer burn on steak looks like dry, leathery patches—because that’s exactly what it is.The Role of Oxidation in Flavor Changes
Once the moisture leaves the food, oxygen moves in to fill the gaps. This leads to oxidation, the same process that turns an apple brown or makes copper turn green. In meat, oxidation affects the fats and pigments, which is why you’ll notice a distinct freezer burn smell that is often described as "cardboard-like" or "rancid." The fats are literally beginning to break down chemically, which ruins the flavor even if the safety remains intact.Why Your Freezer's Defrost Cycle Might Be the Culprit
Modern frost-free freezers are convenient, but they are the enemy of long-term food storage. To prevent ice buildup on the freezer walls, these units periodically raise the internal temperature to melt frost. This temperature fluctuation encourages sublimation. Every time the temperature rises, ice crystals on your food melt slightly and then refreeze, pulling more moisture out of the center of your food and depositing it on the surface as "snow."How to Identify Freezer Burn Like a Pro
Identifying freezer burn is a skill every home cook should master. In my kitchen, I use a "Three-Sense Check": sight, touch, and smell.Visual Cues: Ice Crystals and Discoloration
The FDA food storage guidelines note that freezer burn often appears as grayish-brown leathery spots.- On Meat: Look for white, tan, or gray patches that look dry. Freezer burn on chicken usually looks like white, sandpaper-like spots, while freezer burn on steak appears as dark brown or gray patches.
- On Vegetables: Freezer burn on vegetables usually manifests as a shriveled appearance. Peas might look like tiny, dried-up pebbles, and corn kernels may appear dull and opaque.
- On Ice Cream: Freezer burn on ice cream is the easiest to spot. It looks like a layer of crunchy, snowy ice crystals on the surface of the pint.
Texture Changes: Leathery Patches and Shriveled Edges
When you touch freezer-burned food, it won't feel soft or pliable. It will feel tough, woody, or leathery. This is because the cellular structure of the food has collapsed due to moisture loss. If you poke a freezer-burned piece of meat, it won't have that "spring-back" quality of fresh or properly frozen meat.The "Old Freezer" Smell
The identifying freezer burned meat resource highlights that the smell is a major giveaway. It’s a stale, musty odor. If you open a bag of frozen veggies and it smells like the inside of an old refrigerator, that’s oxidation at work.Kitchen Pro Tip: The Spoilage vs. Burn Test
If you aren't sure if food is burned or spoiled, follow this checklist:
- Check for Slime: If meat is slimy or sticky after thawing, it is likely spoiled (bacterial growth). Toss it.
- Check for Odor: Freezer burn smells like "old ice." Spoilage smells sour, putrid, or like ammonia. If it smells sour, toss it.
- Check the Color: Freezer burn is usually light (white/gray). Spoilage often involves green, black, or fuzzy patches (mold).
Can You Salvage Freezer Burned Food? (And How to Do It)
Just because a piece of meat has a few dry spots doesn't mean it’s destined for the trash. I hate wasting food, especially when I’m trying to stick to cheap meals under $5. Here is how I salvage food based on my years of trial and error.The "Trim and Toss" Method
The most effective way to handle freezer burn is to remove the affected areas. According to the salvaging freezer burned food guide, you should cut away the burned portions either before or after cooking. Personally, I prefer trimming before cooking. Use a sharp chef's knife to slice off the leathery, discolored patches. Since the damage is usually on the surface, the meat underneath is often perfectly fine.Brining and Marinating to Restore Moisture
Because freezer burn is essentially dehydration, you need to reintroduce moisture. A simple salt-and-water brine can work wonders for chicken or pork. The salt helps the muscle fibers hold onto water during the cooking process, masking the dryness caused by the freezer.Best Cooking Methods for Damaged Proteins
Never, ever use dry-heat methods (like grilling or searing) for freezer-burned meat. It will only highlight the tough texture. Instead, opt for low-and-slow moist-heat methods.- Stews and Soups: This is my go-to. The long simmering time softens the fibers, and the liquid hides the lack of internal moisture.
- Slow Cookers: If you have a stash of storing your crockpot freezer meals, you know the power of the slow cooker. The steam trapped inside the pot helps rehydrate the food.
- Strong Flavors: Use bold spices, aromatics (garlic, onions), and acidic components (vinegar, citrus) to mask any lingering "off" flavors from oxidation.
The "Rescue Brine" for Freezer-Burned Poultry
Use this to salvage chicken breasts that have minor surface burn.
- 4 cups cold water
- 1/4 cup Kosher salt
- 2 tbsp brown sugar
- 1 tsp black peppercorns
Instructions: Dissolve salt and sugar in water. Submerge trimmed chicken for 1-2 hours in the fridge. Rinse, pat dry, and cook in a sauce-heavy dish like Chicken Cacciatore or a spicy curry.
When to Cut Your Losses
There is a limit. If more than 50% of the food is covered in thick, woody patches, the texture will be so unpleasant that no amount of gravy can save it. Similarly, if freezer burn on ice cream has turned the entire container into a block of icy slush, the creamy emulsion is broken beyond repair. In these cases, it’s better to compost it and learn for next time.The CookBuddy Guide to Preventing Freezer Burn
Prevention is significantly easier than salvage. After years of testing different wraps and containers, I’ve found that the secret boils down to one rule: Air is the enemy.The Golden Rule: Air is the Enemy
The goal is to eliminate any air space between the food and its packaging. If there is air, there is room for sublimation to occur.Essential Gear: From Freezer Bags to Vacuum Sealers
- Vacuum Sealing: This is the gold standard. A vacuum sealer removes almost all oxygen, preventing both dehydration and oxidation. If you freeze bulk meat often, it pays for itself in six months.
- Heavy-Duty Freezer Bags: Not all bags are created equal. Use bags specifically labeled "Freezer," as they are thicker and less permeable to oxygen.
- Airtight Containers: For liquids like soups, use tempered glass or BPA-free plastic, leaving as little "headspace" as possible.
The Double-Wrap Technique
If you don't have a vacuum sealer, use the method I learned in culinary school:- Wrap the food tightly in plastic wrap (Saran wrap). Ensure it is touching the surface of the food everywhere.
- Wrap that bundle in a layer of heavy-duty aluminum foil.
- Place the double-wrapped bundle into a freezer-safe Ziploc bag and squeeze out the remaining air.
The Water Displacement Method
This is a pro-tip for using standard freezer bags. Place your food in the bag and zip it almost all the way closed, leaving about an inch open. Slowly lower the bag into a large bowl of water. The water pressure will push the air out of the bag and against the food. Zip it shut just before the opening hits the water. It’s a "poor man's vacuum seal" that works incredibly well!Organization and Temperature Management
Keep your freezer at exactly 0°F (-18°C). Avoid opening the door unnecessarily. Also, cool food completely in the refrigerator before moving it to the freezer. Putting hot food in the freezer raises the ambient temperature and creates steam, which immediately turns into those dreaded ice crystals.Freezer Storage Cheat Sheet: How Long is Too Long?
While food stays safe indefinitely at 0°F, its quality has a ticking clock. Here is my personal guide for how long you can store items before freezer burn typically sets in.| Food Item | Peak Quality Duration | Notes |
|---|---|---|
| Ground Meat (Beef, Turkey) | 3 - 4 Months | High surface area makes it prone to burn. |
| Whole Chicken/Turkey | 9 - 12 Months | Large mass holds moisture better. |
| Steaks and Chops | 4 - 12 Months | Better if vacuum sealed. |
| Cooked Casseroles/Meals | 2 - 3 Months | Moisture loss happens faster in cooked items. |
| Vegetables (Blanched) | 8 - 12 Months | Must be blanched first to stop enzymes. |
| Ice Cream | 1 - 2 Months | Open containers burn within days. |
The Importance of Labeling and Dating
I cannot stress this enough: Label everything. I keep a permanent marker and a roll of painter's tape on the side of my fridge. Write the name of the item and the date it was frozen. Use the "FIFO" method (First In, First Out) to ensure you are eating the oldest items before they succumb to the freezer's dry air.Frequently Asked Questions
A: Not significantly. While some vitamins (like Vitamin C) may degrade slightly due to oxidation, the macronutrients (protein, fat, carbs) remain largely intact. It is still nutritious food.
A: Only for short-term storage (less than 2 weeks). Grocery store wrap is very thin and permeable to oxygen. Always over-wrap or repackage for long-term freezing.
A: Yes! Simply scrape off the top layer of ice crystals with a spoon and discard them. To prevent it from happening again, press a piece of plastic wrap directly onto the surface of the ice cream before putting the lid back on.