Quick Answer
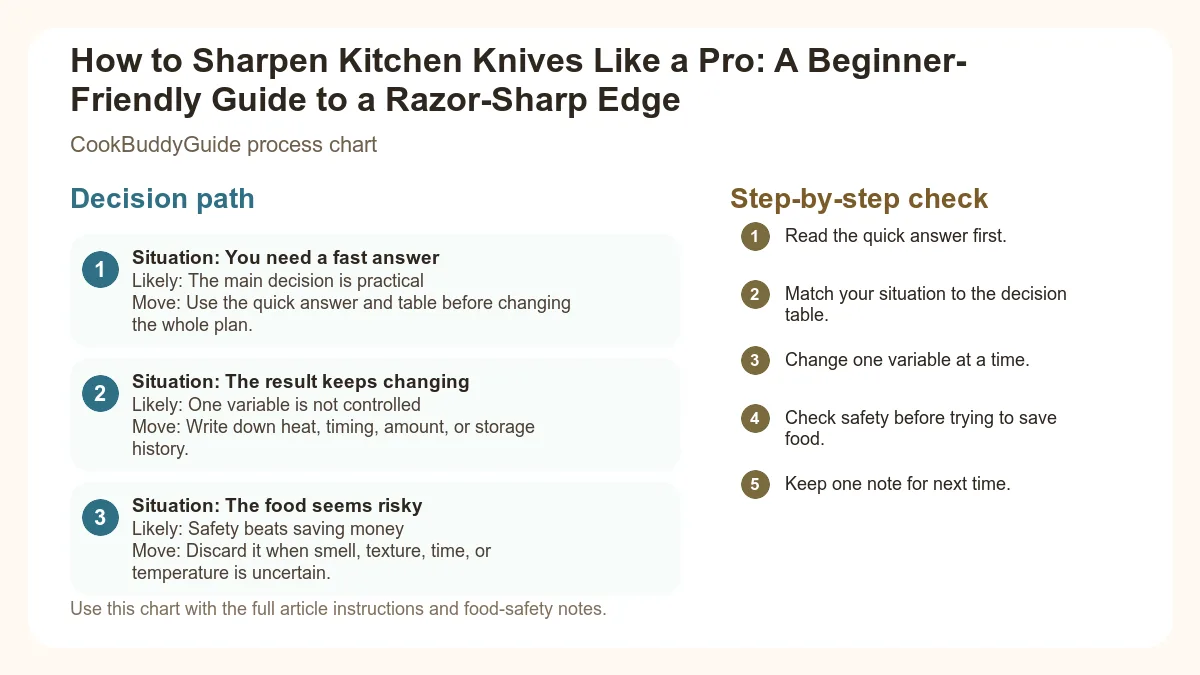
How to Sharpen Kitchen Knives Like a Pro is easiest to handle when you make one clear kitchen decision at a time. Use the table and steps below to identify the likely cause, choose the safest next move, and avoid changing several variables at once.
CookBuddy Kitchen Note
For How to Sharpen Kitchen Knives Like a Pro, this guide centers on Honing, Sharpening, Soak the Stone. Those are the checkpoints we would use first in a normal home kitchen before making a bigger change.
Decision table
| Situation | Likely cause or meaning | Best move |
|---|---|---|
| You need a fast answer | The main decision is practical | Use the quick answer and table before changing the whole plan. |
| The result keeps changing | One variable is not controlled | Write down heat, timing, amount, or storage history. |
| The food seems risky | Safety beats saving money | Discard it when smell, texture, time, or temperature is uncertain. |
Step-by-step fix
- Read the quick answer first.
- Match your situation to the decision table.
- Change one variable at a time.
- Check safety before trying to save food.
- Keep one note for next time.
Common mistakes
- Skipping the quick answer and changing too much at once.
- Treating quality problems and safety problems the same way.
- Not writing down the detail that caused the repeat problem.
Useful next reads
Helpful tools for this guide
- instant-read thermometer
- digital kitchen scale
- cutting board
- airtight storage containers
Related topic hubs
How to Sharpen Kitchen Knives Like a Pro: A Beginner-Friendly Guide to a Razor-Sharp Edge
You’re standing in your kitchen at 6:15 PM, trying to get dinner on the table after a long day. You grab your favorite chef's knife to dice an onion, but instead of a clean, satisfying "thwack," the blade slides off the papery skin, narrowly missing your thumb. We’ve all been there. After 15 years of testing recipes and tools in my own kitchen, I can tell you that a dull knife isn't just a nuisance—it’s the most dangerous tool in your drawer. Learning how to sharpen kitchen knives is the single most important skill you can acquire to transform your cooking experience from a chore into a craft.
In this comprehensive guide, I’m going to pull back the curtain on professional sharpening techniques. Whether you want to master the meditative art of the whetstone, need a quick fix with a ceramic mug, or want to know if that pull-through sharpener is actually ruining your expensive Japanese knives, I’ve got you covered. We will explore how to sharpen knives at home safely and effectively, ensuring your blades are always ready to chopping vegetables for dinners with surgical precision.
- Why Sharp Knives are Safer and More Efficient
- Sharpening vs. Honing: The Crucial Difference
- How to Sharpen Kitchen Knives with a Whetstone
- The Ceramic Mug Trick: Emergency Sharpening
- Using a Honing Rod (Sharpening Steel) Correctly
- Electric and Pull-Through Sharpeners: Pros and Cons
- How to Test for Sharpness
- Common Mistakes When Sharpening Knives at Home
Why Sharp Knives are Safer and More Efficient
The Physics of a Dull Blade
It sounds counterintuitive, but a sharp knife is significantly safer than a dull one. When you use dull blades, you are forced to apply downward pressure and "muscle" the knife through the food. This extra force is exactly what causes the blade to slip. When a sharp blade hits a tomato or an onion, it bites into the surface immediately. A dull blade, however, acts more like a blunt wedge, sliding across the surface until it catches—often on your finger. According to essential kitchen knife safety tips, maintaining a sharp edge is the first rule of injury prevention in the kitchen.
Personal Experience: My First 'Real' Sharp Knife
I remember the first time I used a professionally sharpened carbon steel knife. I was preparing a massive batch of mirepoix for a catering gig. Usually, my eyes would be streaming with tears from the onion vapors. But with a truly sharp edge, the blade slices through the onion cells rather than crushing them. When you crush the cells, they release the enzymes that turn into gas and make you cry. By using a sharp knife, I found I could prep twice as fast with zero tears. This efficiency is vital when you’re trying to streamline your meal prep for a busy week ahead.
Sharpening vs. Honing: The Crucial Difference
One of the most common misconceptions I encounter is people using their honing steel and thinking they are sharpening their knife. They aren't. Understanding the difference between honing and sharpening is key to long-term knife maintenance.
What is Honing?
Think of your knife edge as a series of microscopic "teeth." With regular use, these teeth get bent out of alignment. They are still sharp, but they are pointing in different directions, which makes the knife feel dull. Honing is the process of using a honing steel to push those teeth back into a straight line. It doesn't remove metal; it simply realigns the existing edge.
What is Sharpening?
Sharpening is a more aggressive process. This involves using an abrasive surface—like a water stone or an electric grinder—to actually grind away a small amount of metal from the blade. This creates a brand-new, fresh bevel angle. If honing is like brushing your teeth, sharpening is like going to the dentist for a deep cleaning and a filling.
How Often Should You Do Each?
- Honing: You should hone your knife almost every time you use it. A few quick passes on the steel before you start dicing will keep the edge straight.
- Sharpening: For the average home cook, sharpening 1-2 times per year is usually sufficient. If you find that honing no longer restores the "bite" to your blade, it’s time to sharpen knives at home.
How to Sharpen Kitchen Knives with a Whetstone
If you want a truly razor-sharp edge that rivals a professional sushi chef’s, you need to learn mastering the whetstone technique. It takes practice, but it is the most rewarding way to care for your tools.
The Ultimate Whetstone Sharpening Method
Tools Needed: Double-sided whetstone (1000/6000 grit), a shallow tray of water, a damp kitchen towel, and an angle guide (optional).
- Soak the Stone: Submerge your whetstone in water for about 10-15 minutes until bubbles stop rising. Some "splash-and-go" stones don't require this, but most beginner stones do.
- Set the Stage: Place a damp towel on your counter and set the stone on top (coarse side up). This prevents the stone from sliding while you work.
- Find Your Angle: For most Western knives, you want a 20-degree angle. For Japanese knives, aim for 15 degrees. The Penny Trick: Stacking two pennies on the stone and resting your knife on top gives you roughly a 15-20 degree angle.
- The First Pass: Hold the handle with your dominant hand and use the fingers of your other hand to apply pressure to the blade. Stroke the knife across the stone in a sweeping motion, covering the entire edge from heel to tip.
- Feel for the Burr: This is the most important step. After several passes, run your thumb (carefully!) from the spine of the knife toward the edge on the opposite side. You should feel a microscopic "lip" or wire edge. This is the burr. Once you feel it along the whole blade, flip the knife and repeat on the other side.
- Polishing: Flip the stone to the fine grit size (usually 6000). Repeat the process with lighter pressure to polish the edge and remove the burr.
The Ceramic Mug Trick: Emergency Sharpening at Home
I’ve been in vacation rentals with knives so dull they couldn't cut through a cooked noodle. In these "emergencies," I turn to the ceramic mug trick. It’s a surprisingly effective way to sharpen knives at home when you don't have professional tools.
Why the Bottom of a Mug Works
Most ceramic mugs have an unglazed, slightly rough ring on the bottom. This exposed ceramic is extremely hard—harder than the steel in your knife—making it an excellent abrasive. It essentially acts as a very fine-grit sharpening stone.
Step-by-Step Instructions for the Mug Method
To try this, follow the guide on sharpening with a ceramic mug. Turn the mug upside down on a flat surface. Hold your knife at a 20-degree angle against the unglazed ring. Draw the blade across the ring from heel to tip about 10 times on each side. While this won't give you a "scary sharp" edge, it will certainly provide enough "bite" to get through your dinner prep safely. Note: Avoid doing this with expensive, high-end blades as you have less control over the angle than you would with a proper stone.
Using a Honing Rod (Sharpening Steel) Correctly
A honing steel is that long, rod-like tool that comes in every knife block. Most people use it like they're in a sword fight, but that’s a recipe for an uneven edge (and a trip to the ER).
Types of Rods: Steel, Ceramic, and Diamond
- Stainless Steel: The standard choice for realigning the edge of most Western knives.
- Ceramic: These actually remove a tiny bit of metal, making them a hybrid between honing and sharpening. Great for Japanese knives with a high Rockwell hardness.
- Diamond: Coated with diamond dust, these are very aggressive and should be used sparingly.
The Safe Vertical Method
In my experience, the safest way for beginners to properly use a honing rod is the vertical method. Place the tip of the rod down on a cutting board. Hold the knife at a 15-20 degree angle against the rod. Starting at the heel of the knife, pull the blade down and across the rod in a sweeping motion toward the tip. Imagine you are slicing a very thin piece of wood off the side of the rod. Repeat 5-8 times per side with light pressure.
Electric and Pull-Through Sharpeners: Pros and Cons
As a busy home cook, I understand the appeal of a pull-through sharpener. They are fast, and they don't require the "zen" focus of a whetstone. However, they come with trade-offs.
When Convenience Trumps Manual Labor
If you have a set of entry-level stainless steel knives and you simply don't have the time to learn the whetstone, a high-quality electric sharpener (like those from Chef’sChoice) is a valid option. They use timed stages and guides to ensure a consistent angle, which is the hardest part of sharpening by hand.
The Downside: Metal Removal and Blade Life
The main reason professionals dislike pull-through sharpeners is that they are "aggressive." They often use tungsten carbide blades that "shave" metal off your knife in chunks rather than grinding it smoothly. Over time, this can significantly shorten the life of your blade and can create a ragged edge. Furthermore, many of these tools have a fixed angle that might not match your knife’s specific bevel angle. For example, using a 20-degree pull-through on a 15-degree Japanese blade will effectively ruin the factory edge.
How to Test for Sharpness
How do you know when you’re done? In my 15 years of cooking, I’ve found three reliable tests. Always exercise extreme caution when testing blades.
The Three-Stage Sharpness Test
- The Paper Test: Hold a single sheet of printer paper vertically. Try to slice through the top edge of the paper with the knife. A sharp knife will glide through with a clean "zip" sound. If it snags or tears the paper, you still have a dull spot or a burr.
- The Tomato Test: Place a ripe tomato on the cutting board. Rest the blade on the skin and pull it back toward you with zero downward pressure—just the weight of the knife. A truly sharp edge will break the skin immediately.
- The Fingernail Test: This is for the pros. Gently rest the edge of the knife on your thumbnail at a 45-degree angle. If it "bites" and stays put, it's sharp. If it slides across the nail, it’s still dull. (Note: Do not apply pressure!)
Common Mistakes When Sharpening Knives at Home
Even with the right tools, it’s easy to make mistakes. Here are the most common pitfalls I see home cooks fall into:
Inconsistent Angles
The secret to how to sharpen kitchen knives isn't the stone; it's the consistency. If you start at 20 degrees and end at 25 degrees, you are rounding the edge rather than sharpening it. This is why I often recommend beginners use an angle guide or the "penny trick" until muscle memory takes over.
Ignoring the Tip and the Heel
Many people focus only on the middle of the blade. This leads to a "recurve" where the knife becomes concave over time. Make sure your sharpening stroke follows the curve of the blade all the way to the very tip. This is especially important for kitchen shears and curved chef's knives.
Forgetting to Clean the Blade
Sharpening creates "swarf"—a mixture of water, stone grit, and microscopic metal shavings. If you don't wash your knife thoroughly with soap and water after sharpening, those metal shavings can end up in your food. Always wipe down your blade and your leather strop (if using one) after a session.
Frequently Asked Questions
A: Yes, but you can't use a flat whetstone. You need a ceramic honing rod that fits into the individual "gullets" or serrations of the blade. You sharpen each serration one by one.
A: A 1000/6000 grit combination stone is the gold standard for beginners. The 1000 grit does the sharpening, and the 6000 grit provides a mirror-polish finish.
A: Absolutely not! Power grinders generate heat that can ruin the "temper" of the steel, making it brittle or unable to hold an edge. Stick to manual stones or purpose-built electric kitchen sharpeners.
Conclusion: The Path to a Better Kitchen
Learning how to sharpen kitchen knives is a journey, not a destination. My first few attempts with a whetstone were clumsy, and I certainly didn't get a razor edge right away. But with patience and the right techniques, you will find that a sharp knife changes everything. It makes prep work faster, your food looks more professional, and most importantly, you stay safe while cooking for those you love.
Start with the honing rod today, try the paper test on your favorite knife, and when you're ready, invest in a decent whetstone. Your hands (and your tomatoes) will thank you. Happy cooking!