Quick Answer
How to Brine Chicken is built around practical home-kitchen ratios and simple texture checks. Follow the main method first, then use the variation and troubleshooting notes to adjust sweetness, salt, moisture, or cook time.
CookBuddy Kitchen Note
For How to Brine Chicken, this guide centers on Boil, Chill, Submerge. Those are the checkpoints we would use first in a normal home kitchen before making a bigger change.
Decision table
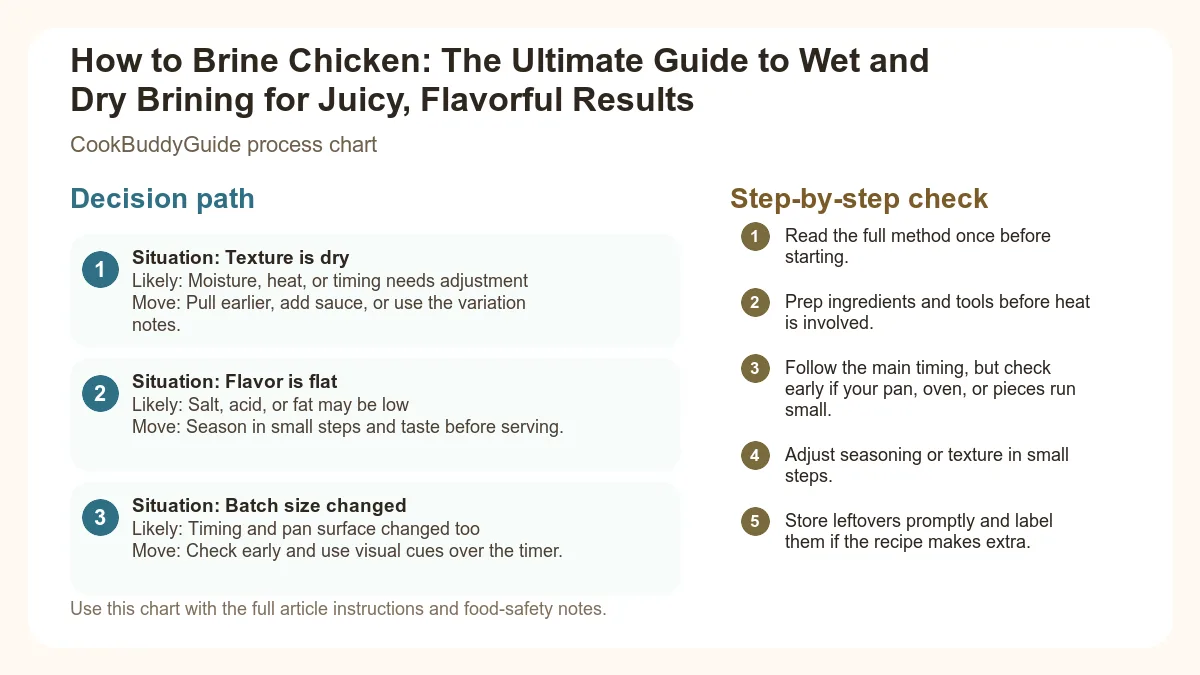
| Situation | Likely cause or meaning | Best move |
|---|---|---|
| Texture is dry | Moisture, heat, or timing needs adjustment | Pull earlier, add sauce, or use the variation notes. |
| Flavor is flat | Salt, acid, or fat may be low | Season in small steps and taste before serving. |
| Batch size changed | Timing and pan surface changed too | Check early and use visual cues over the timer. |
Step-by-step fix
- Read the full method once before starting.
- Prep ingredients and tools before heat is involved.
- Follow the main timing, but check early if your pan, oven, or pieces run small.
- Adjust seasoning or texture in small steps.
- Store leftovers promptly and label them if the recipe makes extra.
Common mistakes
- Changing the recipe before trying the base method once.
- Measuring casually when texture depends on ratios.
- Waiting until the end to fix seasoning.
- Ignoring carryover heat or resting time.
Useful next reads
Helpful tools for this guide
- instant-read thermometer
- digital kitchen scale
- cutting board
- airtight storage containers
Related topic hubs
How to Brine Chicken: The Ultimate Guide to Wet and Dry Brining for Juicy, Flavorful Results
You pull a roasted chicken out of the oven, its skin glowing with a golden-brown hue. But the moment your knife slides into the breast, you realize the truth: it’s as dry as sawdust. We’ve all been there. After 15 years of testing thousands of recipes in my home kitchen, I can tell you that the difference between a mediocre meal and a restaurant-quality feast often comes down to one simple, transformative step. Learning how to brine chicken is the single most effective way to ensure your poultry remains succulent, seasoned to the bone, and impossible to overcook.
In this comprehensive chicken brining guide, I’m going to pull back the curtain on the two primary methods—wet and dry brining—and show you exactly how to use them to elevate your cooking. Whether you’re prepping a quick weeknight meal or a festive Sunday roast, brining acts as your ultimate kitchen insurance policy. By the end of this article, you’ll understand the science of moisture retention, the secret to crispy skin, and why salt is your best friend in the kitchen.
Table of Contents
- The Science of Brining: How It Actually Works
- Wet Brine vs. Dry Brine: Which Method is Best for You?
- How to Wet Brine Chicken: The Step-by-Step Master Class
- How to Dry Brine Chicken: The Secret to Crispy Skin
- Chicken Brining Guide: Timing and Duration Charts
- Essential Equipment for Successful Brining
- Flavor Infusions: Elevating Your Brine
- Preparation After Brining: To Rinse or Not to Rinse?
- Common Brining Mistakes and How to Avoid Them
The Science of Brining: How It Actually Works
Many home cooks think brining is just about "marinating" the meat in salt water. However, the process is far more scientific. To truly master how to brine chicken, you need to understand three key concepts: Osmosis, diffusion, and Denaturation.
Osmosis vs. Diffusion
When you submerge chicken in a brine solution, two things happen. First, through osmosis, the water moves from an area of high concentration (the brine) to an area of lower concentration (the meat cells). However, the real hero is diffusion. Sodium chloride (salt) travels into the meat, Seasoning it deeply. Unlike fats or acids in a marinade, salt is one of the few molecules small enough to actually penetrate deep into the muscle fibers rather than just sitting on the surface.
Denaturing Proteins for Tenderness
Once the salt enters the meat, it begins the process of Denaturation. Salt causes the tightly wound muscle proteins to unwind and relax. In my experience, this is the "magic" moment. These relaxed proteins form a matrix that traps water. When the chicken hits the heat of the oven or grill, the proteins would normally contract and squeeze out moisture. But because they’ve been denatured by the salt, they can’t contract as tightly, leading to significantly better moisture retention. You can read more about the science behind how brining works to see how these microscopic changes yield macroscopic results.
Wet Brine vs. Dry Brine: Which Method is Best for You?
In my 15+ years of cooking, I’ve found that the "best" method depends entirely on your end goal and your schedule. Here is how I break it down for the readers of CookBuddyGuide.com.
The Case for Wet Brining
Wet brining involves submerging the chicken in a solution of water, salt, sugar, and aromatics. This method is the heavyweight champion of juiciness. It actually adds weight to the bird as it absorbs water. I recommend wet brining for lean cuts like boneless, skinless chicken breasts that are prone to drying out quickly. If you're looking for inspiration, these juicy chicken breast recipes work beautifully with a quick 30-minute wet brine.
The Case for Dry Brining (The "Dry Cure")
Dry brining, often called a "dry cure," involves rubbing the chicken with Kosher salt and letting it rest uncovered in the refrigerator. This is my preferred method for roasting or grilling. Why? Because while wet brining adds moisture, it also saturates the skin with water, making it difficult to achieve that shatteringly crispy skin. Dry brining seasons the meat while simultaneously dehydrating the skin, leading to a superior Maillard reaction (the chemical reaction that creates browning and complex flavors). Many professional chefs prefer this method for its efficiency and flavor concentration. You can explore the benefits of dry brining chicken further to understand why it’s a favorite in high-end kitchens.
Comparison Table: Pros, Cons, and Best Uses
| Feature | Wet Brining | Dry Brining |
|---|---|---|
| Primary Benefit | Maximum juiciness and plumpness | Crispy skin and concentrated flavor |
| Prep Time | Requires boiling/cooling water | Fast (rub and go) |
| Fridge Space | Needs large, bulky containers | Minimal (just the plate/tray) |
| Best For | Lean breasts, lean whole birds | Roast chicken, wings, grilled thighs |
How to Wet Brine Chicken: The Step-by-Step Master Class
The most common mistake I see home cooks make with wet brining is getting the ratio wrong. Too much salt and the chicken becomes a salt lick; too little and you’ve just made the meat soggy. After testing dozens of variations, I always return to the "Golden Ratio."
The Golden Ratio: Salt to Water
For a standard brine solution, use 1/4 cup of Diamond Crystal Kosher salt per 1 quart of water. If you are using Morton Kosher salt, reduce this to 3 tablespoons, as Morton is much denser. If you only have table salt, use 2 tablespoons. Using a digital scale is even better: aim for a 5% to 6% salt concentration by weight.
Master Wet Brine Recipe
Ingredients:
- 2 quarts water (divided)
- 1/2 cup Diamond Crystal Kosher salt
- 1/4 cup light brown sugar (for browning)
- 2 bay leaves
- 1 tbsp whole peppercorns
- 3 cloves garlic, smashed
- 1 sprig fresh rosemary or thyme
Instructions:
- Boil: Place 1 quart of water, salt, sugar, and aromatics in a pot. Bring to a simmer until salt and sugar dissolve.
- Chill: Remove from heat and add the remaining 1 quart of cold water (or ice cubes) to rapidly bring the temperature down. Crucial Safety Tip: Never place raw chicken in warm brine. It must be below 40°F (4°C).
- Submerge: Place your chicken in a non-reactive container and pour the chilled brine over it. Ensure the meat is fully submerged.
- Refrigerate: Place in the fridge for the recommended time (see chart below).
How to Dry Brine Chicken: The Secret to Crispy Skin
Dry brining is incredibly simple, but it requires patience. When I’m roasting a whole bird for Sunday dinner, I start the process on Saturday night. The salt draws moisture out of the meat, dissolves into a concentrated brine, and then is reabsorbed into the muscle fibers.
Calculating Salt by Weight
The rule of thumb for dry brining is 1/2 to 3/4 teaspoon of Kosher salt per pound of meat. For a standard 4-pound chicken, you’re looking at about 2 to 3 teaspoons of salt. I like to mix my salt with poultry seasoning or dried herbs like thyme and sage to add an extra layer of flavor.
The Ultimate Dry Brine Method
Ingredients:
- 1 whole chicken (approx. 4 lbs)
- 1 tbsp Diamond Crystal Kosher salt
- 1 tsp cracked black pepper
- 1 tsp dried thyme or poultry seasoning
- 1/2 tsp lemon zest (optional)
Instructions:
- Dry: Pat the chicken extremely dry with paper towels. Moisture is the enemy of the dry brine.
- Season: Mix the salt and seasonings. Generously sprinkle the mixture over every inch of the bird, including inside the cavity and under the skin of the breast if possible.
- Rest: Place the chicken on a wire rack set over a rimmed baking sheet. This allows air to circulate around the entire bird.
- Air-Dry: Leave the chicken uncovered in the refrigerator for at least 12 hours, but preferably 24. The skin will look tight and slightly translucent—this is exactly what you want for maximum crispiness.
Chicken Brining Guide: Timing and Duration Charts
Timing is everything. If you brine for too short a time, the salt won't reach the center. If you brine for too long, the proteins will break down too much, resulting in a "mushy" or overly ham-like texture. I’ve learned this the hard way after leaving a batch of wings in a wet brine for two days—they were inedible! Follow these timing guidelines for different cuts to get it right every time.
Recommended Brining Times
| Chicken Cut | Wet Brine Duration | Dry Brine Duration |
|---|---|---|
| Boneless Breasts | 30 – 60 minutes | 2 – 6 hours |
| Bone-in Thighs/Legs | 1 – 2 hours | 4 – 12 hours |
| Whole Chicken | 4 – 12 hours | 12 – 24 hours |
| Chicken Wings | 30 – 45 minutes | 4 – 8 hours |
The Danger Zone: Never exceed 24 hours for a wet brine or 48 hours for a dry brine. Beyond these points, the chemical structure of the meat changes in ways that are unpleasant to eat.
Essential Equipment for Successful Brining
You don’t need a laboratory, but having the right tools makes the process safer and more efficient. In my 15 years of testing, these are the items I consider non-negotiable.
- Non-Reactive Containers: Always use glass, stainless steel, or food-grade plastic. Avoid aluminum or copper, as the salt and acid in the brine can react with the metal, giving your chicken a metallic "off" flavor.
- Digital Scale: Salt density varies wildly between brands. Measuring by weight (grams) ensures your Equilibrium brining is consistent every single time.
- Digital Meat Thermometer: Brining allows for more leeway, but you still need to pull your chicken at the right internal temperature. I pull my breasts at 160°F (they carry over to 165°F) and thighs at 175°F for the best texture.
- Zip-Top Bags: For wet brining smaller cuts, a gallon-sized zip-top bag is excellent. It requires less brine solution to keep the chicken submerged compared to a large bowl.
Flavor Infusions: Elevating Your Brine
While salt does the heavy lifting, the brine is a great vehicle for aromatics. However, remember that most large molecules (like those in garlic or rosemary) won't penetrate deep into the meat. They mostly season the surface and the cooking juices.
The Buttermilk Brine
If you are making fried chicken, a buttermilk brine is essential. The lactic acid in the buttermilk helps tenderize the meat even further than salt alone. I love using this method for my air fryer chicken recipes to get that classic "fried" taste with less oil.
Aromatic Combinations
- The Classic: Black peppercorns, bay leaves, and smashed garlic cloves.
- The Citrus: Lemon peels, orange slices, and coriander seeds (perfect for grilled chicken).
- The Spicy: Dried chilies, cumin seeds, and a touch of honey.
A Note on Sugar: While sugar doesn't season the meat deep down, it is vital for the Maillard reaction. It helps the skin caramelize and brown more deeply, providing a beautiful contrast to the salty brine.
Preparation After Brining: To Rinse or Not to Rinse?
This is one of the most debated topics in the chicken brining guide community. Here is my definitive take based on years of trial and error.
The Rinsing Debate
If you have used a standard wet brine, do not rinse the chicken under the tap. Rinsing spreads bacteria around your sink and isn't necessary if your salt ratio was correct. However, if you accidentally over-salted the brine or left the chicken in too long, a quick rinse in a bowl of cold water can help remove excess surface salt.
The Importance of Patting Dry
Whether you wet or dry brined, you must pat the chicken dry with paper towels before cooking. If the surface is wet, the chicken will steam rather than sear. For wet-brined chicken, I often let it sit uncovered in the fridge for 30 minutes after patting it dry just to ensure the surface is bone-dry before it hits the pan.
Common Brining Mistakes and How to Avoid Them
Even seasoned cooks can stumble when learning how to brine chicken. Here are the pitfalls I see most often.
Many supermarket chickens are injected with a solution of water, salt, and "natural flavors" (check the label for "up to 15% chicken broth"). If you brine these birds, they will become salt bombs. Only brine "air-chilled" or "natural" chicken that has no added ingredients.
Always keep your chicken refrigerated during the entire brining process. Bacteria thrive at room temperature. Follow the USDA guidelines for safe brining to ensure your meal is as safe as it is delicious.
Since the meat is already seasoned from the inside out, you must reduce the amount of salt in your spice rub. If I’ve dry-brined a bird, I use a salt-free rub (just paprika, garlic powder, onion powder, etc.) for the final cook.
While brining makes for delicious chicken, it does increase the sodium content. If you are watching your intake, consider a shorter brining time or a lower salt concentration. You can check the impact of salt on health for more context on daily sodium limits.
Conclusion: Your Path to Perfect Chicken
Mastering how to brine chicken is a rite of passage for any home cook looking to level up. It takes a bit of foresight, but the results—meat that is consistently juicy, flavorful, and perfectly textured—are worth every minute of prep.
If you’re new to this, I recommend starting with a dry brine on a whole roasting chicken this Sunday. It’s the easiest entry point and yields the most dramatic results in terms of crispy skin and ease of cleanup. Once you see the difference it makes, you’ll never go back to "naked" chicken again.
Happy cooking, and remember: the secret isn't just in the heat of the oven, but in the salt of the brine. Stay tuned to CookBuddyGuide.com for more deep dives into the techniques that make home cooking a joy rather than a chore!