Quick Answer
Air Fryer Chicken Thighs works best when the food is spaced well, lightly coated, and checked before the final minutes. Use the timing in this guide as a starting point, then adjust for food size, basket crowding, and how crisp you want the result.
CookBuddy Kitchen Note
For Air Fryer Chicken Thighs, basket crowding and food size usually change the result more than the brand of air fryer. Check early, shake or flip when needed, and record the timing that works for your basket.
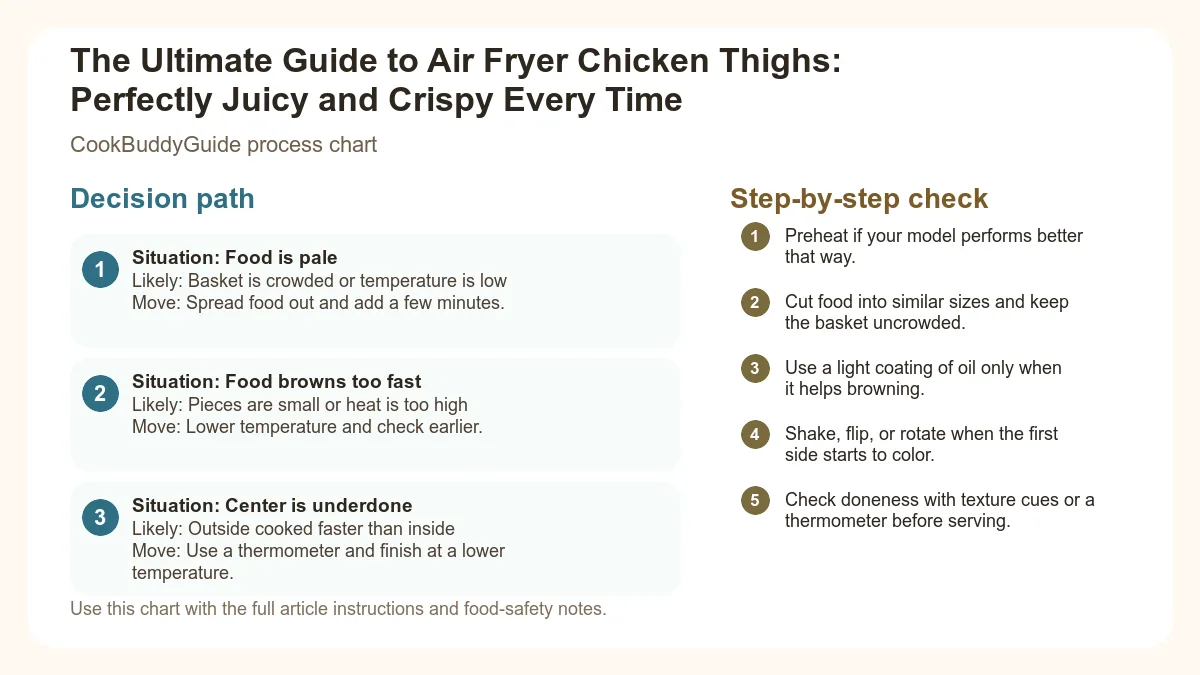
Decision table
| Situation | Likely cause or meaning | Best move |
|---|---|---|
| Food is pale | Basket is crowded or temperature is low | Spread food out and add a few minutes. |
| Food browns too fast | Pieces are small or heat is too high | Lower temperature and check earlier. |
| Center is underdone | Outside cooked faster than inside | Use a thermometer and finish at a lower temperature. |
Step-by-step fix
- Preheat if your model performs better that way.
- Cut food into similar sizes and keep the basket uncrowded.
- Use a light coating of oil only when it helps browning.
- Shake, flip, or rotate when the first side starts to color.
- Check doneness with texture cues or a thermometer before serving.
Common mistakes
- Crowding the basket until food steams instead of browns.
- Using too much oil and making the surface heavy.
- Following time charts without checking piece size.
- Skipping a thermometer for foods where doneness matters.
Useful next reads
Helpful tools for this guide
- instant-read thermometer
- silicone-tipped tongs
- oil mister
- air fryer parchment liners
Related topic hubs
The Ultimate Guide to Air Fryer Chicken Thighs: Perfectly Juicy and Crispy Every Time
It’s 6:15 PM on a Tuesday. You’re standing in front of the refrigerator, staring at a pack of chicken, wondering how to get dinner on the table without spending forty-five minutes hovering over a hot stove or waiting for a massive oven to preheat. We’ve all been there. In my 15 years of testing recipes for home cooks, I’ve found that the absolute best solution for this common weeknight dilemma is air fryer chicken thighs. Not only are they faster than traditional roasting, but they deliver a level of crunch that usually requires a deep fryer, all while keeping the meat incredibly succulent.
When I first started experimenting with air fryers back in 2010, I was skeptical. I thought it was just a glorified toaster oven. But after making juicy crispy air fryer chicken thighs over 50 times in various models—from the classic basket styles to the newer toaster-oven hybrids—I discovered that the secret lies in the physics of the machine. Today, I’m sharing everything I’ve learned so you can skip the trial and error and go straight to the perfect meal. Whether you are looking for easy air fryer chicken recipes for your first night with a new appliance or you're a seasoned pro, this guide has you covered.
Table of Contents
- Why Air Fryer Chicken Thighs are a Weeknight Game Changer
- The Secret to Maximum Crunch: The Science of Crispy Skin
- Choosing Your Cut: Bone-In vs. Boneless Skinless
- Mastering Time and Temperature Settings
- Step-by-Step Instructions for Perfect Results
- Three Signature Seasoning Variations
- Ensuring Food Safety and Doneness
- Common Mistakes and Troubleshooting
- Meal Prep, Storage, and Reheating Tips
Why Air Fryer Chicken Thighs are a Weeknight Game Changer
If you ask any professional chef what their favorite part of the bird is, they won't say the breast. They will almost certainly say the thigh. This dark meat is marbled with just enough fat to stay moist under high heat, making it far more forgiving than leaner cuts. When you combine the natural advantages of the thigh with the technology of an air fryer, magic happens.
The Science of Convection: Why the Air Fryer Wins
An air fryer is essentially a high-powered convection oven. It uses a large fan to circulate hot air rapidly around the food. In a standard oven, the air can become stagnant, leading to "cold spots" and uneven browning. In an air fryer, the constant movement of air facilitates the Maillard reaction—the chemical reaction between amino acids and reducing sugars that gives browned food its distinctive flavor—much more efficiently. This is why you get juicy crispy air fryer chicken thighs in about 20 minutes, whereas an oven might take 40 to 50 minutes to achieve similar results.
Health Benefits vs. Deep Frying
We all love the taste of deep-fried chicken, but the cleanup and the calorie count are less than ideal. By using an air fryer basket, you allow excess fat to drip away from the meat rather than letting the chicken sit in it. You can achieve that "fried" texture using only a light coating of olive oil spray or cooking spray. This makes the dish keto-friendly and low carb, fitting perfectly into a variety of healthy lifestyles. For those tracking their macros, understanding the nutritional profile of chicken thighs helps in planning high protein dinner ideas that actually taste good.
The Secret to Maximum Crunch: The Science of Crispy Skin
In my kitchen testing, I discovered that the biggest disappointment for home cooks is rubbery skin. If you want that glass-like shatter when you bite into your chicken, you have to manage moisture. Water is the enemy of crispiness.
The Importance of Moisture Removal
Before you even think about seasoning, you must pat the skin dry with paper towels. I mean really dry. I often leave my chicken thighs uncovered in the fridge for an hour before cooking to let the air naturally dehydrate the surface. According to the CDC, while you should be careful about properly handling raw chicken (never wash it in the sink!), drying it manually is a safe and necessary step for culinary success.
The Baking Powder Trick: Why It Works
This is my "secret weapon" that I share with all my readers. Adding a small amount of aluminum-free baking powder to your dry rub changes everything. The science is fascinating: the baking powder raises the pH level of the chicken skin, which allows the proteins to break down more efficiently. This creates tiny micro-bubbles on the surface that increase the surface area, resulting in a crunch that rivals any deep-fried wing. This technique is famously detailed in the baking powder for extra crispiness guide by J. Kenji López-Alt, and it works just as well for thighs as it does for wings.
Oil Selection: Smoke Points and Flavor
Because we are cooking at 400°F, you need an oil that can handle the heat. I prefer using an olive oil spray or avocado oil. Avoid using aerosol sprays that contain soy lecithin, as they can leave a sticky residue on your air fryer basket over time. A simple pump spray bottle filled with high-quality oil is your best bet for even coverage without the gunk.
Choosing Your Cut: Bone-In vs. Boneless Skinless
I am often asked which cut is better for the air fryer. The answer depends on your goals for the evening: flavor or speed.
Bone-In Skin-On: The Gold Standard for Flavor
If you want the ultimate dining experience, skin-on chicken with the bone intact is the way to go. The bone acts as an insulator, slowing down the cooking process just enough to keep the interior meat incredibly tender. The skin provides the fat needed to self-baste the meat as it cooks. In my experience, these are the most satisfying for a sit-down weeknight dinner.
Boneless Skinless: The Quick and Easy Alternative
If you are focused on meal prep or want to slice the chicken over a Caesar salad, boneless skinless thighs are a dream. They cook in about two-thirds of the time of bone-in thighs. Because they lack skin, you’ll want to be more generous with your dry rub and oil to prevent the exterior from drying out. They are excellent for those following a strict low carb diet who want to minimize animal fats while keeping protein high.
Cost Analysis and Prep Time Differences
- Bone-in Thighs: Usually the cheapest cut at the butcher. Requires minimal prep other than trimming hanging fat.
- Boneless Thighs: More expensive due to the labor of deboning. Faster to eat (no bones to navigate) but can sometimes require "unrolling" to ensure even cooking.
Mastering Time and Temperature Settings
One mistake I made early on was cooking chicken at 350°F. While the chicken eventually cooked through, the skin was flabby and unappealing. After dozens of tests, I’ve found that 400°F is the "sweet spot."
The Best Temperature for Rendering Fat
At 400°F, the high heat immediately begins to render the subcutaneous fat under the skin. This fat then fries the skin from the inside out. If the temperature is too low, the fat just sits there, resulting in a greasy, rubbery texture. For a deep dive into these settings, air fryer chicken thigh guide resources often confirm that 400°F provides the best balance of speed and texture.
- Bone-In, Skin-On: 18-22 minutes
- Boneless, Skinless: 12-15 minutes
- Frozen Thighs: 25-30 minutes (flip frequently)
The Importance of Preheating Your Air Fryer
Don't skip the preheat! Just like a traditional oven, your air fryer needs to be at the target temperature the moment the food hits the basket. This ensures the Maillard reaction begins immediately, preventing the meat from sticking and ensuring the skin starts crisping right away. Most modern air fryers have a preheat setting, but if yours doesn't, simply run it empty at 400°F for 5 minutes.
Step-by-Step Instructions for Perfect Results
Follow these steps exactly, and I promise you’ll have the best chicken of your life. I’ve refined this process over years of meal prep sessions.
- Prep the Chicken: Remove the thighs from the packaging. Using paper towels, pat them dry on all sides. Trim any large, hanging pieces of fat, but leave the skin intact.
- Season Thoroughly: Lightly coat the chicken with olive oil spray. Apply your dry rub (see variations below) generously. For bone-in thighs, I always peel back the skin slightly and rub some seasoning directly onto the meat before pulling the skin back over. This ensures the flavor penetrates deep.
- Arrange the Basket: This is the "No-Overlap" Rule. For the air to circulate and create juicy crispy air fryer chicken thighs, there must be space between each piece. If you crowd the basket, the chicken will steam rather than fry.
- The Mid-Way Flip: Halfway through the cooking time (usually at the 10-minute mark for bone-in), use silicone-tipped tongs to flip the chicken. This ensures the bottom gets some direct heat and the fat distributes evenly.
- The Final Crisp: For the last 2-3 minutes, flip the chicken back skin-side up. This gives the skin one final blast of intense heat to reach maximum crunch.
Three Signature Seasoning Variations
While salt and pepper are great, these three blends are what keep my family asking for this dish week after week. Each recipe is designed for approximately 1.5 to 2 pounds of chicken.
1. Classic Garlic Herb Rub
This is the ultimate crowd-pleaser. It’s savory, aromatic, and goes with any side dish from mashed potatoes to a light salad.
- 1 tsp Garlic Powder
- 1 tsp Onion Powder
- 1 tsp Dried Parsley
- 1/2 tsp Dried Thyme
- 1 tsp Kosher Salt
- 1/2 tsp Black Pepper
- 1/2 tsp Baking Powder (The secret for crunch!)
Chef's Note: Use dried herbs rather than fresh for the air fryer. Fresh herbs tend to burn under the intense convection heat, becoming bitter.
2. Smoky Paprika and Brown Sugar
This variation creates a beautiful deep red color and a slightly caramelized crust. It's perfect for those who love BBQ flavors without the messy sauce.
- 1 tbsp Smoked Paprika
- 1 tsp Cumin
- 1 tsp Brown Sugar (The sugar aids in the Maillard reaction)
- 1/2 tsp Chili Powder
- 1 tsp Salt
- 1/2 tsp Baking Powder
Chef's Note: Watch the chicken closely in the last 2 minutes, as the brown sugar can transition from caramelized to burnt quickly.
3. Zesty Lemon Pepper Blast
A bright, vibrant option that cuts through the richness of the dark meat. This is my favorite for summer weeknight dinners.
- 1 tbsp Freshly Cracked Black Pepper (Coarse grind is best)
- 1 tbsp Dried Lemon Zest
- 1 tsp Garlic Salt
- 1/2 tsp Onion Powder
- 1/2 tsp Baking Powder
Chef's Note: Avoid using fresh lemon juice before cooking, as the moisture will prevent the skin from crisping. Squeeze fresh lemon over the chicken after it comes out of the air fryer.
Ensuring Food Safety and Doneness
Cooking poultry can be nerve-wracking. You want it safe, but you don't want it to taste like cardboard. This is where a meat thermometer becomes your best friend.
The 165°F Internal Temperature Rule
The USDA mandates a safe internal temperature of 165°F for all poultry. When checking your chicken, insert the instant-read meat thermometer into the thickest part of the thigh, being careful not to hit the bone. The bone conducts heat differently and will give you a false high reading.
Why Thighs Benefit From 175°F
Here is a professional tip: while 165°F is safe, chicken thighs actually taste better when cooked to 175°F or even 180°F. Unlike breast meat, which turns to sawdust at high temps, thighs contain collagen. This collagen doesn't begin to break down into silky gelatin until it hits higher temperatures. Cooking to 175°F ensures the meat is "fall-off-the-bone" tender while remaining incredibly juicy.
The Carry-Over Cooking Effect
Remember that the internal temperature will continue to rise by 3-5 degrees after you remove the chicken from the air fryer. This is called carry-over cooking. I usually pull my chicken at 170°F and let it rest for 5 minutes. This rest period also allows the juices to redistribute, so they don't all run out the moment you cut into it.
Common Mistakes and Troubleshooting
Even with the best guide, things can go wrong. Here is how to fix the most common issues I’ve encountered in my 15+ years of cooking.
This is almost always due to moisture or temperature. Ensure you patted the skin dry and used 400°F. If you used a wet marinade, the skin will never truly crisp up. Stick to a dry rub for the best results.
Chicken thighs render a lot of fat. If that fat drips onto the heating element or the bottom of the drawer, it can smoke. To prevent this, place a tablespoon of water or a slice of bread in the bottom of the air fryer (under the basket) to soak up the grease.
This happens if the chicken was too cold when it went in or if the air fryer wasn't preheated. Try to let your chicken sit at room temperature for 15 minutes before cooking, and always ensure you aren't overlapping the pieces.
Meal Prep, Storage, and Reheating Tips
One of the reasons air fryer chicken thighs are a staple in my house is how well they work for meal prep. I often cook a double batch on Sunday to use throughout the week.
How to Store Leftovers Safely
Allow the chicken to cool completely before placing it in an airtight container. It will stay fresh in the refrigerator for up to 4 days. If you need to store it longer, these thighs freeze remarkably well for up to 3 months.
The Best Way to Reheat Without Losing the Crunch
Never, ever use the microwave to reheat crispy chicken. It will turn the skin into a soggy mess. Instead, put the leftovers back into the air fryer at 350°F for 3-4 minutes. This will revive the crispy skin and warm the meat through without overcooking it. It tastes almost as good as the day it was made!
Creative Ways to Use Leftover Chicken Thighs
- Chicken Tacos: Shred the meat and toss with a little lime juice and cilantro.
- Grain Bowls: Slice the cold chicken over quinoa, roasted sweet potatoes, and a tahini dressing.
- High Protein Salads: Use the lemon pepper variation to top a classic Caesar or Greek salad for a high protein meal.
The Final Verdict
Mastering air fryer chicken thighs is a skill that will pay dividends for years to come. By understanding the importance of moisture removal, the chemical boost of baking powder, and the specific temperature needs of dark meat, you can produce restaurant-quality results in less time than it takes to order delivery. The air fryer isn't just a gadget; it's a tool for better, faster, and healthier cooking. So, the next time you're facing a busy Tuesday night, reach for those thighs, pat them dry, and let the convection cooking do the hard work for you. Happy cooking!