Quick Answer
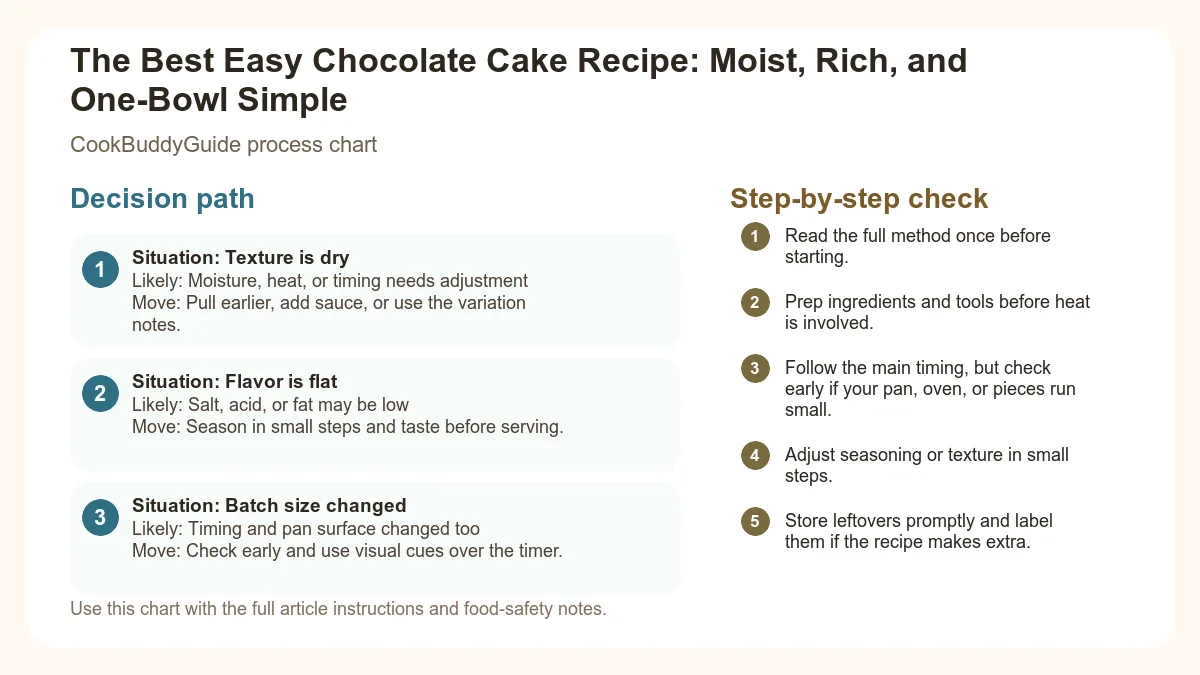
Easy Chocolate Cake Recipe is built around practical home-kitchen ratios and simple texture checks. Follow the main method first, then use the variation and troubleshooting notes to adjust sweetness, salt, moisture, or cook time.
CookBuddy Kitchen Note
For Easy Chocolate Cake Recipe, the most useful home checks are temperature, measuring, resting time, and visible texture. Those details tell you more than guessing, especially before adding extra flour, liquid, heat, or leavening.
Decision table
| Situation | Likely cause or meaning | Best move |
|---|---|---|
| Texture is dry | Moisture, heat, or timing needs adjustment | Pull earlier, add sauce, or use the variation notes. |
| Flavor is flat | Salt, acid, or fat may be low | Season in small steps and taste before serving. |
| Batch size changed | Timing and pan surface changed too | Check early and use visual cues over the timer. |
Step-by-step fix
- Read the full method once before starting.
- Prep ingredients and tools before heat is involved.
- Follow the main timing, but check early if your pan, oven, or pieces run small.
- Adjust seasoning or texture in small steps.
- Store leftovers promptly and label them if the recipe makes extra.
Common mistakes
- Changing the recipe before trying the base method once.
- Measuring casually when texture depends on ratios.
- Waiting until the end to fix seasoning.
- Ignoring carryover heat or resting time.
Useful next reads
Helpful tools for this guide
- digital kitchen scale
- instant-read thermometer
- rimmed sheet pan
- silicone spatula
Related topic hubs
The Best Easy Chocolate Cake Recipe: Moist, Rich, and One-Bowl Simple
It is 5:30 PM on a Tuesday, and you realize you promised to bring a dessert to the school bake sale or a friend’s dinner party. Your pantry is half-empty, your energy is flagging, and the last thing you want to do is navigate the temperamental nature of a multi-step genoise or a fussy layer cake that requires three different mixing bowls. We have all been there. In my 15 years of professional recipe testing, I have realized that the most requested recipe isn't the most complex one—it’s the one that works every single time with minimal effort. This easy chocolate cake recipe is the result of years of "tinkering" to find the perfect balance between a moist crumb and a deep, dark chocolate flavor that rivals any high-end bakery.
- Why This is the Only Easy Chocolate Cake Recipe You Need
- The Science of Flavor: Cocoa Powder vs. Melted Chocolate
- The Secret Ingredient: Why Hot Water or Coffee is Non-Negotiable
- Essential Ingredients and Substitutions
- Step-by-Step: Mastering the One-Bowl Mixing Method
- Baking and Doneness: How to Avoid a Dry Cake
- The Finishing Touch: Three Foolproof Frosting Options
- Storage, Make-Ahead, and Freezing Tips
- Common Mistakes and Troubleshooting
Why This is the Only Easy Chocolate Cake Recipe You Need
The Magic of the One-Bowl Method
There is a persistent myth in the baking world that quality is proportional to the number of dishes you soil. I am here to tell you that is patently false. The one bowl chocolate cake method is actually a scientific advantage, not just a shortcut. When you mix all your dry ingredients first and then incorporate the wet ingredients in a specific order, you control the emulsification process more effectively. This technique minimizes the risk of over-aerating the batter, which often leads to those large, unsightly tunnels in your cake's crumb structure. According to the experts at Bon Appétit, the benefits of one-bowl baking extend beyond just easier cleanup; it helps prevent the over-development of gluten, ensuring your cake remains tender rather than bread-like.
Tested and Perfected: Our E-E-A-T Approach
I didn't just stumble upon this recipe; I built it through trial and error. In my early years as a food writer, I followed recipes that called for creaming butter and sugar for ten minutes, only to end up with a cake that was dry by the next morning. I discovered that for a truly easy chocolate cake recipe, oil is your best friend. After making this specific version over 20 times for everything from toddler birthdays to elegant dinner parties, I’ve refined the ratios to ensure it works in any oven, whether you're using a springform pan or a standard 9x13 rectangular dish. This recipe is designed to be as reliable as our simple five ingredient dinner recipes—low stress, high reward.
The Science of Flavor: Cocoa Powder vs. Melted Chocolate
Why Cocoa Powder Wins for Texture
Many home cooks assume that melting a bar of expensive dark chocolate into the batter is the key to richness. However, in my testing, I found that melted chocolate often introduces too much cocoa butter and fat, which can make a cake feel heavy or even greasy. Unsweetened cocoa powder, on the other hand, provides a concentrated burst of chocolate flavor without the added weight. This is because cocoa powder is essentially the "soul" of the chocolate bean with most of the fat removed. Using cocoa powder allows us to control the fat source separately (using oil), which leads to a more consistent moist crumb. For a deeper dive into this, The Kitchn explains the structural cocoa powder versus melted chocolate differences that affect how your cake rises and feels on the tongue.
Dutch-Process vs. Natural Cocoa: Which to Choose?
When you stand in the baking aisle, you'll see "Natural" and "Dutch-processed" cocoa. This choice is critical because it affects your leavening agents. Natural cocoa is acidic, which means it reacts with baking soda to create lift. Dutch-processed cocoa powder has been treated with an alkalizing agent to neutralize its acidity, resulting in a darker color and a smoother, mellower flavor. For this recipe, I recommend Dutch-processed because it creates that iconic Oreo-dark color. However, because it is neutral, we must use both baking powder vs baking soda to ensure the cake has enough "oomph" to rise properly in the oven.
The Role of Fat Ratios in Moisture Retention
If you want a cake that stays moist for three or four days, you must use oil. Butter is delicious, but it contains water and milk solids that evaporate and firm up at room temperature. Oil remains liquid at room temperature, which coats the flour proteins and prevents them from forming a tough gluten network. In my kitchen, I prefer a neutral-flavored oil like grapeseed or vegetable oil. This ensures the chocolate flavor remains the star of the show while providing that signature "melt-in-your-mouth" texture.
The Secret Ingredient: Why Hot Water or Coffee is Non-Negotiable
Blooming the Cocoa for Maximum Depth
If there is one step you absolutely cannot skip in this one bowl chocolate cake, it is the addition of boiling liquid at the very end. This process is called "blooming." When you pour boiling water or coffee over the cocoa powder in your batter, it dissolves the cocoa solids and releases flavor compounds that would otherwise remain trapped. It’s the difference between a cake that tastes "sweet" and a cake that tastes "intensely chocolate." Serious Eats has a fantastic technical breakdown on blooming cocoa powder with hot liquid that explains how this heat application bypasses the waxy barrier of cocoa fat.
Does the Cake Taste Like Coffee?
I get this question constantly: "Will my kids eat this if I use coffee?" The answer is a resounding yes. Using hot brewed coffee doesn't make the cake taste like a mocha; instead, the bitterness of the coffee acts as a foil to the sugar, amplifying the chocolate’s natural profile. It’s a trick used by professional pastry chefs to enhance the Maillard reaction—the chemical reaction between amino acids and reducing sugars that gives browned food its distinctive flavor. If you are strictly avoiding caffeine, boiling water works perfectly well, but coffee is the "pro secret" that will have your guests asking for the recipe.
Temperature Matters: Why Boiling Liquid is Key
The liquid must be truly boiling. Not just warm, not just hot from the tap. The high temperature helps to dissolve the sugar crystals instantly, creating a very thin, liquid batter. Do not be alarmed when your batter looks like chocolate soup! This high hydration is exactly what creates the moist crumb once the heat of the oven sets the structure.
Essential Ingredients and Substitutions
Pantry Staples for Success
To ensure consistency, I always recommend using a kitchen scale. Volume measurements (cups) can vary by as much as 20% depending on how tightly you pack the flour. However, if you are using cups, be sure to "spoon and level" your flour. You will need:
- All-Purpose Flour: Provides the necessary structure.
- Granulated Sugar: For sweetness and moisture retention.
- Unsweetened Cocoa Powder: Preferably Dutch-processed.
- Leavening Agents: A combination of baking powder and baking soda.
- Salt: Never skip this; it balances the sugar.
- Room temperature eggs: These are vital for proper emulsification. If your eggs are cold, they will cause the oil to clump rather than blend.
Buttermilk vs. Milk and Acid
Buttermilk is the unsung hero of the easy chocolate cake recipe. Its acidity breaks down gluten, resulting in a tender crumb structure. If you don't have buttermilk on hand, don't run to the store. You can make a buttermilk substitute by adding 1 tablespoon of lemon juice or white vinegar to 1 cup of whole milk. Let it sit for 5-10 minutes until it curdles slightly. This DIY version works just as well as the store-bought carton in this specific batter.
Gluten-Free and Dairy-Free Adjustments
I have tested this recipe with a 1:1 gluten-free flour blend (like King Arthur or Cup4Cup), and it performs beautifully because the high moisture content prevents the grittiness often found in GF bakes. For a dairy-free version, use almond milk with vinegar as your buttermilk substitute and ensure your chocolate ganache is made with coconut cream or a dairy-free alternative.
The Ultimate One-Bowl Chocolate Cake
Yield: Two 9-inch rounds or one 9x13 pan
Ingredients
- 2 cups (250g) all-purpose flour
- 2 cups (400g) granulated sugar
- 3/4 cup (75g) Dutch-processed cocoa powder
- 2 tsp baking soda
- 1 tsp baking powder
- 1 tsp kosher salt
- 1 cup (240ml) buttermilk (or buttermilk substitute)
- 1/2 cup (120ml) vegetable oil
- 2 large room temperature eggs
- 2 tsp pure vanilla extract
- 1 cup (240ml) boiling water or hot brewed coffee
Instructions
- Preheat and Prep: Preheat your oven to 350°F (175°C). Grease two 9-inch cake pans or a springform pan and line the bottoms with parchment paper. This is the best insurance policy against a cake sticking.
- Whisk Dry Ingredients: In a large mixing bowl, sift together the flour, sugar, cocoa powder, baking soda, baking powder, and salt. Whisking ensures no clumps of cocoa remain.
- Add Wet Ingredients: Add the buttermilk, oil, eggs, and vanilla. Beat on medium speed with a hand mixer or whisk vigorously by hand for about 2 minutes. The batter will be thick at this stage.
- The Bloom: Reduce speed to low and carefully pour in the boiling water or coffee. Stir gently until combined. The batter will be very thin—this is normal!
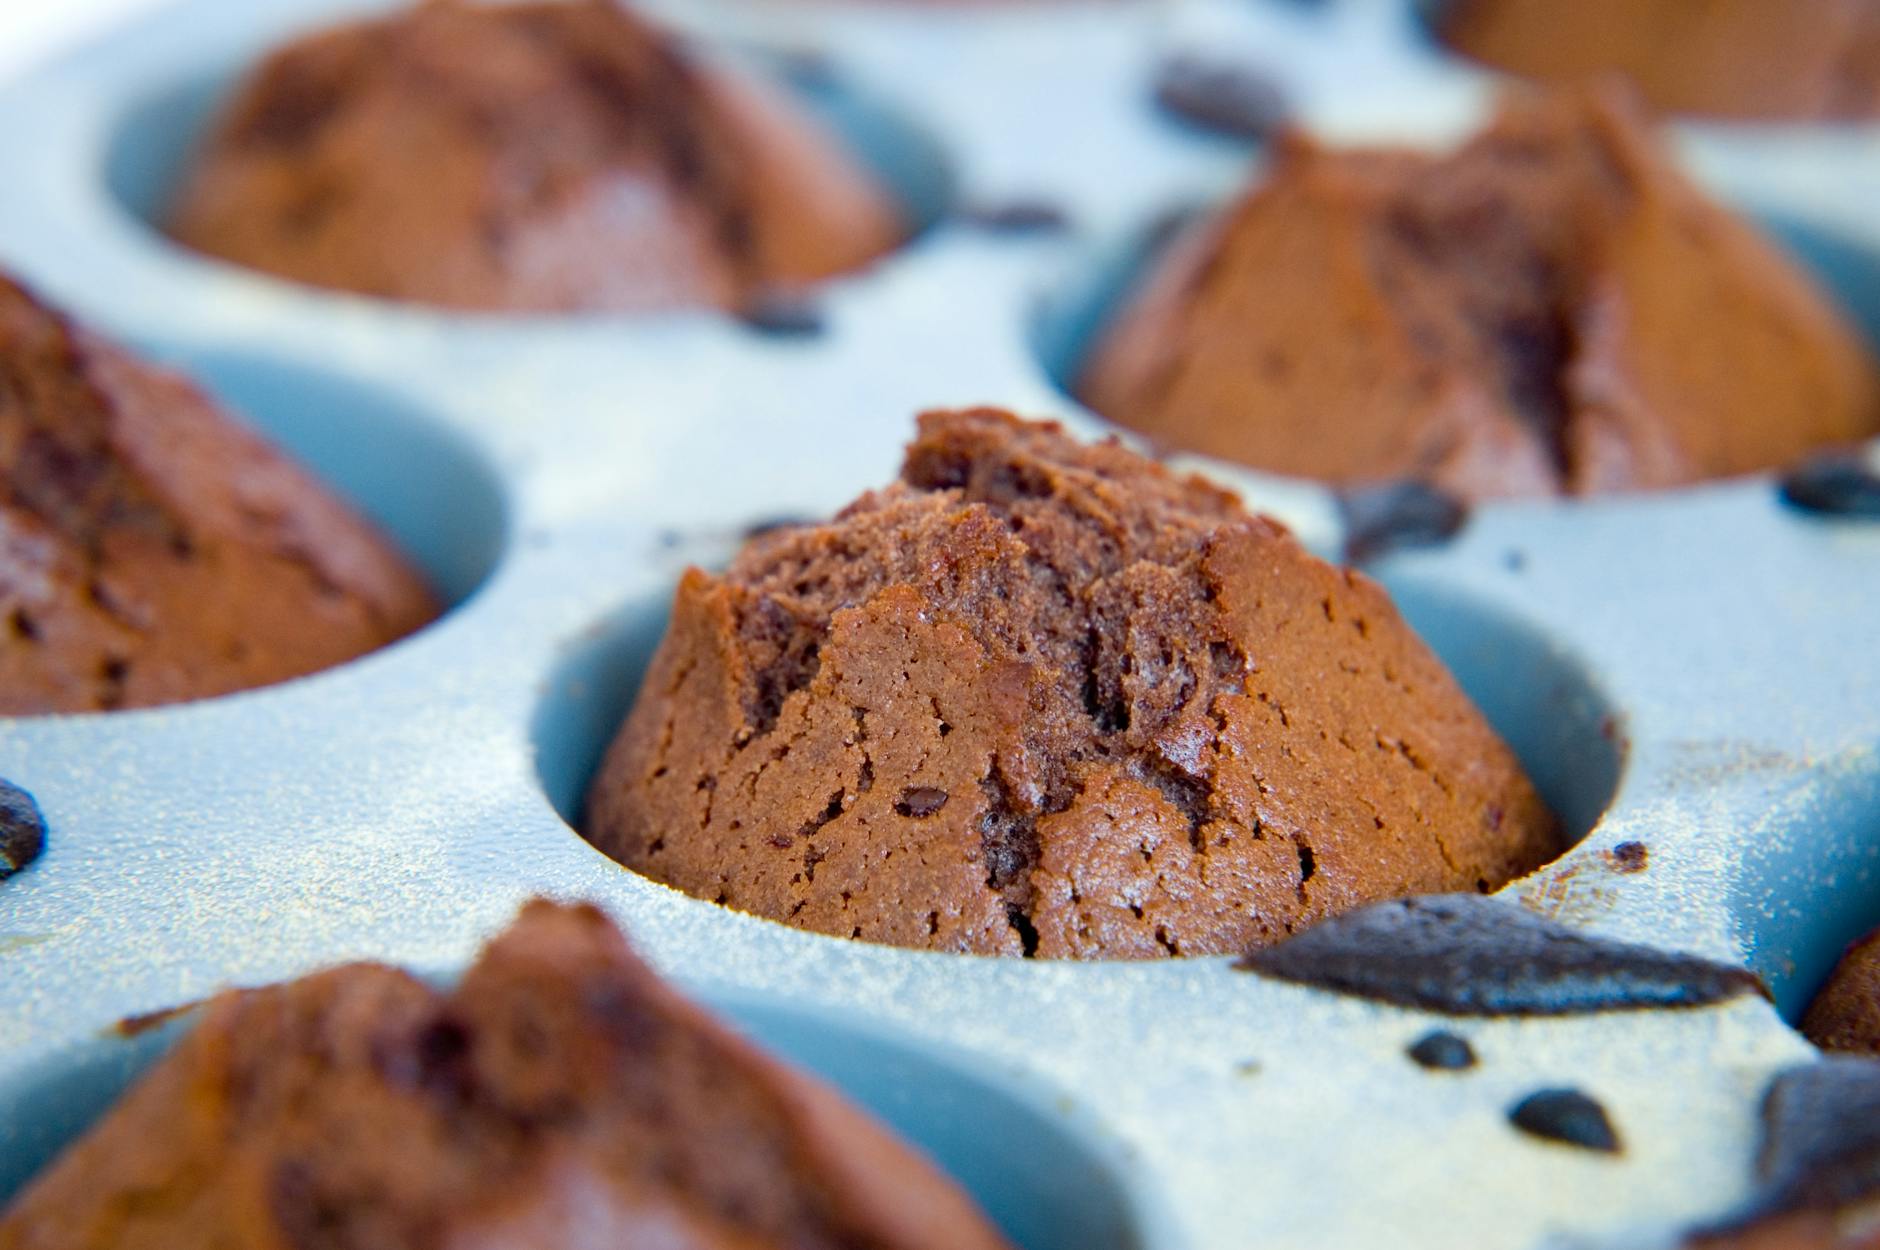
- Bake: Pour the batter evenly into the prepared pans. Bake for 30-35 minutes.
- The Toothpick Test: Insert a toothpick into the center. It should come out with a few moist crumbs attached, not completely clean (which indicates overbaking).
- Cool: Cool in the pans for 10 minutes, then transfer to a cooling rack to cool completely before frosting.
Step-by-Step: Mastering the One-Bowl Mixing Method
Sifting vs. Whisking Dry Ingredients
I used to be lazy about sifting, but cocoa powder is notorious for forming small, stubborn lumps that don't break down during mixing. If you don't have a sifter, use a fine-mesh strainer. If you're in a real rush, a vigorous whisking of the dry ingredients for at least 60 seconds can suffice, but sifting is the gold standard for a professional crumb structure.
The Emulsion: Adding Wet to Dry
When you add the buttermilk, oil, and eggs, you are creating an emulsion. This is where the fat and water-based ingredients bind together. I’ve found that using a hand mixer for this stage helps to aerate the eggs slightly, providing a bit of extra lift. However, once the boiling liquid is added, switch to a spatula or a low speed to avoid splashing. If you have kids helping, this is a great time to teach them about kitchen safety—that boiling liquid is no joke!
Avoiding Overmixing: The Gluten Trap
The beauty of this one bowl chocolate cake is that it is very forgiving. However, you should still stop mixing as soon as the batter is smooth. Overmixing develops gluten, which is great for sourdough bread but terrible for a tender cake. If you see tiny bubbles forming on the surface of the batter after adding the hot liquid, that’s the baking soda reacting—get it into the oven quickly to capitalize on that lift!
Baking and Doneness: How to Avoid a Dry Cake
Oven Calibration and Rack Positioning
Did you know that most home ovens are off by 10 to 25 degrees? I highly recommend investing in an oven thermometer. Oven calibration is the difference between a cake that sinks in the middle and one that rises perfectly. Always bake your cakes on the middle rack to ensure even heat distribution from both the top and bottom elements.
The Toothpick Test vs. The Spring-Back Method
While the toothpick test is the classic standard, I prefer the "spring-back" method. Gently press the center of the cake with your finger; if it springs back, it’s done. If the indentation remains, it needs a few more minutes. For the most precision, you can check the internal temperature of baked goods with a digital thermometer. A chocolate cake is perfectly done when it hits 205°F to 210°F (96°C to 99°C).
Carryover Cooking: When to Pull it Out
Remember that the cake continues to cook for several minutes after you remove it from the oven due to residual heat. This is why I look for those "moist crumbs" on the toothpick. If the toothpick comes out bone-dry, you’ve likely already overbaked it. Pull the cake out just a minute before you think it’s "perfect" to account for this carryover cooking.
The Finishing Touch: Three Foolproof Frosting Options
Silky Chocolate Ganache (The 2-Ingredient Wonder)
If you want an elegant, glass-like finish, a chocolate ganache is the way to go. Simply heat 1 cup of heavy cream until simmering, then pour it over 8 ounces of chopped semi-sweet chocolate. Let it sit for 5 minutes, then whisk until smooth. You can pour it over the cake while liquid for a glaze, or let it cool and whip it for a fluffy frosting. It’s the ultimate pairing for this easy chocolate cake recipe.
Classic American Chocolate Buttercream
For a nostalgic, birthday-party vibe, go with buttercream. The key is to beat the butter for at least 5 minutes before adding the sugar and cocoa. This incorporates air and makes the frosting light and spreadable. Use a pinch of salt to cut through the sweetness. This is a favorite when I'm making toddler dinner ideas and want a special treat to follow.
Tangy Cream Cheese Frosting for Contrast
The richness of chocolate is beautifully balanced by the tang of cream cheese. I recommend a 2:1 ratio of cream cheese to butter. Ensure both are at room temperature to avoid lumps. This frosting is softer than buttercream, so it’s best for a 9x13 sheet cake where you don't have to worry about the layers sliding.
Storage, Make-Ahead, and Freezing Tips
Keeping the Cake Moist for Days
Because this cake uses oil, it stays moist longer than butter-based cakes. At room temperature, an unfrosted cake will stay fresh for 3 days if wrapped tightly in plastic wrap. Once frosted, it depends on the frosting type. A buttercream cake can sit out, but a cream cheese frosted cake must be refrigerated. Refer to the safe cold food storage charts for specific timelines on perishable frostings.
How to Freeze Cake Layers Like a Pro
I often bake the layers a week in advance. Once the layers are completely cool, wrap them twice in plastic wrap and then once in aluminum foil. This prevents freezer burn. You can frost the cake while the layers are still slightly frozen; it actually makes it easier to spread the frosting without the cake tearing. Just allow the cake to thaw completely (about 2-3 hours) before serving.
Reheating for that 'Freshly Baked' Experience
If you have a leftover slice that has been in the fridge, pop it in the microwave for exactly 12 seconds. This softens the fats and makes the chocolate flavor "bloom" all over again. It’s like eating a fresh cake every single time.
Common Mistakes and Troubleshooting
This usually happens for two reasons: either the oven door was opened too early, causing a sudden temperature drop, or your leavening agents (baking powder/soda) are expired. Always check the dates on your tins! Another culprit is over-beating the eggs, which creates too much air that collapses as the cake cools.
Rubbery texture is almost always a sign of overmixing the flour. Once the flour is added, you want to mix just until the white streaks disappear. This prevents the gluten from becoming too elastic.
First, don't panic. Take a thin offset spatula and run it around the edges. If it’s still stuck, place the bottom of the pan on a warm, damp towel for 2 minutes. The steam helps release the parchment or grease from the bottom. In the future, always use parchment paper—it is a baker's best friend.
This can happen if you use too much baking soda or if the cocoa powder wasn't properly incorporated. Ensure you are using level measurements and sifting your dry ingredients together to distribute the soda evenly.
Conclusion: Your New Go-To Dessert
Baking doesn't have to be a high-stress endeavor. By understanding the chemistry of blooming cocoa and the structural benefits of the one-bowl method, you can produce a bakery-quality dessert in the time it takes to watch a sitcom. This easy chocolate cake recipe has been my "secret weapon" for over a decade, and I hope it becomes yours too. Whether you're celebrating a milestone or just making it through a long Tuesday, this cake is a reminder that sometimes the simplest methods yield the richest rewards. Now, grab that bowl and start whisking—you're only 50 minutes away from chocolate perfection!