Quick Answer
Your gravy lumpy usually comes down to a controllable kitchen variable such as heat, timing, moisture, measuring, or storage history. Start with the most visible clue, change one variable, and compare the next batch before changing the whole method.
CookBuddy Kitchen Note
For your gravy lumpy, this guide centers on thickening agent, whisking constantly, cornstarch slurry. Those are the checkpoints we would use first in a normal home kitchen before making a bigger change.
Decision table
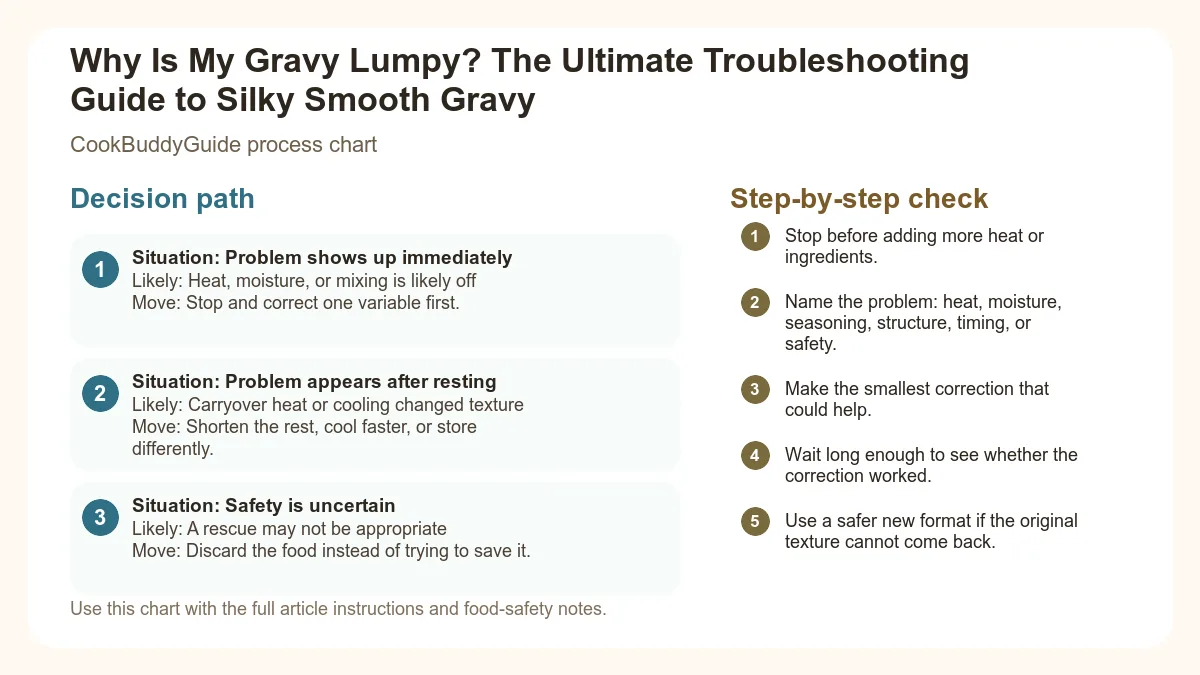
| Situation | Likely cause or meaning | Best move |
|---|---|---|
| Problem shows up immediately | Heat, moisture, or mixing is likely off | Stop and correct one variable first. |
| Problem appears after resting | Carryover heat or cooling changed texture | Shorten the rest, cool faster, or store differently. |
| Safety is uncertain | A rescue may not be appropriate | Discard the food instead of trying to save it. |
Step-by-step fix
- Stop before adding more heat or ingredients.
- Name the problem: heat, moisture, seasoning, structure, timing, or safety.
- Make the smallest correction that could help.
- Wait long enough to see whether the correction worked.
- Use a safer new format if the original texture cannot come back.
Common mistakes
- Adding several fixes at once and losing track of what helped.
- Using high heat to rush a texture problem.
- Trying to rescue food when safety is uncertain.
- Repeating the recipe without writing down the likely cause.
Useful next reads
Helpful tools for this guide
- instant-read thermometer
- digital kitchen scale
- cutting board
- airtight storage containers
Related topic hubs
Why Is My Gravy Lumpy? The Ultimate Troubleshooting Guide to Silky Smooth Gravy
It’s 6:15 PM on Thanksgiving. The turkey is resting, the mashed potatoes are pillowy and hot, and your guests are taking their seats. You go to pour your homemade turkey gravy into the heirloom boat, and your heart sinks. Instead of a glossy, velvet-smooth sauce, you’re looking at something that resembles wet oatmeal. You ask yourself the age-old question: why is my gravy lumpy, and more importantly, can I save this before the rolls get cold?
I have been there. In my 15+ years of testing recipes for CookBuddyGuide.com, I’ve had my fair share of "gravy panics." I once spent three hours roasting a prime rib only to serve it with a lumpy, floury mess that looked like it belonged in a craft store rather than on a dinner plate. That failure sent me on a mission to master the science of the thickening agent. After testing dozens of batches and consulting with food scientists, I’ve discovered that lumps aren't just bad luck—they are the result of specific chemical reactions gone wrong. In this guide, I’ll show you exactly how to fix lumpy gravy and ensure you never have to deal with a "flour bomb" again.
In This Guide:
The Science of a Smooth Sauce: Why Texture Matters
To understand why is my gravy lumpy, we first have to look at the microscopic level. Most gravies rely on all-purpose flour or cornstarch as a thickener. These are packed with starch granules. When these granules are exposed to heat and moisture, they undergo a process called gelatinization.
Understanding Starch Gelatinization
During gelatinization, the starch molecules absorb liquid, swell up like tiny sponges, and eventually burst, releasing amylose and amylopectin into the liquid. This creates the network that thickens your beef stock or pan drippings. However, if these granules aren't separated before they hit the hot liquid, they stick together. The outer layer gelatinizes instantly, creating a waterproof seal around a dry, powdery center. This is the anatomical structure of a lump. You can read more about the science of starch gelatinization to see how temperature control plays a pivotal role in this process.
The Role of Fat in Preventing Clumps
This is where the Roux comes in. A roux is a 1:1 fat-to-flour ratio. By mixing the flour with fat (butter, oil, or rendered turkey fat) before adding liquid, you are essentially coating every single starch grain in a layer of fat. This fat acts as a physical barrier. When the hot stock is added, the fat prevents the starch granules from bumping into each other and sticking. Instead, they stay suspended and hydrate individually, resulting in a smooth consistency.
Beyond the chemistry, texture has a massive psychological impact. We associate smoothness with luxury and care. A lumpy gravy tastes "raw" because those dry pockets of flour never got a chance to cook, leading to a pasty mouthfeel that can ruin even the best quick chicken breast recipes.
Why Is My Gravy Lumpy? 4 Common Mistakes
In my experience, 90% of gravy failures come down to one of these four technical errors. If you've ever wondered how to fix lumpy gravy, identifying which of these you did will help you choose the right rescue method.
Mistake 1: Adding Cold Liquid to a Hot Roux
This is the most debated topic in professional kitchens. Some chefs swear by cold stock; others demand hot. In my testing, adding ice-cold beef stock directly to a scorching hot roux causes "thermal shock." The starch on the bottom of the pan seizes up instantly before you can even move your whisk. The secret is to add the liquid gradually, starting with just a splash, to create a thick paste before thinning it out into a sauce.
Mistake 2: Adding Raw Flour Directly to Hot Liquid
This is the cardinal sin of gravy making. If you find your gravy is too thin and you decide to sprinkle a tablespoon of flour directly into the bubbling pot, you have created "flour bombs." According to the experts at Penn State, how starch granules behave when they hit steam is predictable: they clump. The steam hydrates the outside of the flour clump faster than you can whisk it away.
Mistake 3: Under-cooking Your Roux
A "blonde" roux is great for white sauces, but for turkey gravy, you want to see a slight color change. If you don't cook the flour and fat for at least 2-3 minutes, the starch hasn't fully integrated with the fat. More importantly, you miss out on the Maillard reaction, which provides that deep, savory flavor. Under-cooked roux is unstable and more likely to break or clump when the liquid is added.
Mistake 4: Inconsistent Whisking Technique
You cannot walk away from gravy. Whisking constantly is not just a suggestion; it’s a mechanical necessity. You need to keep the starch granules in motion so they don't settle at the bottom of the pan and scorch or bond together. I recommend a figure-eight motion rather than a circular one to ensure you're reaching the "corners" of your saucepan.
The Perfect Base Roux
Ingredients:
- 4 tbsp Unsalted Butter (or pan drippings)
- 4 tbsp All-Purpose Flour
- 1/2 tsp Salt
Instructions:
- Melt butter in a heavy-bottomed saucepan over medium heat until foaming.
- Whisk in the flour all at once.
- Cook for exactly 3 minutes, whisking constantly, until it smells slightly nutty and looks like wet sand.
- This base is now ready for your liquid of choice.
How to Fix Lumpy Gravy: 3 Rescue Methods That Actually Work
If you’re reading this while a pot of lumpy sauce is simmering on your stove, don't panic. You don't need to start over. Here are the three most effective ways to achieve a smooth consistency after the damage is done.
1. The Sieve Method: The Classic Strain
This is the most reliable method and the one I use most often in professional settings. If the lumps are large and numerous, simply pour the gravy through a fine-mesh sieve or a chinois into a clean pot. The mesh will catch the undissolved flour pockets. Use the back of a spoon to press the liquid through, but do not force the lumps through the mesh, or you'll just end up with smaller lumps. You can find a detailed guide on straining through a fine-mesh sieve if you're unsure about the technique.
2. The Power Move: Using an Immersion Blender
If you have a "stick" blender, this is the fastest way to save your dinner. The high-speed blades of an immersion blender will pulverize flour clumps and emulsify the fat back into the sauce. Safety Note: Ensure the head of the blender is fully submerged before turning it on to avoid "gravy explosions" and painful burns. According to Bon Appétit, using an immersion blender is the ultimate "cheat code" for home cooks who want restaurant-quality texture in seconds.
3. The Manual Fix: Vigorous Whisking Over Low Heat
If the lumps are very small (the size of a pinhead), you might be able to whisk them out. Turn the heat down to low, add a splash of warm stock to loosen the consistency, and whisk as hard as you can for 2 minutes. The combination of heat and mechanical force can sometimes break the surface tension of the lumps, allowing the dry flour inside to finally hydrate.
The "Emergency Rescue" Protocol
Use this when your gravy looks like a disaster and guests are waiting.
- Remove the pan from the heat immediately.
- Pour the mixture into a blender (or use an immersion blender).
- Blend on high for 30 seconds.
- Return to a clean pan through a fine-mesh sieve.
- Simmer for 1 minute to re-stabilize.
Prevention: The Pro Chef's Workflow for Perfect Gravy
Mastering the workflow is the difference between a stressed cook and a confident one. After 15 years, I've developed a "Zero-Lump Workflow" that I teach to all my culinary students.
Mastering the Slurry vs. the Roux
While a roux is traditional, a cornstarch slurry is a fantastic alternative, especially for beginner instant pot recipes. A slurry is made by mixing equal parts cold liquid and cornstarch (or flour) in a small jar and shaking it until smooth. Because the starch is already fully hydrated in cold liquid, it won't clump when it hits the hot pot. Pro Tip: Always whisk the slurry into the simmering liquid in a slow, steady stream.
The Temperature Rule
The golden rule I follow in my kitchen: Hot Roux + Warm Liquid = Success. If your roux is hot, your stock should be at least room temperature or warm. This prevents the fat in the roux from solidifying instantly upon contact, which is a major cause of clumping. For more on this, check out the Food Network's guide on whisking the roux constantly and managing temperatures.
The Importance of the Right Equipment
A standard balloon whisk is great for whipping cream, but for gravy, you want a flat whisk (also called a roux whisk). Its flat profile allows you to scrape the entire bottom surface of the pan, preventing those hidden pockets of flour from sticking in the corners. Additionally, always use a heavy-bottomed saucepan to ensure even heat distribution and prevent localized scorching.
Advanced Troubleshooting: Beyond the Lumps
Sometimes your gravy is smooth, but it still isn't right. Here is how to handle other common issues:
Fixing Greasy or Oily Gravy
If you see a layer of yellow fat floating on top, your emulsion has broken. This often happens if the fat-to-flour ratio was off (too much fat). The Fix: Use a fat separator if you have one. If not, drag a folded paper towel or a piece of bread crust across the surface to soak up the excess oil. Alternatively, whisk in a small "Beurre Manie"—a paste made of equal parts softened butter and flour—to bind the excess fat.
What to Do if Your Gravy is Too Thin
Never add dry flour! Instead, make a quick cornstarch slurry (1 tbsp cornstarch + 1 tbsp cold water) and whisk it into the boiling gravy. Let it boil for one minute; cornstarch reaches its full thickening power at the boiling point.
Rescuing Overly Salty Gravy
This happens easily when using store-bought beef stock or concentrated pan drippings. Do not add a potato (that’s a myth; it doesn't actually lower the salt concentration significantly). Instead, increase the volume by adding more unsalted stock or a splash of heavy cream. A teaspoon of sugar or a squeeze of lemon juice can also help mask the saltiness by balancing the palate.
CookBuddyGuide Testing Notes: Our Lab Results
In our test kitchen, we ran a series of experiments to see just how much abuse a gravy can take before it fails. Here are our findings:
Testing Different Flour Types
We compared all-purpose flour against Wondra (an "instantized" flour). The Result: Wondra is almost impossible to lump. Because the flour particles are pre-gelatinized and then dried, they dissolve instantly in liquid. If you are a beginner, keeping a canister of Wondra in your pantry is the best insurance policy against lumpy gravy.
The "Slow Pour" Experiment
We tested adding 2 cups of stock all at once vs. adding it in 1/4 cup increments. The Result: Adding liquid in small increments for the first cup is crucial. When we added all the liquid at once to a hot roux, we experienced a 40% increase in visible lumps. The "paste stage" is the most critical part of the process.
The Ultimate No-Lump Turkey Gravy
Ingredients:
- 1/4 cup Turkey Pan Drippings (fat only)
- 1/4 cup All-Purpose Flour
- 3 cups Warm Turkey or Chicken Stock
- 1/2 tsp Black Pepper
- Optional: 1 tsp Soy Sauce (for color and umami)
Instructions:
- Separate the fat from your pan drippings using a fat separator.
- In a saucepan, whisk the fat and flour over medium heat for 3 minutes.
- Slowly drizzle in 1/2 cup of warm stock, whisking constantly until a thick paste forms.
- Gradually add the remaining stock in a steady stream while whisking.
- Bring to a simmer and cook for 5 minutes until thickened. Season to taste.
Frequently Asked Questions
A: Yes, but be extremely careful. Never fill a blender more than halfway with hot liquid. Remove the center piece of the lid and cover it with a folded kitchen towel to allow steam to escape. If you don't, the pressure can blow the lid off, causing severe burns.
A: This means your Roux didn't cook long enough. You need to cook the flour and fat together for at least 2-3 minutes to toast the raw starch. If the gravy is already finished, simmer it on low for an additional 5-10 minutes to help cook out that flavor.
A: It depends on the result you want. Flour makes an opaque, creamy, traditional gravy. Cornstarch makes a translucent, glossy gravy (like you see in stir-fries). Cornstarch is also naturally gluten-free.
A: Absolutely! In fact, I recommend it. Make it a day early, store it in the fridge, and reheat it slowly on the stove. If it thickens too much in the fridge, just whisk in a splash of stock during reheating to bring it back to a smooth consistency.
Final Thoughts: You Are the Master of Your Sauce
The next time you find yourself staring at a pot of lumpy liquid and wondering why is my gravy lumpy, remember that it's just physics, not a personal failing. Whether you reach for the fine-mesh sieve or the immersion blender, you now have the tools to fix it in minutes. Cooking is about recovery as much as it is about preparation. By mastering the Roux, understanding gelatinization, and keeping your whisk moving, you'll produce silky, delicious gravy that will be the star of the table.
Happy cooking, and may your holiday dinners always be lump-free!