Quick Answer
How to Cook Corn on the Cob is built around practical home-kitchen ratios and simple texture checks. Follow the main method first, then use the variation and troubleshooting notes to adjust sweetness, salt, moisture, or cook time.
CookBuddy Kitchen Note
For How to Cook Corn on the Cob, this guide centers on Chili Lime Butter, Garlic Herb Compound Butter, Parmesan and Black Pepper Crust. Those are the checkpoints we would use first in a normal home kitchen before making a bigger change.
Decision table
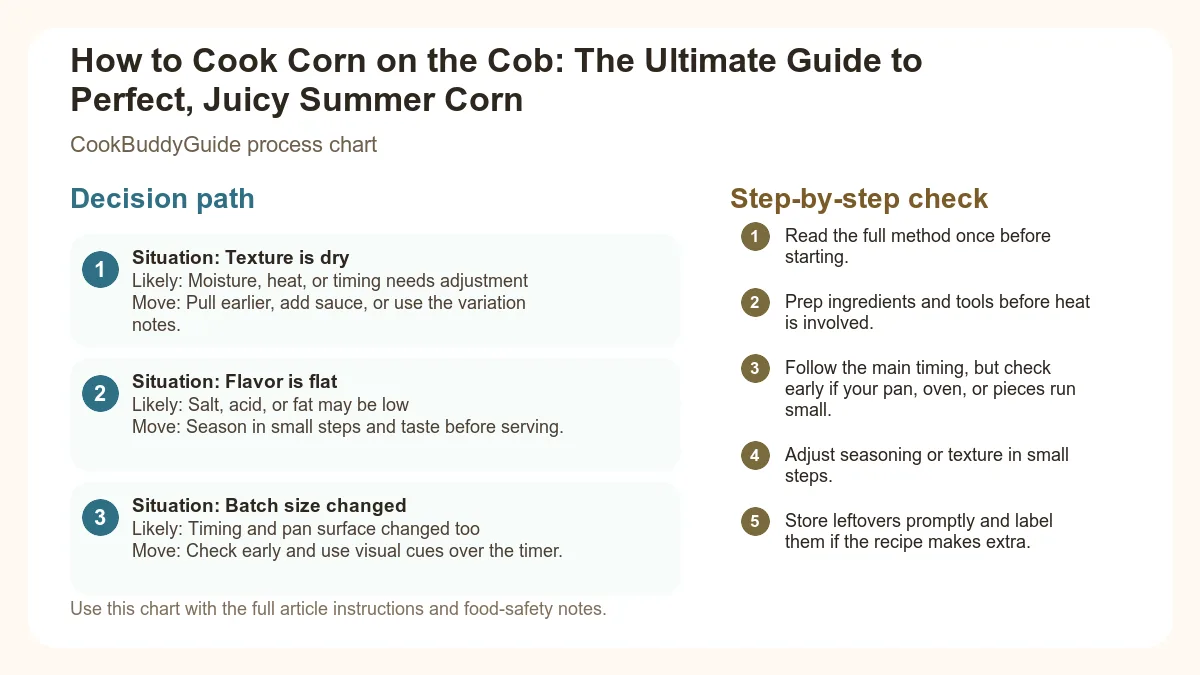
| Situation | Likely cause or meaning | Best move |
|---|---|---|
| Texture is dry | Moisture, heat, or timing needs adjustment | Pull earlier, add sauce, or use the variation notes. |
| Flavor is flat | Salt, acid, or fat may be low | Season in small steps and taste before serving. |
| Batch size changed | Timing and pan surface changed too | Check early and use visual cues over the timer. |
Step-by-step fix
- Read the full method once before starting.
- Prep ingredients and tools before heat is involved.
- Follow the main timing, but check early if your pan, oven, or pieces run small.
- Adjust seasoning or texture in small steps.
- Store leftovers promptly and label them if the recipe makes extra.
Common mistakes
- Changing the recipe before trying the base method once.
- Measuring casually when texture depends on ratios.
- Waiting until the end to fix seasoning.
- Ignoring carryover heat or resting time.
Useful next reads
Helpful tools for this guide
- instant-read thermometer
- digital kitchen scale
- cutting board
- airtight storage containers
Related topic hubs
There is nothing quite like the first bite of a perfectly cooked ear of corn in the peak of July. You know the feeling: the kernels pop with a satisfying crunch, releasing a spray of sweet, milky juice that tastes like pure sunshine. But we’ve all been there—standing over a stove or grill, only to end up with corn that is either tough and starchy or mushy and waterlogged. After 15 years of testing recipes in my own kitchen for CookBuddyGuide.com, I can tell you that learning how to cook corn on the cob is less about a single secret ingredient and more about understanding the science of the vegetable itself.
In my experience, the best way to cook corn depends entirely on your schedule and the flavor profile you’re chasing. Are you looking for the smoky, charred depth of a backyard BBQ? Or do you need a lightning-fast method for a Tuesday night dinner? In this guide, I’m breaking down my three tried-and-true methods: boiling, grilling, and microwaving. I’ve made the mistakes so you don’t have to—like the time I salted my boiling water and ended up with "corn-flavored rubber." We’re going to ensure your summer side dish is the star of the plate every single time.
Table of Contents
- How to Choose the Best Corn at the Market
- Method 1: How to Cook Corn on the Cob by Boiling
- Method 2: The Best Way to Cook Corn on the Grill
- Method 3: The Fastest Way—Microwaving Corn
- Elevate Your Corn: Beyond Plain Butter
- Kitchen Pro Tips: Handling and Prep
- Storage, Reheating, and Using Leftovers
- Common Mistakes to Avoid
How to Choose the Best Corn at the Market
Before you even turn on the stove, the success of your meal is decided at the farm stand or grocery store. Sweet corn is a living thing, and the moment it is picked, its natural sugars begin converting into starch. This is why "supermarket corn" often tastes bland compared to what you find at a roadside stand. To get that iconic sweetness, you need fresh corn that was harvested as recently as possible.
The Look: Bright Green Husks and Damp Silks
In my testing, I’ve found that the corn husk is the best indicator of hydration. You want husks that are bright green and wrapped tightly around the ear. If they look yellowed or feel like parchment paper, the corn is drying out. Look at the corn silk (the tassels sticking out the top). They should be golden brown and slightly damp to the touch. If they are black or brittle, that ear has been sitting on the shelf far too long.
The Feel: Plump Kernels from Top to Bottom
Instead of peeling back the husk (which I’ll explain in a moment), use your hands. Give the ear of corn a gentle squeeze from the bottom to the tip. You should feel individual, plump corn kernels through the husk. If you feel significant gaps or "bald spots" at the tip, put it back. You want a full, heavy ear that feels dense for its size.
The 'No-Peek' Rule: Why you shouldn't pull back the husk
I see people doing this all the time: they rip back the top two inches of the husk to check the kernels. Please, don't be that person! Once you peel that husk, you expose the corn to air, which accelerates the drying process and the sugar-to-starch conversion. Trust your sense of touch and the visual cues of the husk and silk. If you’re worried about the nutritional profile of sweet corn, remember that the fresher it is, the more vitamins and antioxidants it retains.
Method 1: How to Cook Corn on the Cob by Boiling
The stovetop method is the classic way most of us grew up eating corn. It’s reliable, feeds a crowd, and provides a neutral canvas for any topping. However, most people boil their corn for far too long. After making this 20+ times in a single summer for a family reunion, I discovered that the "boil for 10 minutes" rule is a myth that leads to mushy kernels.
The Salt vs. Sugar Debate
This is the most common question I get: "Should I salt the water?" My answer is a firm no. According to the science of boiling corn, salt in the boiling water actually toughens the cell walls of the kernels, making them chewy rather than crisp. If you want to enhance the flavor, add a tablespoon of sugar instead. It reinforces the natural sweetness of the corn without altering the texture.
The Milk and Butter Bath Technique
If you want to take your boiled corn to a restaurant-quality level, try the "Milk Bath." I learned this from a chef in the Midwest, and it’s a game-changer. By adding a cup of milk and half a stick of butter directly to the pot, you create an emulsion that coats every kernel as the corn cooks. It results in a velvety mouthfeel that plain water just can't match.
The Perfect Boiled Corn (Milk Bath Method)
Ingredients:
- 6-8 ears of fresh corn, shucked
- Large pot of water (about halfway full)
- 1 cup whole milk
- 1/2 cup (1 stick) unsalted butter
- 1 tbsp granulated sugar
Instructions:
- Bring a large pot of water to a rolling boil over medium-high heat.
- Add the milk, butter, and sugar. Let the butter melt completely.
- Carefully submerge the shucking corn into the liquid.
- Once the water returns to a boil, set a timer for exactly 4 to 5 minutes.
- Remove the corn immediately using tongs. Do not let it sit in the water, or it will continue to cook and become tough.
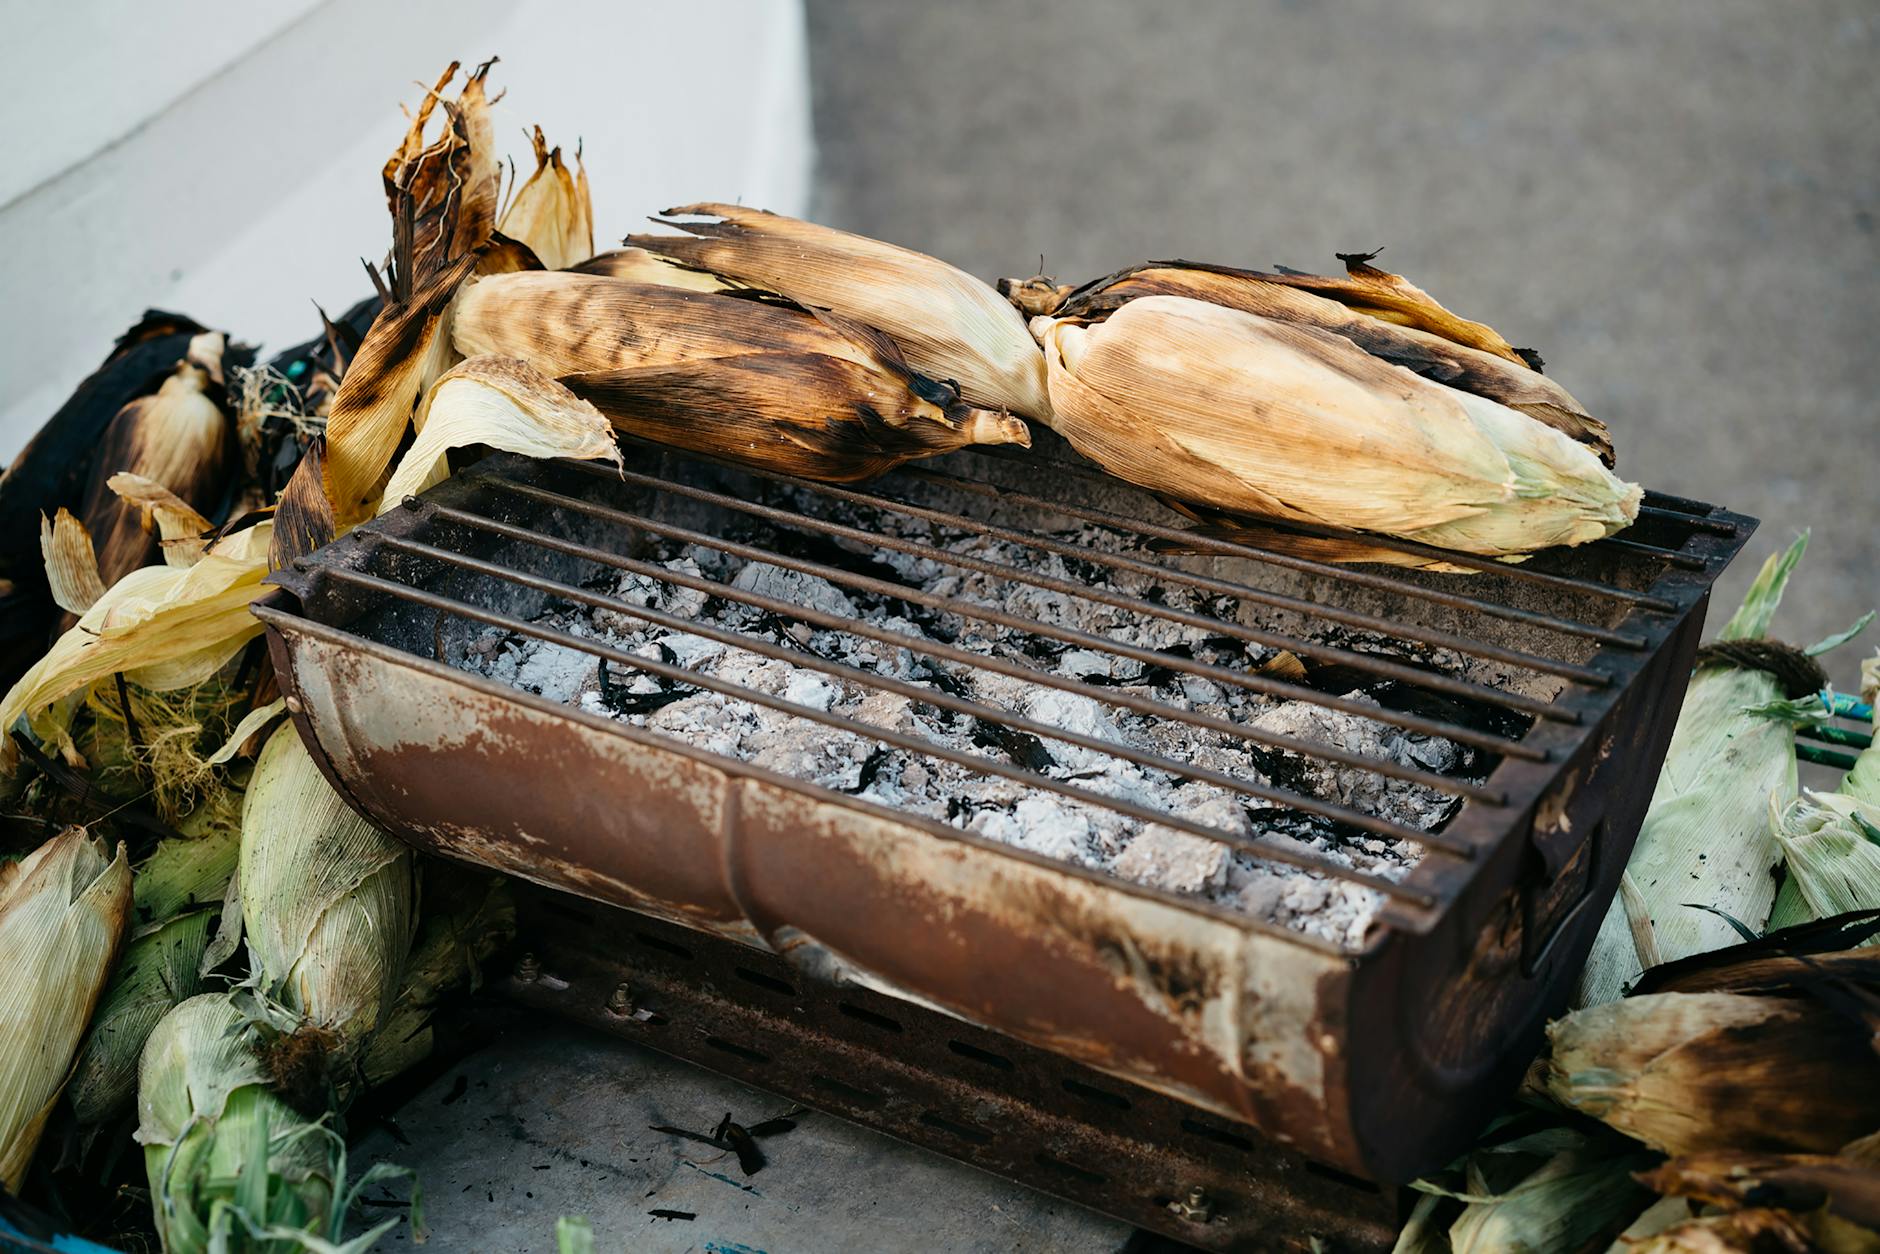
Method 2: The Best Way to Cook Corn on the Grill
When I think of the best way to cook corn, my mind immediately goes to the grill. There is a specific chemical reaction called the Maillard reaction that happens when the sugars in the corn hit high heat, creating a smoky, caramelized flavor that boiling simply cannot replicate. However, grilling requires a bit more finesse to avoid burning the exterior while leaving the interior raw.
Grilling in the Husk: Steamed to Perfection
This is the "low maintenance" method. By leaving the corn in its natural wrapper, you are essentially steaming the corn inside the husk. The moisture from the silk and husk keeps the kernels incredibly juicy. Pro tip: Soak the entire ear (husk and all) in cold water for 15 minutes before grilling to prevent the husks from catching fire too quickly.
The Foil Wrap Method: For Maximum Butter Infusion
If you love compound butter, the aluminum foil method is for you. You shuck the corn, slather it in seasoned butter, and wrap it tightly. The foil traps the fats and flavors, allowing the corn to confit in its own juices. It’s less "smoky" than other methods but incredibly rich.
Naked Grilling: Achieving the Perfect Char
For those who want those beautiful black char marks, you must grill the corn "naked" (shucked). This requires constant attention. You want a medium-high heat (around 375-400°F). Place the ears directly on the grates and turn them every 2 minutes. You’re looking for a bright yellow color with spots of deep brown char. For more variations, check out this guide to grilling corn.
Triple-Threat Grilled Corn
Instructions for the "Naked Char":
- Preheat your grill to medium-high. Clean the grates thoroughly.
- Lightly brush shucked corn with a high-smoke-point oil (like avocado or canola).
- Place corn on the grill. Close the lid and cook for 2-3 minutes.
- Rotate a quarter turn and repeat until all sides are charred and kernels are tender (usually 10-12 minutes total).
- Remove and immediately slather with salted butter and a squeeze of lime.
Method 3: The Fastest Way—Microwaving Corn
I’ll be honest: I used to be a corn snob. I thought the microwave was only for reheating leftovers. But then I tried the microwave corn in the husk technique, and it changed my life. This is the absolute fastest way to cook corn on the cob, especially if you’re only cooking one or two ears.
The 4-Minute Hack
The secret is to leave the husk on. The husk acts as a pressurized steam chamber. In my testing, one ear of corn takes exactly 4 minutes on high. If you’re doing two ears, go for 7 minutes. The result is surprisingly crisp and vibrant.
The Easy-Shuck Trick: No More Silk Mess
The best part of this method isn't just the speed—it's the cleanup. When you microwave corn in the husk, the heat causes the corn silk to release its grip on the kernels. Once the corn is done, use an oven mitt to hold the top, and cut off the bottom (the stalk end) about an inch up. Grab the top of the husk and shake—the ear of corn will slide right out, completely free of silk. It’s like magic.
If you're looking for other quick kitchen wins, you might enjoy our easy Instant Pot recipes, which offer similar time-saving benefits for busy weeknights.
Elevate Your Corn: Beyond Plain Butter
While a simple pat of butter and a sprinkle of salt is a classic, your summer side dish deserves an upgrade. Compound butters are the easiest way to add "wow" factor with minimal effort. Here are four of my favorite flavor combinations that I’ve perfected over the years.
- Chili Lime Butter: Mix 4 tbsp softened butter with 1 tsp chili powder, the zest of one lime, and a pinch of cayenne. This is a nod to Mexican Elote and pairs perfectly with grilled meats.
- Garlic Herb Compound Butter: Combine butter with minced roasted garlic, fresh chives, and chopped parsley. This is the ultimate crowd-pleaser for a Sunday roast.
- Parmesan and Black Pepper Crust: After buttering your corn, roll it in finely grated Parmesan cheese and cracked black pepper. It creates a savory, salty crust that is addictive.
- Miso Honey Glaze: Whisk 1 tbsp white miso paste with 1 tsp honey and 2 tbsp melted butter. Brush this on grilled corn recipe style during the last 2 minutes of cooking for a sweet-savory umami bomb.
To make these toppings stick, always apply them while the corn is piping hot. If the corn has cooled, the fats won't melt into the crevices between the corn kernels, and your toppings will just slide off.
Kitchen Pro Tips: Handling and Prep
Preparation is where most home cooks get frustrated. Shucking corn can be messy, and those tiny silks seem to get everywhere. Over 15 years, I’ve developed a few "pro-moves" to keep your kitchen clean.
The Bundt Pan Trick
If you need to cut kernels off the cob for a salad or chowder, do not just do it on a flat cutting board. The kernels will fly across the room! Instead, place the tip of the corn cob into the center hole of a Bundt pan. As you slice downward with a sharp knife, the wide bowl of the pan catches all the kernels and the milky juice. It’s the cleanest method I’ve ever used. For a visual guide, see this cut kernels off the cob tutorial.
Removing Every Last Strand of Silk
If you’ve shucked your corn and it’s still covered in stubborn silks, don't pick them off one by one. Use a soft-bristled vegetable brush or even a clean, damp paper towel. Rub the ear of corn firmly in a downward motion. The friction will grab the silks and pull them away in seconds.
Storage, Reheating, and Using Leftovers
If you find yourself with leftover ears after a BBQ, don't throw them away! Cooked corn stays delicious for up to 4 days if stored correctly. Place the cooled cobs in an airtight container or a heavy-duty zip-top bag to prevent them from picking up "fridge smells."
The Best Way to Reheat Without Drying Out
Never reheat corn in the microwave without protection, or it will turn into "corn nuts." Instead, wrap the ear in a damp paper towel and microwave for 30-45 seconds. This creates a mini-steam environment that restores the moisture to the kernels.
Creative Leftover Ideas
Leftover corn is actually a blessing. I love stripping the kernels and tossing them into a refreshing no-cook summer meal like a black bean and corn salad. You can also use them in:
- Corn Chowder: The charred flavor from grilled leftovers adds incredible depth.
- Corn Fritters: Mix kernels with flour, egg, and green onions, then pan-fry.
- Summer Pasta: Toss kernels with cherry tomatoes, basil, and olive oil for a light dinner.
Common Mistakes to Avoid
Even seasoned cooks can stumble when it comes to how to cook corn on the cob. Here are the three most common pitfalls I see:
If your corn is chewy or sticks to your teeth, you likely cooked it too long. Modern sweet corn varieties are bred to be eaten almost raw. 3-5 minutes of boiling is plenty. Anything over 10 minutes starts to break down the starch in a way that makes it gummy.
Corn in January is never going to taste like corn in July. If it’s not summer, you are better off using high-quality frozen corn, which is blanching processed at the peak of freshness. Fresh "winter corn" is often starchy and flavorless.
I cannot stress this enough: cook your corn the day you buy it. If you must wait, keep it in the refrigerator with the husks on. The cold temperature slows down the conversion of sugar to starch, but it won't stop it entirely.
Final Thoughts from the Kitchen
At the end of the day, the best way to cook corn is the one that gets you to the table with a smile on your face. Whether you choose the "Milk Bath" boil for its richness, the grill for its smoky Maillard reaction, or the microwave for its sheer speed, you now have the tools to master this summer staple. Remember: start with the freshest ears you can find, watch your timer like a hawk, and never be afraid to experiment with bold compound butters. Happy cooking, and here’s to a summer filled with perfect, juicy corn!