Quick Answer
The Ultimate Chimichurri Sauce Recipe is built around practical home-kitchen ratios and simple texture checks. Follow the main method first, then use the variation and troubleshooting notes to adjust sweetness, salt, moisture, or cook time.
CookBuddy Kitchen Note
For The Ultimate Chimichurri Sauce Recipe, this guide centers on Prep the Herbs, The "Bloom" Technique, Combine. Those are the checkpoints we would use first in a normal home kitchen before making a bigger change.
Decision table
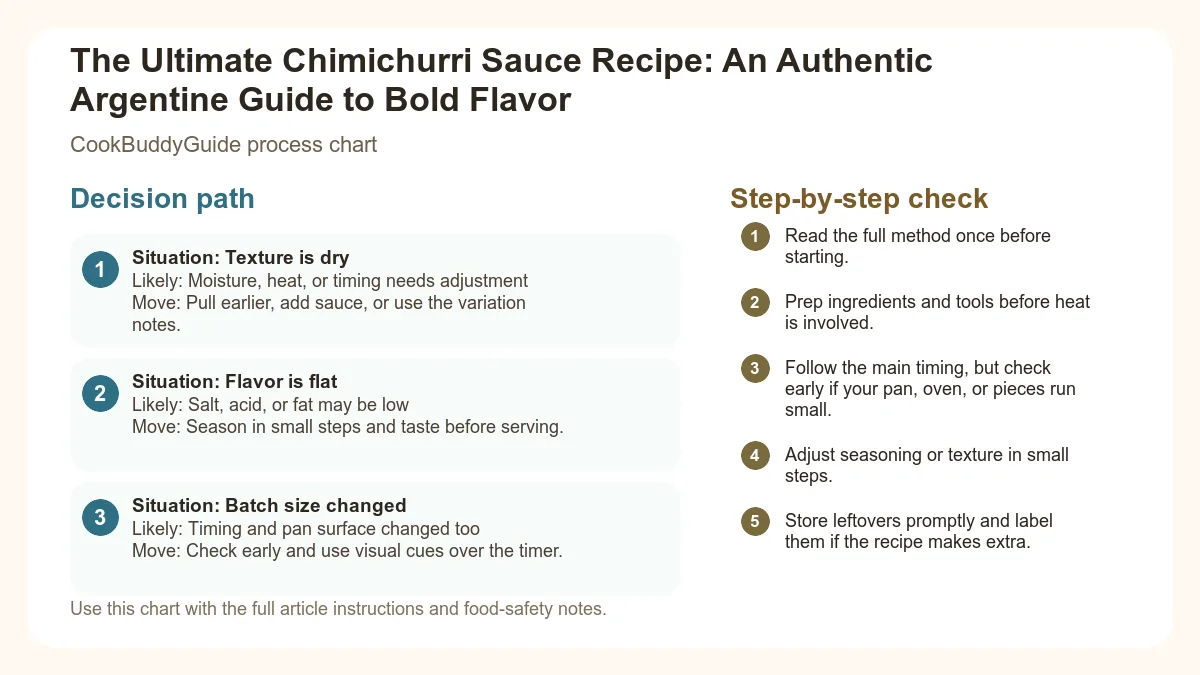
| Situation | Likely cause or meaning | Best move |
|---|---|---|
| Texture is dry | Moisture, heat, or timing needs adjustment | Pull earlier, add sauce, or use the variation notes. |
| Flavor is flat | Salt, acid, or fat may be low | Season in small steps and taste before serving. |
| Batch size changed | Timing and pan surface changed too | Check early and use visual cues over the timer. |
Step-by-step fix
- Read the full method once before starting.
- Prep ingredients and tools before heat is involved.
- Follow the main timing, but check early if your pan, oven, or pieces run small.
- Adjust seasoning or texture in small steps.
- Store leftovers promptly and label them if the recipe makes extra.
Common mistakes
- Changing the recipe before trying the base method once.
- Measuring casually when texture depends on ratios.
- Waiting until the end to fix seasoning.
- Ignoring carryover heat or resting time.
Useful next reads
Helpful tools for this guide
- instant-read thermometer
- digital kitchen scale
- cutting board
- airtight storage containers
Related topic hubs
The air in Buenos Aires carries a specific scent: the intoxicating aroma of wood smoke, charred beef fat, and the sharp, herbaceous tang of vinegar hitting a hot grill. It is the scent of the Argentine Asado. For over 15 years, I have chased the perfect chimichurri sauce recipe, testing more than 20 variations in my own kitchen and side-by-side with parrilleros (grill masters) in the heart of Palermo Soho. What I discovered is that while everyone has a "secret," the most authentic Argentine chimichurri relies on a specific philosophy of patience and precision rather than a long list of exotic ingredients.
At CookBuddyGuide, we believe that superior home cooking isn't about complicated gadgetry; it’s about mastering the "why" behind the technique. You don't need a culinary degree to make a world-class condiment recipe, but you do need to understand why we hand-chop our herbs and why dried oregano is actually superior to fresh in this one specific instance. If you’ve ever been disappointed by a watery, bitter, or overly oily store-bought jar, this guide is for you. We are going to build a sauce that is bright, punchy, and structurally sound enough to stand up to the richest ribeye or the simplest grilled chicken.
Table of Contents
Chimichurri Verde vs. Chimichurri Rojo: Understanding the Difference
In most North American kitchens, "chimichurri" is synonymous with a bright green herb sauce. However, if you travel through the Pampas, you'll find that Gaucho cuisine actually embraces two distinct profiles: Verde (Green) and Rojo (Red). Understanding the difference is the first step in mastering the art of the Argentine condiment.
The Classic Green (Verde) Profile
Chimichurri Verde is the standard-bearer. It is parsley-forward, incredibly bright, and high in acidity. The goal of a Verde sauce is to provide a "cut" to the richness of fatty meats. When you are serving a highly marbled Wagyu or a traditional Argentine tira de asado (short ribs), the Verde variation acts as a palate cleanser. In my experience, the best Verde recipes focus on the interplay between fresh herbs and the sharp bite of garlic cloves.
The Smoky Red (Rojo) Variation
Chimichurri Rojo is the deeper, moodier cousin. It incorporates pimentón dulce (sweet smoked paprika) and often roasted red peppers or chili paste. While Verde is about brightness, Rojo is about depth and earthiness. I personally prefer the Rojo variation when I’m working with leaner proteins like pork tenderloin or even roasted root vegetables. The addition of smoked paprika creates a bridge between the char of the grill and the freshness of the herbs. Choosing between them depends on your protein: use Verde for beef and lamb; use Rojo for pork, poultry, or hearty vegetables.
The Anatomy of Authentic Argentine Chimichurri Ingredients
The biggest mistake I see home cooks make is treating chimichurri like a pesto. It is not a pesto. It is an oil-and-vinegar-based vinaigrette that happens to be loaded with herbs. To get that authentic flavor, we have to look at the specific ratios used in traditional Argentine chimichurri ingredients.
The Herb Ratio: Parsley and Oregano
Flat-leaf parsley (Italian parsley) is non-negotiable. Curly parsley is too fibrous and lacks the essential oils needed for a smooth mouthfeel. But here is the real secret I learned in Buenos Aires: Argentines almost always use dried oregano. While it sounds counterintuitive to use a dried herb in a "fresh" sauce, dried oregano provides a concentrated, earthy backbone that fresh oregano simply cannot match. Fresh oregano can often turn bitter or soapy when chopped; the dried version absorbs the vinegar and oil, swelling into little flavor bombs that anchor the sauce.
The Aromatics: Garlic and Red Pepper Flakes
You need fresh garlic cloves—not the pre-minced stuff in a jar. The garlic should be pungent but not overwhelming. I’ve found that the "bite" of the garlic depends entirely on how you prep it. If you want a mellow flavor, mince it and let it sit in the vinegar for 10 minutes before adding the oil. For the heat, we use red pepper flakes (known as ají molido in Argentina). It’s not meant to be a "hot sauce," but it should provide a gentle warmth at the back of the throat.
The Liquids: Red Wine Vinegar and Olive Oil
The ratio of acid to fat is critical. I use a 1:2 ratio of vinegar to oil. Red wine vinegar is the gold standard here because of its 6% acidity and fruity undertones. For the fat, choose a high-quality extra virgin olive oil. Be careful, though—some extremely robust, peppery olive oils can clash with the parsley. Look for something mid-range and buttery. Beyond flavor, there are significant health benefits of olive oil, making this one of the most heart-healthy sauces in your repertoire.
Technique Matters: Hand-Chopped vs. Food Processor
If you take away only one thing from this 3000-word guide, let it be this: put down the food processor. In my first five years of cooking, I used a blender because it was faster. I couldn't figure out why my sauce looked like a muddy green smoothie and tasted bitter.
The science is simple: mechanical blades at high speeds oxidize the parsley and bruise the garlic, releasing sulfur compounds that create a harsh, metallic aftertaste. Furthermore, high-speed blending can cause the olive oil to emulsify with the moisture in the herbs, creating a creamy, mayonnaise-like texture. An authentic chimichurri should be "broken"—you should see the distinct flecks of green herbs suspended in clear, shimmering oil.
I highly recommend hand-chopping herbs for better texture. Using a sharp chef's knife allows you to control the "mince." You want the parsley to be small, but not a paste. This creates a varied mouthfeel where you get bursts of herb, then a hit of acid, then the richness of the oil. It’s a mosaic of flavor, not a monolith.
The Master Authentic Argentine Chimichurri (Verde)
This recipe yields approximately 1.5 cups of sauce.
Ingredients:
- 1 large bunch fresh flat-leaf parsley (approx. 2 cups firmly packed leaves)
- 4-6 large garlic cloves, very finely minced
- 2 tablespoons dried oregano
- 1 teaspoon red pepper flakes (ají molido)
- 1 teaspoon kosher salt (plus more to taste)
- 1/2 teaspoon freshly cracked black pepper
- 1/2 cup red wine vinegar
- 1 cup extra virgin olive oil
Instructions:
- Prep the Herbs: Wash the parsley and dry it thoroughly. Moisture is the enemy of shelf life. Remove the thick bottom stems, but don't worry about the tender stems near the leaves—they hold a lot of flavor. Hand-chop the parsley until fine but not mushy.
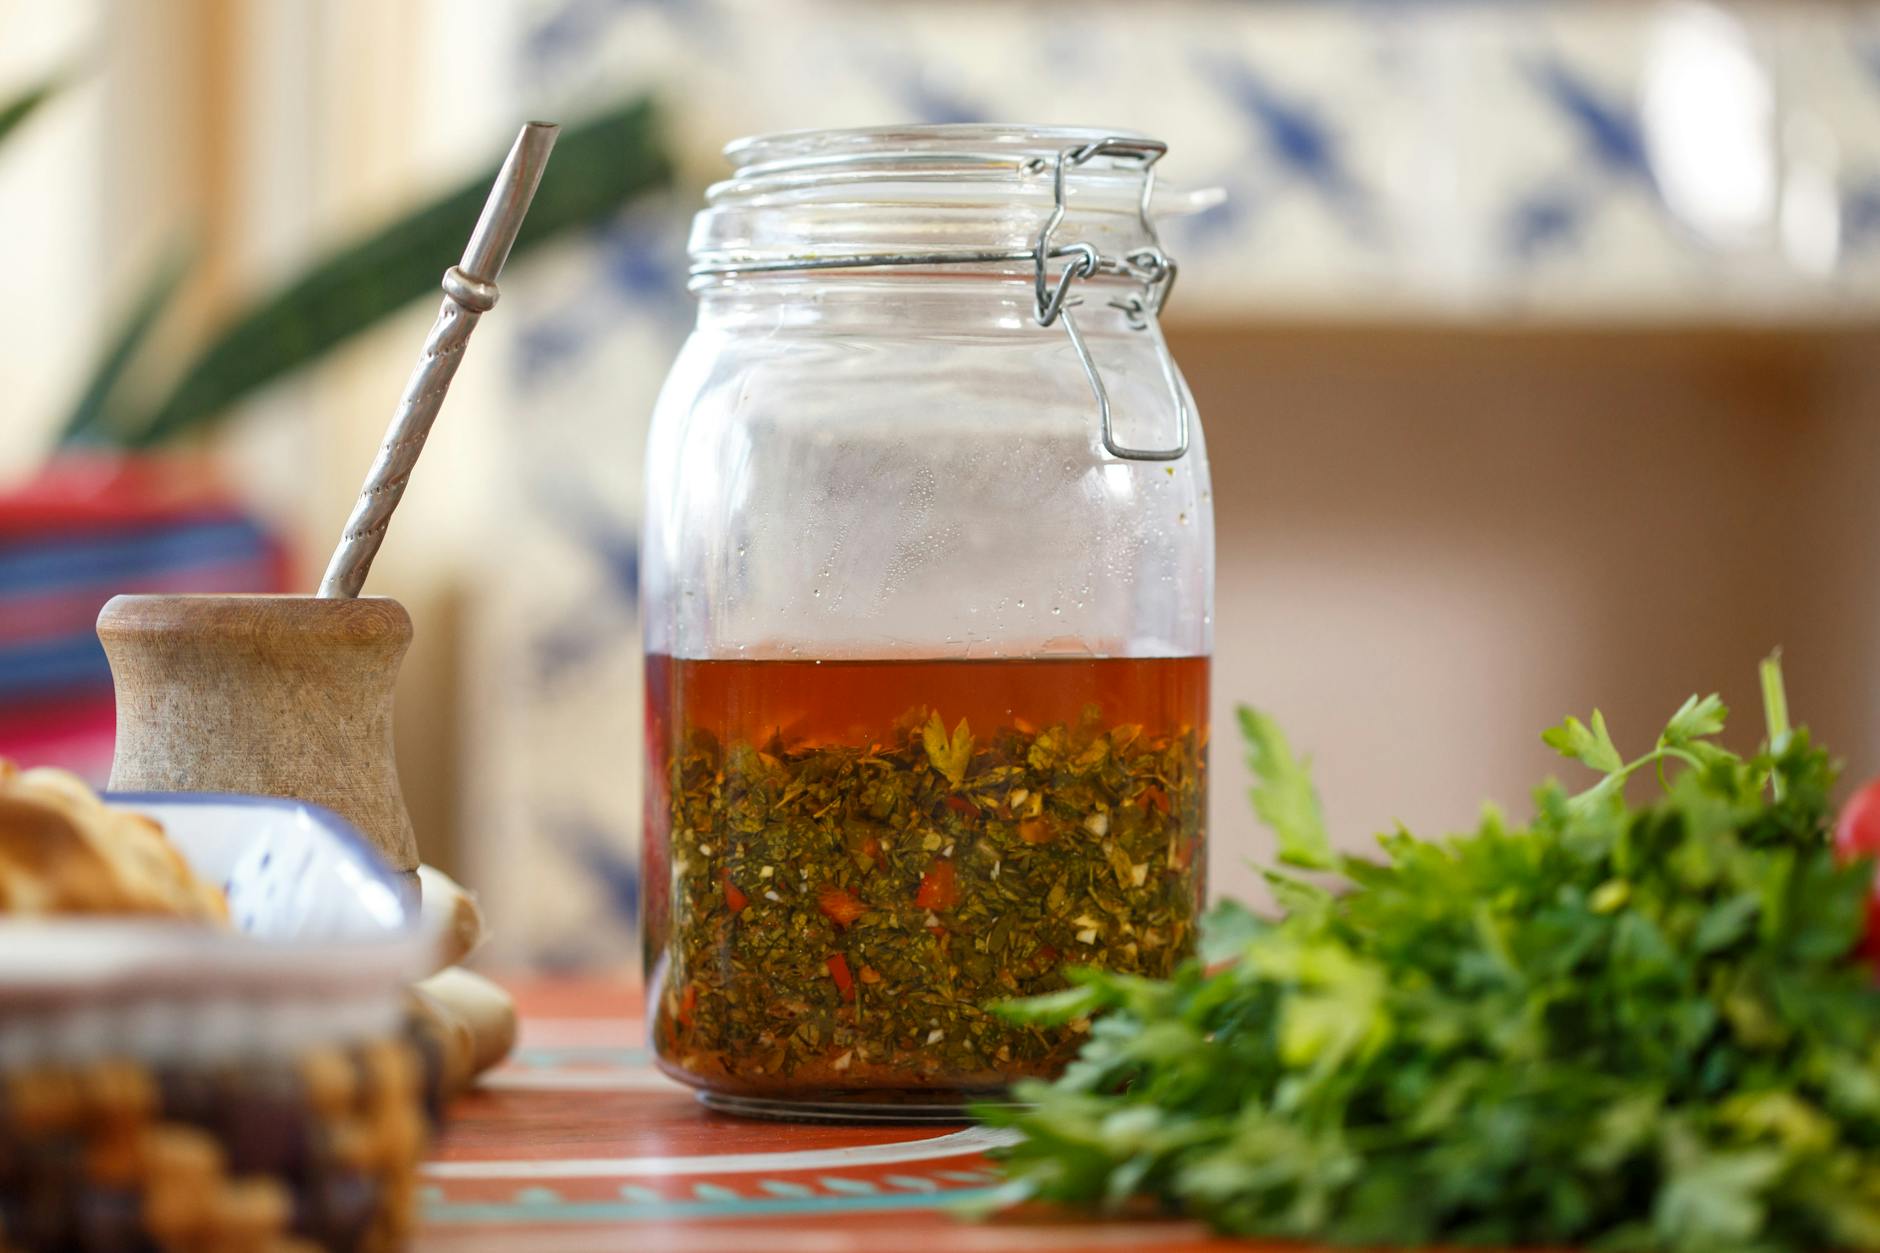
- The "Bloom" Technique: In a medium glass bowl, combine the dried oregano, red pepper flakes, kosher salt, and black pepper. Pour the red wine vinegar over the spices. Let this sit for 5-10 minutes. This "blooms" the dried spices and mellows the raw garlic bite.
- Combine: Add the hand-chopped parsley and minced garlic to the vinegar mixture. Stir to combine.
- The Pour: Slowly pour in the extra virgin olive oil while stirring with a fork. You are not looking for emulsification; you just want to incorporate the ingredients.
- Adjust: Taste the sauce. It should be vibrantly salty and acidic. If it feels too sharp, add another tablespoon of oil. If it feels flat, add a pinch more salt.
The Secret Ingredient: Time (The Resting Phase)
I have seen countless people make a beautiful chimichurri sauce recipe and serve it immediately. This is a mistake. When you first mix the sauce, the flavors are "separate"—you taste the oil, then the vinegar, then a sharp hit of garlic.
The chemistry of a great sauce requires a resting period. During this time, the oil acts as a solvent, extracting fat-soluble flavor compounds from the parsley and oregano. Meanwhile, the vinegar pickles the garlic slightly, removing that harsh "burn" that stays on your breath for days.
According to experts on letting the sauce rest, even 20 minutes at room temperature makes a difference. However, in my testing, the 24-hour mark is the "sweet spot." By the next day, the dried oregano has fully hydrated, the oil has turned a slight tint of green, and the acidity has mellowed into a complex, rounded brightness. If you are planning an Asado, make your chimichurri the day before. Your guests will notice the difference.
Common Mistakes and Troubleshooting
Even with a simple recipe, things can go wrong. Here is how I fix the most common issues I’ve encountered over 15 years of testing:
This is usually caused by one of two things: you used a food processor (which oxidized the herbs) or your olive oil is rancid. Always taste your oil before starting. If it's already bitter, adding more salt or a pinch of sugar can help mask it, but it won't fix the underlying structural issue.
Garlic strength varies wildly by season and variety. If your sauce is too "garlicky," you can dilute it by adding more parsley and oil. Next time, try the "vinegar soak" mentioned in the recipe card to take the edge off.
You likely didn't dry your parsley well enough. Excess water dilutes the oil and vinegar. To fix an overly acidic sauce, don't just add oil—add a tiny pinch of pimentón or even a teaspoon of warm water to help balance the pH without making it too greasy.
Beyond the Steak: Versatile Uses for Chimichurri
While this is the ultimate steak marinade and topping, its utility in a busy kitchen goes far beyond the grill. Because it’s essentially a shelf-stable herb vinaigrette, I use it as a "mother sauce" for various weeknight meals.
- The Ultimate Marinade: Use 1/2 cup of the sauce to marinate chicken thighs or pork chops for 4 hours. The vinegar tenderizes the meat while the oil and herbs create a crust that caramelizes beautifully. It works perfectly with these 15-minute chicken breast recipes.
- Vegetable Elevation: Toss roasted carrots, cauliflower, or baby potatoes in a few tablespoons of chimichurri immediately after they come out of the oven. The heat from the veggies will release the aroma of the herbs.
- Salad Dressing Base: Whisk a spoonful of chimichurri with a little extra Dijon mustard and honey for a world-class dressing that breathes life into boring greens.
- No-Cook Summer Meals: On hot days, I use chimichurri to dress cold pasta salads or as a dip for crusty bread. It’s a staple for no-cook summer meals when you don't want to turn on the stove.
Storage, Shelf Life, and Freezing
Proper storage is essential, not just for flavor, but for safety. Because this recipe contains low-acid ingredients (garlic and herbs) submerged in oil, there is a theoretical risk of botulism if stored improperly at room temperature for long periods. I always refer to the USDA and storing herb-infused oil sauces safely guidelines.
Refrigeration: Keep your chimichurri in a glass jar in the fridge. It will stay fresh for up to 2 weeks. Note that the olive oil will solidify in the cold. Simply take it out 30 minutes before serving to let it return to a liquid state.
The "Oil Seal" Trick: To keep the parsley a vibrant green, always make sure the herbs are fully submerged. After you use some of the sauce, use a spoon to push the herbs down and pour a thin layer of fresh olive oil over the top to seal out the air.
Freezing: Yes, you can freeze chimichurri! I recommend freezing it in ice cube trays. Once frozen, transfer the cubes to a freezer bag. You can drop a cube into a hot pan of sautéed shrimp or melt it over a hot steak for an instant flavor boost. It will keep in the freezer for up to 3 months.
Conclusion: Bringing the Asado Home
Mastering the chimichurri sauce recipe is a rite of passage for any home cook who loves the grill. It is a testament to the power of simple ingredients—parsley, garlic, vinegar, and oil—working in perfect harmony. By choosing the right authentic Argentine chimichurri techniques, like hand-chopping and allowing for a 24-hour rest, you elevate a simple condiment into a culinary masterpiece.
Next time you fire up the grill, remember the Gauchos. Take the extra ten minutes to chop those herbs by hand. Let the sauce sit and develop its character. Whether you're serving a prime cut of beef or a simple tray of roasted vegetables, this sauce will be the star of the show. Happy cooking, and welcome to the CookBuddyGuide family!