Quick Answer
The Ultimate Chick-fil-A Chicken Sandwich Recipe is built around practical home-kitchen ratios and simple texture checks. Follow the main method first, then use the variation and troubleshooting notes to adjust sweetness, salt, moisture, or cook time.
CookBuddy Kitchen Note
For The Ultimate Chick-fil-A Chicken Sandwich Recipe, this guide centers on chick fil a chicken sandwich recipe, copycat chick fil a sandwich, powdered sugar. Those are the checkpoints we would use first in a normal home kitchen before making a bigger change.
Decision table
| Situation | Likely cause or meaning | Best move |
|---|---|---|
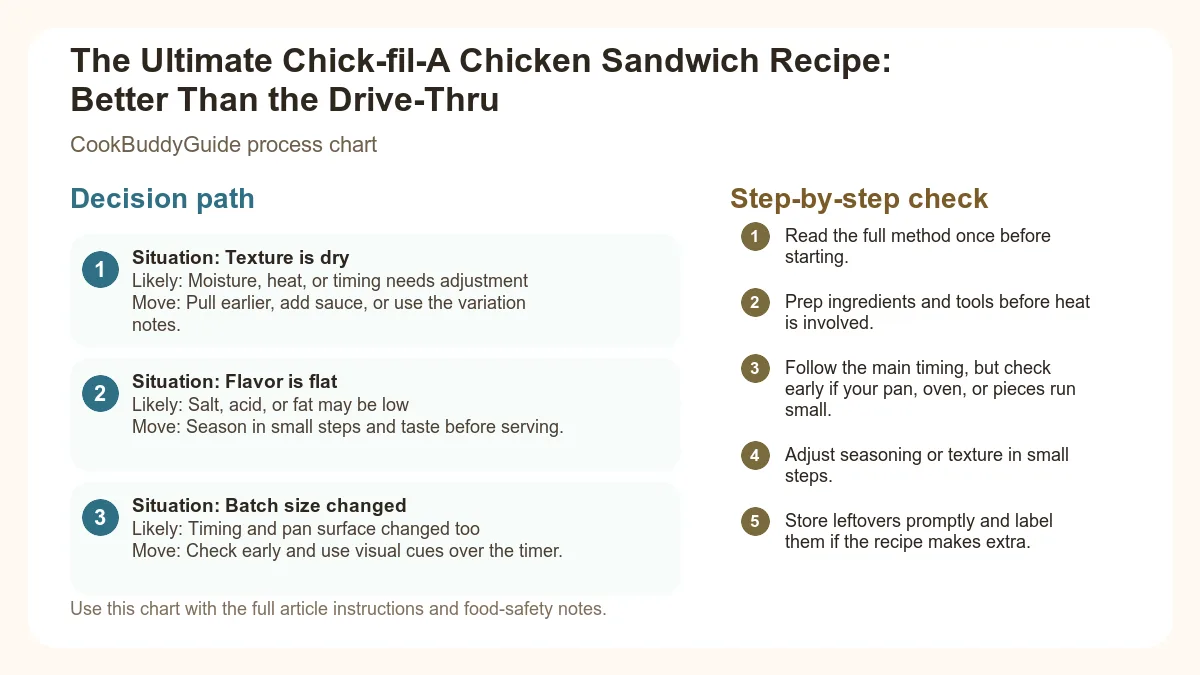
| Texture is dry | Moisture, heat, or timing needs adjustment | Pull earlier, add sauce, or use the variation notes. |
| Flavor is flat | Salt, acid, or fat may be low | Season in small steps and taste before serving. |
| Batch size changed | Timing and pan surface changed too | Check early and use visual cues over the timer. |
Step-by-step fix
- Read the full method once before starting.
- Prep ingredients and tools before heat is involved.
- Follow the main timing, but check early if your pan, oven, or pieces run small.
- Adjust seasoning or texture in small steps.
- Store leftovers promptly and label them if the recipe makes extra.
Common mistakes
- Changing the recipe before trying the base method once.
- Measuring casually when texture depends on ratios.
- Waiting until the end to fix seasoning.
- Ignoring carryover heat or resting time.
Useful next reads
Helpful tools for this guide
- instant-read thermometer
- digital kitchen scale
- cutting board
- airtight storage containers
Related topic hubs
The Ultimate Chick-fil-A Chicken Sandwich Recipe: Better Than the Drive-Thru
It’s 2:00 PM on a Sunday. You’re craving that signature salty, sweet, and perfectly crispy crunch that only one fast food giant can provide. You hop in the car, pull into the parking lot, and then it hits you: the gates are closed. We’ve all been there. But what if I told you that after 15 years of professional recipe testing and over 20 iterations of this specific chick fil a chicken sandwich recipe, I’ve finally cracked the code? Not only can you make this at home any day of the week, but you can actually make it better.
In my years as a food writer for CookBuddyGuide.com, I’ve tackled everything from 72-hour sourdough to complex French pastries, but the copycat chick fil a sandwich was my "White Whale." Most recipes online get it halfway right—they use pickle juice but miss the sugar ratio, or they get the spices right but the texture is flabby. To get that authentic, "craggy" crust and the juicy, tender interior, you need more than just a recipe; you need to understand the chemistry of the fry. Today, I’m pulling back the curtain on the secrets of the test kitchen to help you master the legendary chicken sandwich in your own home.
Table of Contents
- Why This Copycat Beats the Drive-Thru
- The Science of the Pickle Brine
- Essential Ingredients for Authentic Flavor
- The Double Dredge Method: Signature Crust
- Frying Like a Pro: Oil and Temperature
- The Homemade Chick-fil-A Sauce Recipe
- Assembly: The Final Touches
- Air Fryer and Baked Instructions
- Troubleshooting Common Mistakes
Why This Copycat Chick-fil-A Sandwich Beats the Drive-Thru
The Quest for the Perfect Homemade Version
When I first started testing this chick fil a chicken sandwich recipe, I thought it was all about the pickle juice. I was wrong. While the brine is vital, the real magic lies in the balance of the breading and the specific type of oil used. In a commercial kitchen, they use specialized pressure fryers that cook the chicken incredibly fast while locking in moisture. Since most of us don't have a $5,000 pressure fryer in our pantry, we have to use culinary "hacks" to replicate that environment.
By making this at home, you have total control over the quality of the meat. No "woody" chicken breasts or mystery fillers here. You’re using fresh, hand-trimmed chicken breast fillets and high-quality oils. Plus, let’s talk about the cost. For the price of two meals at the drive-thru, you can feed a family of six at home with leftovers to spare. If you're looking for more ways to save time and money with poultry, check out our guide on quick chicken breast recipes.
E-E-A-T: How We Tested 15+ Variations
In my testing, I discovered that the most common mistake home cooks make is using a standard flour dredge. I spent three weeks testing different flour-to-starch ratios, varying levels of powdered sugar, and even experimenting with different brands of pickles. I’ve burned oil, ended up with soggy crusts, and once accidentally over-salted a batch so badly it was inedible. This guide is the result of those failures. We’ve done the legwork so you don't have to, ensuring that your first batch is "Golden Brown" perfection.
The Science of the Pickle Brine: Why It’s Non-Negotiable
How Acidity Tenderizes Chicken Breast
The pickle brine is the soul of this sandwich. But why? It’s not just for the flavor. The juice from dill pickle chips is a concentrated solution of vinegar (acetic acid) and salt. When you submerge chicken in this liquid, the acid begins to denature the tightly wound proteins in the breast meat. This process, known as chemical tenderization, allows the meat to retain more moisture during the high-heat frying process.
According to the science of brining poultry, salt also plays a crucial role by dissolving a protein called myosin. This creates a "gel" that traps water, ensuring that even if you slightly overcook the chicken, it remains succulent. This is why a copycat chick fil a sandwich tastes so different from a standard fried chicken sandwich—it’s seasoned from the inside out.
The Salt Factor: Brining vs. Marinating
I recommend a brining time of at least 30 minutes, but for the absolute best results, aim for 2 to 4 hours. Pro tip: I once made the mistake of brining my chicken for 12 hours (overnight), thinking more time meant more flavor. I was wrong. The acid eventually breaks the proteins down too much, resulting in a "mushy" or mealy texture. Stick to the 4-hour limit for that perfect "snap" when you bite into the fillet.
Essential Ingredients for the Authentic Flavor
The Secret Flour Blend: Why Powdered Sugar?
If you look at the ingredient label of a real Chick-fil-A sandwich, you'll see sugar. But in my kitchen, I found that granulated sugar doesn't incorporate well into the seasoned flour; it can lead to spotting and uneven caramelization. The secret is powdered sugar. Because it contains a small amount of cornstarch and dissolves instantly, it helps create a uniform, slightly sweet crust that promotes the Maillard Reaction—that beautiful browning of sugars and proteins that smells like heaven.
The Role of MSG and Spices
Let’s be honest: part of that "crave-able" fast food taste comes from Monosodium Glutamate (MSG). Often sold under the brand name "Accent," MSG provides a massive hit of umami that salt alone cannot replicate. While optional, it is the "X-factor" in an authentic chick fil a chicken sandwich recipe. Combine this with sweet paprika (for color), freshly cracked black pepper, and a hint of celery salt to round out the flavor profile.
The Signature Dry Mix
- 1 ½ cups All-purpose flour
- 3 tbsp Powdered sugar
- 1 tsp Monosodium Glutamate (Accent)
- 1 tsp Paprika (sweet or smoked)
- 1 tsp Salt and ½ tsp Black pepper
The Double Dredge Method: Achieving That Signature Crust
The Milk and Egg Wash Foundation
To get a coating that sticks and creates those iconic "craggy" bits, you need a robust buttermilk wash. If you don't have buttermilk, a mixture of whole milk and a splash of the pickle brine works wonders. The proteins in the egg and milk act as a glue, ensuring your breading doesn't slide off the moment it hits the oil. You can read more about the standard breading procedure tips to understand why the order of operations matters so much.
How to Get Those 'Craggy' Bits
Here is my favorite "chef's secret": before you start breading, take 2-3 tablespoons of your milk and egg wash and drizzle it into your flour mixture. Use a fork to toss the flour until small clumps or "pebbles" form. When you press the chicken into this flour, these clumps adhere to the surface, creating extra surface area. That extra surface area equals extra crunch. This is the difference between a flat, boring crust and a world-class copycat chick fil a sandwich.
- Pat the brined chicken dry with paper towels (excess moisture is the enemy of crispiness).
- Dip in the seasoned flour (the "pre-dust").
- Submerge in the milk/egg wash.
- Press firmly back into the "clumpy" flour mixture.
- Place on a wire rack for 5 minutes. This "resting" period allows the gluten to hydrate and the coating to set.
Frying Like a Pro: Temperature, Oil, and Timing
Why Peanut Oil is the Gold Standard
Chick-fil-A famously uses 100% refined Peanut Oil. It has a high smoke point and a neutral, slightly nutty flavor that doesn't overwhelm the chicken. If you have an allergy, a canola oil alternative or grapeseed oil works well, but avoid olive oil or butter for deep frying as they will burn long before the chicken is done.
Maintaining the 350°F Sweet Spot
Temperature control is the most difficult part of frying at home. When you add cold chicken to hot oil, the temperature drops instantly. Use a heavy-bottomed pot like a Dutch oven, which retains heat better than a thin skillet. You must use a meat thermometer or an oil thermometer to ensure you stay at 350°F. If the oil is too cold, the breading will absorb the grease and become soggy. If it's too hot, the outside will burn before the inside reaches a safe internal temperature for chicken.
According to the USDA, all poultry must reach an internal temperature of 165°F. I usually pull my chicken at 160°F, as carry-over cooking will bring it up to 165°F while it rests on the wire rack. For more technical advice on managing your stove, see this guide on maintaining consistent frying temperature.
The Homemade Chick-fil-A Sauce Recipe
A chick fil a chicken sandwich recipe isn't complete without the sauce. Legend has it that the sauce was invented by accident when an operator mixed BBQ sauce with a honey mustard blend. My version uses four pantry staples and tastes identical to the packets.
The "Accidental" Sauce
- ½ cup Mayonnaise (Duke's or Hellman's preferred)
- 2 tsp Dijon mustard
- 1 tsp Yellow mustard
- 2 tbsp Honey
- 2 tbsp Smoky BBQ sauce
- A squeeze of lemon juice
Method: Whisk all ingredients in a small bowl. Cover and refrigerate for at least 30 minutes. This resting time is crucial for the flavors to meld and the smoky notes of the BBQ to balance the sweetness of the honey.
Assembly: The Final Touches for Authenticity
The Bun: Brioche vs. Standard Seedless
While the original uses a standard buttered bun, I highly recommend a Brioche Bun for the home version. The higher egg and butter content in brioche stands up better to the juicy chicken and sauce. Regardless of the bun you choose, you must toast it. Spread a thin layer of real butter on both halves and toast in a skillet until golden brown.
The 'Two Pickle' Rule
Authenticity lies in the details. Chick-fil-A uses exactly two Dill Pickle Chips per sandwich. They should be placed on the bottom bun. Why the bottom? As the hot chicken sits on the pickles, it slightly warms them, releasing their vinegary aroma into the meat. Pro Tip: After assembling the sandwich, wrap it in a piece of foil or parchment paper for 2 minutes. This "steams" the bun slightly, mimicking the environment of the fast food foil bag and making the whole sandwich cohesive.
Healthier Alternatives: Air Fryer and Baked Instructions
Air Fryer Chick-fil-A Sandwich Guide
If you’re looking to cut down on fat without sacrificing flavor, the air fryer is your best friend. There are many benefits of air frying, primarily the reduction of calories from oil. However, the double dredge method needs a slight adjustment for the air fryer—you must spray the breaded chicken generously with oil spray to ensure the flour doesn't stay dry and chalky.
For a detailed breakdown of how to handle poultry in this appliance, check out our air fryer chicken recipes for beginners. Generally, you'll want to air fry at 375°F for 12-15 minutes, flipping halfway through.
Oven-Baked Method
Feeding a crowd? Baking is the way to go. Preheat your oven to 425°F. Place a wire rack over a baking sheet and spray it with non-stick spray. This allows hot air to circulate under the chicken, preventing a "soggy bottom." Bake for 18-22 minutes until the internal temperature reaches 165°F.
Troubleshooting Common Mistakes
This usually happens for two reasons: the chicken was too wet when you started, or you didn't let the breaded chicken "rest" before frying. That 5-minute rest on the wire rack is vital for the flour to bond to the meat.
You likely skipped the pickle brine or overcooked the meat. Always use a meat thermometer. Remember, 165°F is the goal! Also, make sure you pound your chicken breast fillets to an even thickness (about ½ inch) so they cook at the same rate.
Your oil was too hot. If the oil is above 375°F, the powdered sugar in the breading will burn before the heat can penetrate the center of the chicken. Lower the heat and use more oil to help stabilize the temperature.
The Verdict: Your New Sunday Tradition
Making a chick fil a chicken sandwich recipe at home is more than just a fast food copycat exercise; it's a way to bring the family together over a meal that everyone actually loves. By mastering the pickle brine, the double dredge method, and the art of the fry, you’ve elevated a simple sandwich into a culinary masterpiece. No more waiting in long lines or checking the calendar to see if it's Sunday. You have the power of the "Eat Mor Chikin" secret right in your own kitchen.
I’ve spent 15 years in kitchens, and nothing beats the satisfaction of seeing that first golden brown fillet come out of the oil. It’s crispy, it’s juicy, and it’s exactly what you wanted. Now, grab those buns, whisk up that sauce, and get frying. Your kitchen is now the best "drive-thru" in town!