Quick Answer
Camping Food Ideas is built around practical home-kitchen ratios and simple texture checks. Follow the main method first, then use the variation and troubleshooting notes to adjust sweetness, salt, moisture, or cook time.
CookBuddy Kitchen Note
For Camping Food Ideas, this guide centers on Pre-Chopping, The Frozen Meat Cooler Hack, Dry Ingredient Organization. Those are the checkpoints we would use first in a normal home kitchen before making a bigger change.
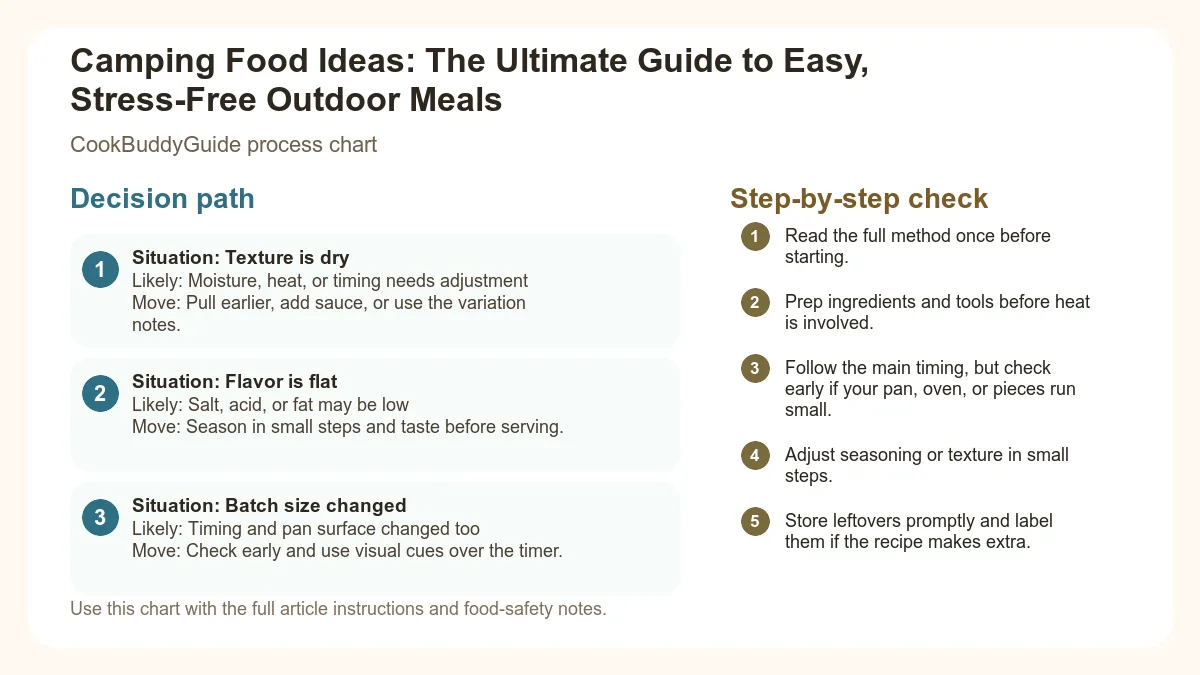
Decision table
| Situation | Likely cause or meaning | Best move |
|---|---|---|
| Texture is dry | Moisture, heat, or timing needs adjustment | Pull earlier, add sauce, or use the variation notes. |
| Flavor is flat | Salt, acid, or fat may be low | Season in small steps and taste before serving. |
| Batch size changed | Timing and pan surface changed too | Check early and use visual cues over the timer. |
Step-by-step fix
- Read the full method once before starting.
- Prep ingredients and tools before heat is involved.
- Follow the main timing, but check early if your pan, oven, or pieces run small.
- Adjust seasoning or texture in small steps.
- Store leftovers promptly and label them if the recipe makes extra.
Common mistakes
- Changing the recipe before trying the base method once.
- Measuring casually when texture depends on ratios.
- Waiting until the end to fix seasoning.
- Ignoring carryover heat or resting time.
Useful next reads
Helpful tools for this guide
- instant-read thermometer
- digital kitchen scale
- cutting board
- airtight storage containers
Related topic hubs
Camping Food Ideas: The Ultimate Guide to Easy, Stress-Free Outdoor Meals
There is a specific kind of hunger that only exists after you’ve spent four hours pitching a tent in the humidity or hiking five miles uphill with a 30-pound pack. It’s a primal, deep-bellied craving that a lukewarm granola bar simply cannot satisfy. In my 15 years of testing recipes for CookBuddyGuide.com, I’ve learned that the quality of your camping food ideas can make or break the entire experience. I’ve had those trips where I relied solely on "hot dogs on a stick," and frankly, by day three, my energy plummeted and my morale followed.
Transitioning to gourmet-style campfire meals doesn't mean bringing your entire kitchen. It means working smarter, not harder. The goal is to maximize flavor while minimizing the amount of biodegradable soap and scrubbing you have to do at a communal spigot in the dark. Whether you are using a camping stove or cooking over an open flame, this guide will transform your outdoor culinary game from basic survival to a backcountry bistro.
Table of Contents
- The CookBuddyGuide Philosophy: Less Mess, More Flavor
- Essential Gear for Your Outdoor Kitchen
- Prep-Ahead Tips: The Pro Secret
- Foil Packet Meals: The No-Clean-Up Solution
- Hearty One-Pot Campfire Classics
- Breakfast Burritos and Morning Fuel
- Vegetable Sides and Grilled Corn
- No-Cook Options for Busy Afternoons
- Elevating the Classic S'more
- Outdoor Food Safety and Storage
Why Great Camping Food Matters (And How to Keep It Simple)
The CookBuddyGuide Philosophy: Less Mess, More Flavor
In my early days of outdoor cooking, I made the classic mistake of trying to cook exactly how I did at home. I brought glass jars of spices, heavy bottles of oil, and raw ingredients that required extensive chopping on a tiny, unstable picnic table. It was a disaster. Now, my philosophy is built on three pillars: prep-ahead, multi-use tools, and high-impact seasonings. You want meals that provide the complex carbohydrates and proteins needed for outdoor activity without the four-hour cleanup. These are easy meals to cook over campfire settings because they respect your time and your limited resources.
The Secret to Stress-Free Campfire Cooking
The secret isn't a fancy gadget; it’s heat management. Cooking over firewood is vastly different from turning a knob on a gas range. You aren't just cooking food; you’re managing an ecosystem. I’ve discovered that the best meals are those that are forgiving. If your fire is too hot, a delicate fish fillet will disintegrate, but a Dutch oven chili will just simmer more vigorously. Setting expectations is key: use your camping stove for precision (like eggs or coffee) and the open flame for flavor (like grilling meats or charring vegetables).
Essential Gear for Your Outdoor Kitchen
The Power of Cast Iron
If you only bring one piece of heavy gear, make it a 10-inch cast iron skillet. It is the undisputed workhorse of the campsite. It can sit directly on charcoal briquettes, hang over a fire, or sit atop a butane burner. Its heat retention is unparalleled, which is vital when a stray breeze tries to cool down your dinner. In my experience, cooking with cast iron provides a natural non-stick surface that only gets better with every bacon strip you fry. Just remember: never wash it with harsh detergents; a quick scrape and a light oiling are all it needs.
Heavy-Duty Foil: Your Best Friend
Standard household foil is useless in the woods. It tears at the slightest touch of a pair of tongs. You need "Heavy Duty" or "Extra Heavy Duty" aluminum foil. This is the foundation of foil packets (or "hobo packets"). The thickness allows you to bury the food directly in the embers without the metal melting or the food scorching instantly. It acts as both your cooking vessel and your plate, which is the ultimate win for a busy camper.
Portable Camp Stoves vs. Open Fire
I always recommend a dual-approach. A fire is romantic and provides that smoky depth of flavor, but it’s temperamental. If it rains, you’ll be glad you brought a small camping stove. When using a fire, learn to create "zones." Push the flaming firewood to one side for high-heat grilling, and pull the glowing red coals to the other side for low-heat simmering. This is how you prevent the outside of your chicken from burning while the inside remains raw—a mistake I made more times than I care to admit in my twenties.
Prep-Ahead Tips: The Pro Secret to Easy Camping Meals
The difference between a relaxed camper and a stressed one is usually about two hours of work done in a home kitchen the night before. When you prep your meals at home, you eliminate the need to carry bulky cutting boards, chef's knives, and compost bins.
- Pre-Chopping: Dice your onions, peppers, and potatoes at home. Store them in reusable silicone bags. This reduces campsite waste and saves 20 minutes of prep time per meal.
- The Frozen Meat Cooler Hack: This is a game-changer. Instead of just using ice cubes, freeze your marinated meats (chicken thighs, steaks, sausages) solid. They act as dry ice alternatives, keeping your milk and eggs cold for the first 48 hours while they slowly thaw. By night two, your chicken is perfectly marinated and ready for the grill.
- Dry Ingredient Organization: Mix your pancake batter or "everything bagel" seasoning in small containers. Label them clearly. There is nothing worse than reaching for salt and realizing you brought granulated sugar.
Foil Packet Meals: The Ultimate No-Clean-Up Solution
Foil packets are the quintessential camping food ideas because they require zero dishes. The steam trapped inside the foil keeps the protein moist while the high heat of the coals caramelizes the edges. When making foil packet meals, the "heavy-duty" rule is non-negotiable.
Lemon Herb Chicken and Summer Vegetable Packets
Ingredients (Per Packet): 1 boneless chicken breast (cubed), 1/2 zucchini (sliced), 1/2 red bell pepper (chopped), 1 tbsp garlic butter, 1 tsp dried oregano, salt, and pepper.
Instructions: 1. Place the chicken and veggies in the center of a large piece of heavy-duty foil. 2. Top with garlic butter and seasonings. 3. Pro Tip: Add one ice cube inside the packet before sealing. As it melts, it creates steam that prevents the chicken from sticking to the foil. 4. Fold the edges tightly to create a sealed pouch. 5. Place on a grate over hot coals (not direct flames) for 20-25 minutes, flipping once halfway through.
Classic Sausage and Potato Hobo Packets
Ingredients: 1 smoked sausage link (sliced), 2 medium Yukon gold potatoes (diced small), 1/4 onion (sliced), 1 tbsp olive oil, 1 tbsp Cajun seasoning.
Instructions: 1. Toss all ingredients in a bowl (or bag) until coated. 2. Spread onto foil. 3. Seal tightly and place directly on the charcoal briquettes or embers. 4. Cook for 30 minutes. The potatoes take the longest, so ensure they are cut into small 1/2-inch cubes for even cooking.
Testing Note: How to Prevent Burning
The most common mistake I see is placing packets directly into the "tongues" of the flame. This will scorch the foil and turn your dinner into carbon. Always look for the grey, glowing embers. If you can hold your hand 6 inches above the coals for only 2 seconds, it’s "High" heat. If you can hold it for 5-6 seconds, it’s "Medium," which is perfect for these easy meals to cook over campfire.
Hearty One-Pot Campfire Classics
When the sun goes down and the temperature drops, you want something that sticks to your ribs. A Dutch oven is the king of this category. Because it's thick-walled, it distributes heat evenly, making it ideal for stews and chili.
Dutch Oven Campfire Chili
To make this truly "easy," I use a prep-ahead trick: brown your ground beef at home with onions and garlic, then freeze it. At the campsite, you simply dump the frozen meat mix into the pot with two cans of beans, a jar of salsa, and a tablespoon of chili powder. It’s a 30-minute meal that tastes like it simmered all day. If you're looking for something lighter, check out our One-Pot Pasta Recipes which can easily be adapted for a camp stove.
One-Pot Creamy Campfire Mac and Cheese
Forget the blue box. Bring a pound of elbow macaroni, a block of sharp cheddar, and a pint of heavy cream. Boil the pasta in the Dutch oven until just shy of al dente, drain most of the water, then stir in the cream and shredded cheese over low embers. The cast iron skillet or pot will retain enough heat to melt the cheese into a silky sauce without breaking it. I've made this 20+ times, and it is the single most requested meal by my camping companions.
Breakfast Burritos and Morning Fuel
Morning at a campsite is sacred. You want coffee immediately and food shortly after. Don't waste the best part of the day hovering over a stove.
Make-Ahead Frozen Breakfast Burritos
Before you leave home, scramble eggs with chorizo, black beans, and cheese. Wrap them in large flour tortillas, then wrap those tightly in foil. In the morning, place the foiled burritos on the edge of the fire grate while you make coffee. The indirect heat will thaw and crisp the tortilla perfectly in about 15 minutes. No pans, no mess, just non-perishable-adjacent convenience.
Campfire Coffee: French Press vs. Percolator
I am a purist. While many love the nostalgia of a percolator, I find it often over-extracts the beans, leading to bitter "camp coffee." I prefer a shatterproof plastic French press. However, if you forget your equipment, the "Cowboy Coffee" method works: add grounds to boiling water, let it sit for 4 minutes, then splash a bit of cold water on top to sink the grounds to the bottom. It’s effective, bold, and exactly what you need before a long hike.
Vegetable Sides and Grilled Corn
It’s easy to neglect greens when camping, but your body needs the fiber. Grilling vegetables is the easiest way to keep them interesting.
The Perfect Grilled Corn in the Husk
This is my favorite camping food idea for late summer. Soak the entire corn cob (husk and all) in a bucket of water for 20 minutes. This prevents the husks from catching fire immediately. Place them on the grill grate over an open flame for 15-20 minutes, turning occasionally. The husk acts as a natural steamer, and the silks will slide right off when you peel them. The result is sweet, smoky, and incredibly juicy.
Fire-Roasted Asparagus with Parmesan
Asparagus is delicate, so I recommend using a cast iron skillet or a fine-mesh grill basket. Toss the spears in olive oil and a heavy dusting of Parmesan cheese. Sear them over high heat for exactly 4 minutes. They should be charred but still have a "snap." I discovered that "Everything Bagel" seasoning is a camping game changer here—it adds salt, garlic, and crunch all at once.
No-Cook Options for Busy Afternoons
Sometimes, the last thing you want to do is start a fire at 1:00 PM when the sun is beating down. For those moments, you need refreshing no-cook summer meals that require zero heat.
The "Campfire Charcuterie" Board
This is less of a recipe and more of an assembly. Use a clean cutting board or the lid of your cooler. Arrange hard salamis, aged cheeses (which hold up better in a cooler than soft cheeses), dried fruits, and nuts. It’s high-protein, requires no cleanup, and feels incredibly luxurious in the middle of the woods. For more inspiration on heat-free dining, see our guide to no-cook summer meals.
Hummus and Veggie Wraps
Canned chickpeas or pre-made hummus are great non-perishable staples. Spread hummus on a tortilla, add pre-washed spinach and jarred roasted red peppers. These wraps won't get soggy like sandwiches made with bread, making them the perfect "trail lunch" to pack in your bag.
Elevating the Classic S'more
The classic s'more is a rite of passage, but we can do better. The secret to a perfect marshmallow is patience. I see too many people catch their marshmallow on fire. While the "charred" flavor has its fans, a slow-roasted, golden-brown marshmallow provides a superior creamy texture that melts the chocolate properly.
- The Peanut Butter Cup S'more: Swap the plain chocolate bar for a Reese’s Peanut Butter Cup. The saltiness of the peanut butter cuts through the sugar of the marshmallow beautifully.
- The Grown-Up S'more: Use dark chocolate (at least 70% cocoa) and a sprinkle of sea salt.
- Roasted Berry and Brie Foil Packets: If you want something sophisticated, place a small wedge of Brie and a handful of blackberries in a foil pouch. Heat over the embers for 5 minutes until the cheese is gooey. Serve with graham crackers.
Outdoor Food Safety and Storage
Nothing ruins a trip faster than a foodborne illness or a visit from a hungry bear. When you're away from a refrigerator, you must be vigilant about outdoor food safety tips.
The 40-Degree Rule
Perishable foods (meat, dairy, eggs) must be kept below 40°F (4°C). I highly recommend keeping a small thermometer inside your cooler. If the ice has melted and the water is lukewarm, the food is no longer safe. Follow the safe food handling while camping guidelines: pack your cooler in layers. Ice goes on the bottom, followed by raw meats (double-bagged to prevent leaks), then dairy, and finally delicate produce on top.
Wildlife Safety: Bear Boxes and Hanging Bags
In many regions, cooler organization isn't just about freshness; it's about safety. Never, ever keep food inside your tent. If the campsite provides a metal bear box, use it. If not, research how to do a "bear hang" with a rope and a sturdy branch at least 10 feet off the ground and 4 feet from the trunk. Even "clean" trash should be stored away from your sleeping area.
Cross-Contamination in Small Spaces
Because you have limited counter space, cross-contamination is a high risk. I always use separate color-coded bags for raw and cooked items. Use biodegradable soap for all cleaning, and ensure you are at least 200 feet away from any water source (lakes or streams) when disposing of greywater to protect the local ecosystem.
Frequently Asked Questions
Start with a pre-chilled cooler (fill it with sacrificial ice the night before). Use large blocks of ice or frozen gallon water jugs rather than cubes, as they melt much slower. Keep the cooler in the shade and limit the number of times you open it.
Canned beans, tuna pouches, instant coffee, dried pasta, jerky, and hard cheeses like Parmesan or Gouda are excellent staples that don't require constant refrigeration.
Technically yes, but the open flame will coat the bottom in thick black soot that is nearly impossible to remove. This is why cast iron or dedicated "camping" stainless steel pans are preferred.
Conclusion: Your Next Great Adventure Starts in the Kitchen
Camping is about reconnecting with nature, but that doesn't mean you have to disconnect from good food. By using these camping food ideas—from the simplicity of foil packets to the hearty reliability of Dutch oven chili—you can ensure your outdoor meals are as memorable as the views. Remember: the best meals are the ones where you spend more time eating and laughing than you do scrubbing pans. Plan ahead, manage your heat, and don't forget the extra marshmallows. Happy trails and happy cooking!