Quick Answer
The Ultimate 4th of July Food Ideas is built around practical home-kitchen ratios and simple texture checks. Follow the main method first, then use the variation and troubleshooting notes to adjust sweetness, salt, moisture, or cook time.
CookBuddy Kitchen Note
For The Ultimate 4th of July Food Ideas, this guide centers on The Thumbprint Trick, Proteins, Produce. Those are the checkpoints we would use first in a normal home kitchen before making a bigger change.
Decision table
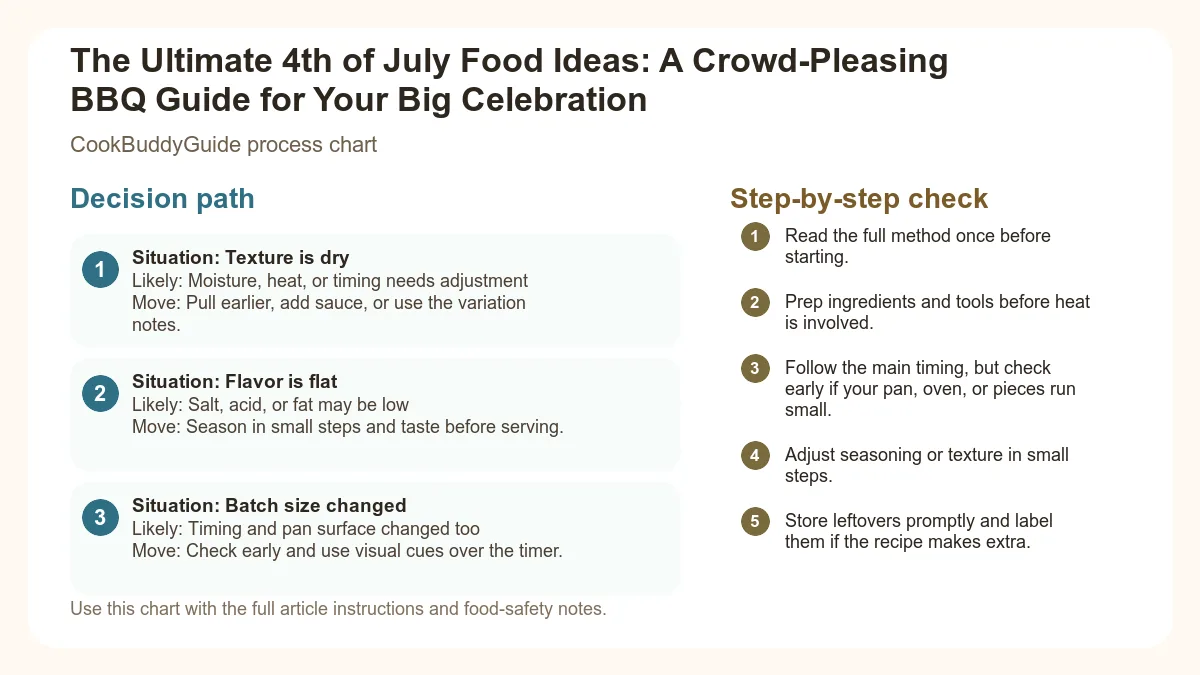
| Situation | Likely cause or meaning | Best move |
|---|---|---|
| Texture is dry | Moisture, heat, or timing needs adjustment | Pull earlier, add sauce, or use the variation notes. |
| Flavor is flat | Salt, acid, or fat may be low | Season in small steps and taste before serving. |
| Batch size changed | Timing and pan surface changed too | Check early and use visual cues over the timer. |
Step-by-step fix
- Read the full method once before starting.
- Prep ingredients and tools before heat is involved.
- Follow the main timing, but check early if your pan, oven, or pieces run small.
- Adjust seasoning or texture in small steps.
- Store leftovers promptly and label them if the recipe makes extra.
Common mistakes
- Changing the recipe before trying the base method once.
- Measuring casually when texture depends on ratios.
- Waiting until the end to fix seasoning.
- Ignoring carryover heat or resting time.
Useful next reads
Helpful tools for this guide
- instant-read thermometer
- digital kitchen scale
- cutting board
- airtight storage containers
Related topic hubs
- Planning the Perfect Independence Day Menu
- The Main Event: Better-Than-The-Diner Burgers
- The Ultimate Hot Dog Topping Bar
- Foolproof Grilled Chicken for a Crowd
- Essential Summer Sides: Corn and Watermelon
- Patriotic Red, White, and Blue Desserts
- Festive Drinks: Cocktails and Mocktails
- Mastering the Grill for 20+ People
- The Ultimate Shopping List and Prep Timeline
- Frequently Asked Questions
Planning the Perfect Independence Day Menu
When you're **feeding a crowd**, the biggest mistake you can make is trying to cook five different "hero" dishes. A hero dish is something that requires constant attention—like a delicate fish fillet or a steak that needs to be cooked to five different levels of doneness. For a successful **4th of july bbq recipes crowd pleasing** menu, you want one or two main proteins and a variety of high-impact, low-effort **side dishes for bbq**.Why These Recipes Work for Large Groups
I’ve curated these specific recipes because they rely on **make ahead recipes** and bulk-cooking techniques. For example, rather than individual sliders, we’re focusing on full-sized burgers and hot dogs that can be prepped in batches. We’re also leaning heavily on **potluck ideas** like watermelon salads and trifles that actually taste better after sitting for an hour, rather than wilting the moment they hit the table.Balancing the Grill: Timing and Temperature
The grill is your most valuable real estate. To manage it effectively, you need to understand the "1.5 rule." In my experience, you should account for 1.5 servings of protein per person. If you have 20 guests, don't just buy 20 burgers. Buy 30. Someone will drop one, a teenager will eat three, and you’ll want leftovers for the next day. Expert tip: Use your indoor oven as a "holding station." Set it to its lowest possible temperature (usually 170°F) and keep finished meats there in a foil-covered pan. This prevents the "chef's curse" of everyone eating at different times because the grill was too small.The Main Event: Better-Than-The-Diner Burgers
A burger is the cornerstone of **American Cuisine** on the 4th of July. But far too often, backyard burgers end up as dry, gray pucks or bloated "meatballs" that roll off the bun. After testing hundreds of patties, I can tell you that the secret isn't in the seasoning—it’s in the fat content and the handling.The Secret to Juicy 80/20 Beef Patties
You must use 80/20 ground chuck. Anything leaner (like 90/10 or 93/7) will dry out the moment it hits the **grilling temperature**. The fat is what provides the flavor and the "juice" that drips down your chin. If you're looking for more inspiration, check out our guide on Quick Ground Beef Recipes for alternative patty blends.Common Burger Mistakes to Avoid
The biggest mistake? Overworking the meat. When you press and squeeze the ground beef to form a patty, you develop proteins that make the burger tough. According to the science of grilling burgers, you should handle the meat as little as possible to maintain a tender texture.The Ultimate Backyard Burger
Ingredients: 5 lbs 80/20 ground chuck, Kosher salt, Black pepper, Brioche buns.
Instructions:
- Portion the cold meat into 6-ounce balls. Do not season the meat in a bowl; wait until the patties are formed.
- Gently press the balls into patties about 1 inch thick and slightly wider than your buns.
- The Thumbprint Trick: Use your thumb to create a shallow indentation in the center of each patty. This prevents the burger from "doming" or puffing up into a ball as the muscle fibers contract.
- Chill the patties for at least 30 minutes before grilling. Cold fat stays in the meat longer.
- Generously salt and pepper both sides right before they hit the grill.
- Grill over high direct heat for 4 minutes per side for medium-well. Never press the patties with a spatula—you’re just squeezing out the flavor!
The Ultimate Hot Dog Topping Bar
Hot dogs are often an afterthought, but for **outdoor entertaining**, a self-serve hot dog bar is a total game-changer. It transforms a basic snack into a customizable experience, and it saves you from having to play "waiter" all night.Beyond Ketchup and Mustard
While the classics are essential, offering **summer appetizers** in the form of creative toppings makes your BBQ memorable. I like to set out small bowls of:- Crumbled bacon
- Diced pineapple salsa
- Sriracha mayo
- Pickled jalapeños
Regional Favorites: Chicago vs. New York Style
If you want to get fancy, label your toppings. A "Chicago Dog" station needs yellow mustard, chopped white onions, bright green sweet pickle relish, a dill pickle spear, tomato wedges, pickled sport peppers, and a dash of celery salt on a poppy seed bun. A "New York Dog" is simpler: spicy brown mustard and sauerkraut or onions simmered in tomato paste.Quick Pickled Red Onions
These add a bright, acidic crunch to any hot dog or burger.
- 1 large red onion, thinly sliced
- 1/2 cup apple cider vinegar
- 1 tbsp sugar, 1.5 tsp kosher salt
- 1/2 cup warm water
Whisk the vinegar, sugar, salt, and water until dissolved. Pour over onions in a jar. Let sit for 30 minutes. They will turn a beautiful vibrant pink!
Foolproof Grilled Chicken for a Crowd
Chicken is notoriously difficult to grill for a large group. Breasts dry out in seconds, and legs often stay raw near the bone while the skin burns. My solution? Stick to bone-in, skin-on chicken thighs. They are much more forgiving and stay succulent even if they stay on the grill a few minutes too long.The 24-Hour Brine for Maximum Flavor
If you want chicken that people will actually talk about the next day, you have to brine it. A simple solution of salt, sugar, and water seasons the meat all the way to the bone and helps it retain moisture. I’ve found that a 24-hour soak is the "sweet spot" for texture.Avoiding the 'Dry Chicken' Syndrome
The key to safety and flavor is using a **meat thermometer**. You cannot judge doneness by color alone, especially with grilled meats. For poultry, you are looking for an internal temperature of 165°F. Refer to the safe internal cooking temperatures guide to ensure you're serving a safe meal to your guests.Lemon-Herb Marinated Thighs
Ingredients: 10 lbs chicken thighs, 1 cup olive oil, 1/2 cup lemon juice, 6 cloves garlic (minced), 2 tbsp dried oregano, 1 tbsp salt.
Instructions:
- Whisk marinade ingredients and pour over chicken in large gallon-sized bags.
- Preheat your grill for zone grilling (one side high heat, one side low heat).
- Sear the chicken skin-side down over high heat for 3-5 minutes until charred and crispy.
- Move the chicken to the "cool" side of the grill. Close the lid and cook for another 15-20 minutes. This indirect heat cooks the inside without burning the outside.
Essential Summer Sides: Corn and Watermelon
No **4th of july bbq recipes crowd pleasing** list is complete without the classics. While I love a good potato salad, corn and watermelon are the true stars because they require very little "kitchen time."Grilled Corn on the Cob with Compound Butters
There is a massive debate in the grilling community: husk-on or husk-off? In my kitchen testing, I’ve found that grilling "husk-off" provides a superior smoky flavor and beautiful charred kernels. If you prefer a steamed texture, you can follow this grilling corn on the cob guide for the foil-wrap method.Refreshing Feta and Mint Watermelon Salad
This is the ultimate "anti-heat" side dish. The saltiness of the feta perfectly offsets the sweetness of the watermelon. For more ideas like this, browse our No-Cook Summer Meals.Chili-Lime Compound Butter
Mix 1 stick of softened salted butter with 1 tsp chili powder, the zest of 1 lime, and 1 tbsp chopped cilantro. Slather this on hot grilled corn for an instant upgrade.
Patriotic Red, White, and Blue Desserts
When it comes to the **patriotic theme**, dessert is where you can really let your creativity shine. However, July is hot. Avoid anything with heavy buttercream frosting that will melt into a puddle within ten minutes.No-Bake Berry Trifle
Trifles are the ultimate **make ahead recipes**. You can layer store-bought pound cake, vanilla pudding (or whipped cream), strawberries, and blueberries in a large glass bowl the night before. The cake soaks up the juices, and it stays cold and refreshing.The Classic American Flag Sheet Cake
If you must bake, a sheet cake is the way to go. Use a simple vanilla sponge, cover it in a stable cream cheese frosting, and use rows of raspberries (for stripes) and a rectangle of blueberries (for the stars) to create the flag. It’s a classic for a reason!Festive Drinks: Cocktails and Mocktails
Hydration is critical during an outdoor **Independence Day** party. I always set up a "Hydration Station" separate from the bar. Fill large dispensers with ice water, cucumber slices, and mint. It looks beautiful and keeps people from getting dehydrated in the sun.Spiked Strawberry Lemonade
Batching your cocktails is the only way to survive a party of 20+. Mix a large gallon of lemonade with pureed strawberries and vodka (or bourbon). Keep it in a dispenser with plenty of ice on the side so the drink doesn't get watered down.The 'Bomb Pop' Mocktail for Kids
This is always a hit with the little ones. Fill a glass with ice and lemon-lime soda. Slowly pour in a splash of grenadine (it sinks to the bottom). Then, carefully float a splash of blue Gatorade on top. Garnish with a cherry. It creates a layered red, white, and blue effect that looks just like the famous popsicle.Mastering the Grill for 20+ People
To successfully cook for a large group, you need to treat your grill like a professional kitchen. Whether you are using **charcoal vs gas**, the principles of heat management remain the same.Zone Grilling: Direct vs. Indirect Heat
Never cover your entire grill surface with high heat. You need a "safety zone." On a gas grill, turn one or two burners to high and leave the others off or on low. On a charcoal grill, pile all the hot coals on one side. This allows you to sear meat over the flames and then move it to the cool side to finish cooking through without burning. This is the gold standard for grilling for a large group.The Importance of Resting Your Meat
I cannot stress this enough: **Let your meat rest.** When you pull a burger or a chicken thigh off the grill, the juices are frantic and thin. If you cut into it immediately, those juices will run out onto the plate, leaving you with dry meat. Give your burgers 5 minutes and your chicken 10 minutes under a loose tent of foil. The fibers will relax and reabsorb that moisture.The Ultimate Shopping List and Prep Timeline
Feeding 20 people requires a bit of math. Here is a breakdown of what you’ll likely need for a standard 4th of July menu:- Proteins: 8 lbs ground beef, 30 hot dogs, 10 lbs chicken thighs.
- Produce: 2 large watermelons, 25 ears of corn, 3 lbs strawberries, 2 pints blueberries, 4 large onions, 2 heads of garlic.
- Pantry/Dairy: 30 burger buns, 30 hot dog buns, 2 lbs feta cheese, 1 gallon lemonade, 5 lbs charcoal (if using), 30 lbs of ice.
The 3-Day Prep Countdown
- 48 Hours Before: Shop for all non-perishables and hardy produce (corn, onions). Make your compound butters.
- 24 Hours Before: Buy the meat. Brine the chicken. Chop the watermelon. Make the "Quick Pickled Onions."
- Morning Of: Form the burger patties (keep them cold!). Assemble the trifle. Set up the drink station.
- 2 Hours Before: Light the charcoal or preheat the gas grill. Set out the non-perishable toppings.
Frequently Asked Questions
A good rule of thumb is 1.5 to 2 pounds of ice per person. This covers both ice for drinks and ice used to keep coolers cold. For 20 people, buy four 10-lb bags.
I don't recommend it. Burgers are best fresh. However, you can prep the patties 24 hours in advance and keep them layered between parchment paper in the fridge.
Always have an "indoor backup." Most of these items (burgers, chicken, corn) can be finished in a heavy cast-iron skillet or under the oven broiler if the weather turns.