Quick Answer
3 Ingredient Peanut Butter Cookies is built around practical home-kitchen ratios and simple texture checks. Follow the main method first, then use the variation and troubleshooting notes to adjust sweetness, salt, moisture, or cook time.
CookBuddy Kitchen Note
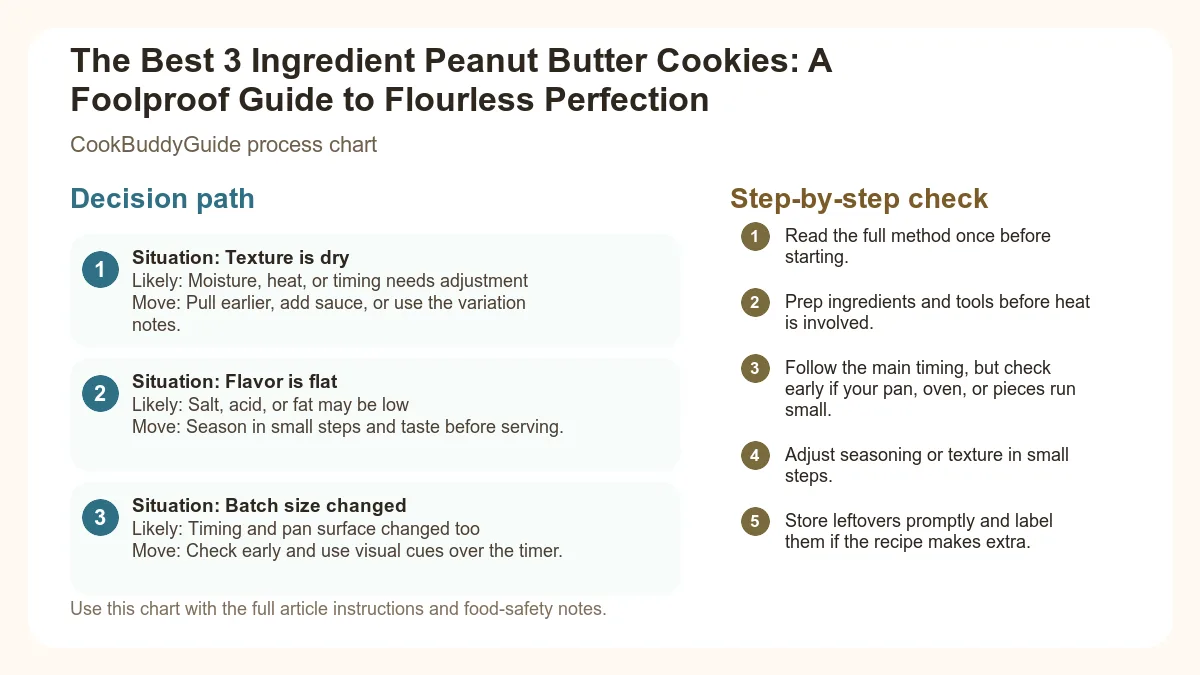
For 3 Ingredient Peanut Butter Cookies, the most useful home checks are temperature, measuring, resting time, and visible texture. Those details tell you more than guessing, especially before adding extra flour, liquid, heat, or leavening.
Decision table
| Situation | Likely cause or meaning | Best move |
|---|---|---|
| Texture is dry | Moisture, heat, or timing needs adjustment | Pull earlier, add sauce, or use the variation notes. |
| Flavor is flat | Salt, acid, or fat may be low | Season in small steps and taste before serving. |
| Batch size changed | Timing and pan surface changed too | Check early and use visual cues over the timer. |
Step-by-step fix
- Read the full method once before starting.
- Prep ingredients and tools before heat is involved.
- Follow the main timing, but check early if your pan, oven, or pieces run small.
- Adjust seasoning or texture in small steps.
- Store leftovers promptly and label them if the recipe makes extra.
Common mistakes
- Changing the recipe before trying the base method once.
- Measuring casually when texture depends on ratios.
- Waiting until the end to fix seasoning.
- Ignoring carryover heat or resting time.
Useful next reads
Helpful tools for this guide
- digital kitchen scale
- instant-read thermometer
- rimmed sheet pan
- silicone spatula
Related topic hubs
The Best 3 Ingredient Peanut Butter Cookies: A Foolproof Guide to Flourless Perfection
You’re standing in your kitchen at 8:00 PM on a Tuesday. The kids are finally settled, but your sweet tooth is screaming for something warm, salty, and sweet. You check the pantry: no flour, no butter, no baking soda. In most scenarios, this would be the end of your dessert dreams. But if you have a jar of peanut butter, a bag of sugar, and a single egg, you are less than 15 minutes away from cookie nirvana. These 3 ingredient peanut butter cookies are the ultimate kitchen "magic trick," turning pantry staples into a decadent, melt-in-your-mouth treat that rivals any complex bakery offering.
I’ve spent over 15 years testing recipes in my home kitchen for CookBuddyGuide.com, and I’ll be honest: early in my career, I was a skeptic. I thought a cookie without flour would be a greasy, structural mess. I was wrong. After baking thousands of these—testing every variable from oven rack position to the brand of peanut butter—I’ve perfected the method. Whether you are looking for a quick cheap meals under five dollars dessert companion or a gluten-free staple, this guide will show you exactly how to achieve flourless perfection every single time.
Table of Contents
- The Magic of the 3-Ingredient Peanut Butter Cookie
- The Science of Flourless Baking: Why It Works
- Choosing Your Ingredients: Quality Matters
- Essential Kitchen Tools for Success
- Step-by-Step Instructions: The Foolproof Method
- Texture Mastery: Crispy vs. Chewy Outcomes
- Common Mistakes and How to Fix Them
- Elevating the Basic Recipe: Optional Add-ins
- Dietary Adaptations and Substitutions
- Storage, Freezing, and Make-Ahead Tips
The Magic of the 3-Ingredient Peanut Butter Cookie
Why This Recipe is a Kitchen Staple
The beauty of this recipe lies in its elegant simplicity: the 1-1-1 ratio. One cup of peanut butter, one cup of sugar, and one large egg. It is the quintessential "emergency" dessert. When I’m balancing a heavy workload and family life, I don't always have the mental energy for measuring out six different dry ingredients. These easy peanut butter cookies eliminate the friction between "I want a cookie" and "I am eating a cookie."
Beyond convenience, these cookies are a lifesaver for those on a gluten-free diet. Since there is no flour involved, there is zero risk of cross-contamination or the gritty texture sometimes associated with gluten-free flour blends. They are naturally inclusive, making them a go-to for school bake sales or potlucks where dietary restrictions are a factor.
The E-E-A-T Approach: Why Our Testing Matters
At CookBuddyGuide.com, we don't just curate recipes; we stress-test them. I’ve made these cookies using everything from high-end artisanal almond butters to the generic store-brand peanut butter you find on the bottom shelf. I’ve discovered that while the recipe is simple, the technique is nuanced. In my testing, I found that small variables—like the temperature of your egg or the humidity in your kitchen—can change these cookies from "crumbly" to "fudgy." This guide is the result of those hundreds of batches, designed to ensure your first tray is as perfect as my hundredth.
The Science of Flourless Baking: Why It Works
The Role of the Egg as a Binder
You might wonder: how does a cookie stay together without flour? The answer lies in the role of eggs in baking. In a traditional cookie, flour provides a gluten network that traps gases and provides structure. In this flourless version, the egg takes on the entire structural burden. As the egg proteins heat up, they denature and coagulate, creating a firm web that holds the fats and sugars together. The egg also acts as an emulsifier, ensuring the oil from the peanut butter doesn't just seep out onto your parchment paper.
Protein and Fat: The Structural Backbone
Peanut butter is more than just a flavor; it’s a functional ingredient. According to the nutritional profile of peanut butter, it contains a high concentration of both plant-based proteins and healthy fats. These proteins work alongside the egg to provide the "chew" we expect from a cookie.
One of the most fascinating aspects of this recipe is the Maillard reaction. This is the chemical reaction between amino acids and reducing sugars that gives browned food its distinctive flavor. Because these cookies are so high in protein (from the nuts and egg) and sugar, they undergo intense browning. This creates a deeply toasted, savory-sweet profile that you simply don't get with standard flour-based cookies. Furthermore, because there is no gluten, you don't have to worry about overmixing. In fact, the more you stir the cookie dough, the more you help the egg emulsify the fats, leading to a smoother, more consistent bake.
Choosing Your Ingredients: Quality Matters
Commercial vs. Natural Peanut Butter
This is the most frequent question I receive: "Can I use the natural stuff?" The short answer is yes, but the results will differ. In my experience, "no-stir" commercial brands like Jif or Skippy yield the most consistent, classic results. These brands contain stabilizers (like palm oil or hydrogenated vegetable oils) that keep the peanut butter in a semi-solid state. This results in a cookie that holds its shape and has a soft, uniform crumb.
If you prefer natural peanut butter, you must be careful. Natural varieties often have a layer of oil on top. If you don't stir this back in perfectly, your cookies will be either too dry and crumbly or too oily and flat. For a deep dive into how these differences manifest, I highly recommend reading about natural versus commercial peanut butter. If you use natural, I recommend chilling the dough for at least 30 minutes to help the natural oils solidify before baking.
Sugar Varieties: Granulated, Brown, or Alternatives
The standard classic 3-ingredient peanut butter cookies recipe calls for granulated sugar. This gives the cookies a slightly crisp edge and a clean sweetness. However, I often swap half of the white sugar for light brown sugar. The molasses in brown sugar adds moisture and creates a much chewier, fudgier center.
For those looking for a low carb dessert, you can use a brown sugar substitute like erythritol or monk fruit sweetener. In my testing, these sugar alcohols behave similarly to granulated sugar, though they can leave a slight "cooling" sensation on the tongue. If you're looking for more ways to save on your grocery bill while eating well, check out our guide on 5-ingredient dinner recipes.
The Importance of Egg Size
Do not reach for a "medium" or "extra-large" egg if you can help it. A "Large" egg is the industry standard for recipes, providing approximately 50 grams of liquid. If your egg is too small, the dough will be dry and won't hold the crosshatch pattern. If it's too large, the cookies will spread into one giant peanut butter pancake. If you only have extra-large eggs, whisk one in a small bowl and remove about a teaspoon of the liquid before adding it to your mixing bowl.
Essential Kitchen Tools for Success
The CookBuddy Tool Checklist
- Heavy-Duty Baking Sheet: Prevents the bottoms from burning before the centers are set.
- Parchment Paper: Non-negotiable. These cookies have a high sugar content and will stick to a bare pan like glue.
- Cookie Scoop (1 tablespoon size): Ensures all cookies are the same size so they bake evenly.
- Wire Cooling Rack: Essential for air circulation to prevent soggy bottoms.
- Sturdy Mixing Bowl: The dough gets very thick and heavy; a flimsy bowl won't cut it.
One mistake I made early on was using a thin, dark-colored baking sheet. Dark pans absorb more heat, which caused the bottoms of my cookies to char while the tops were still raw. I now exclusively use light-colored aluminum pans. If you only have dark pans, reduce your oven temperature by 25 degrees Fahrenheit and keep a close eye on the baking time.
Step-by-Step Instructions: The Foolproof Method
1. Mixing the Dough to the Right Consistency
Preheat your oven to 350°F (175°C). In your mixing bowl, combine 1 cup of creamy peanut butter (or crunchy peanut butter if you like texture), 1 cup of sugar, and 1 large egg. Use a stiff spatula or a wooden spoon. At first, it will look like it won't come together, but keep stirring. Suddenly, the oil will emulsify, and the mixture will transform into a thick, shiny, and cohesive cookie dough that pulls away from the sides of the bowl. This is your visual cue that the proteins have bonded.
2. The Art of the Fork Crosshatch
Scoop rounded tablespoons of dough and roll them into balls about 1 inch in diameter. Place them on your prepared baking sheet about 2 inches apart. Now comes the iconic step: the fork crosshatch technique. Dip a fork in a little extra sugar (to prevent sticking) and press down on the ball to flatten it. Turn the fork 90 degrees and press again.
Why do we do this? It’s not just for aesthetics. Because this dough is so dense and lacks chemical leaveners like baking powder, the balls won't naturally spread much in the oven. Pressing them down ensures they are thin enough for the heat to penetrate the center quickly, leading to an even bake.
3. Baking Times and Temperature Precision
Bake for exactly 10 to 12 minutes. This is the "danger zone" where most people fail. You must understand the "Carryover Cooking" principle. When you pull the cookies out, they will look slightly underdone and very soft. You might be tempted to give them "just two more minutes." Don't. If they look fully firm in the oven, they will be hard as rocks once they cool. Let them rest on the hot pan for at least 5 minutes. This allows the internal structure to set while the residual heat finishes the cooking process.
Texture Mastery: Crispy vs. Chewy Outcomes
The Secret to a Soft, Fudgy Center
If you prefer a cookie that mimics the texture of a Reese’s Cup interior, pull them out at the 9-minute mark. At this stage, the edges are just beginning to set, but the center is still semi-liquid. As they cool on the cooling rack, they will remain dense and fudgy. Another trick I’ve discovered is chilling the dough balls for 20 minutes before the crosshatch step. This keeps the fat from melting too quickly, resulting in a thicker, softer cookie.
How to Achieve a Snap and Crunch
For those who love a "snap," use 100% granulated sugar and extend the bake time to 13 minutes. The higher sugar-to-moisture ratio will allow the edges to caramelize more deeply. I also find that using crunchy peanut butter adds to the perceived "crunch" of the cookie, providing a delightful contrast to the brittle dough.
Keep in mind that humidity plays a role. On a very rainy day, the sugar in the cookies will pull moisture from the air, making them naturally softer. If it’s a humid day and you want crispy cookies, you may need to leave them in the oven (with the power off and the door cracked) for 5 minutes after the baking time is up to "dry" them out.
Common Mistakes and How to Fix Them
Why My Cookies Crumbled
If your cookies are falling apart as soon as you touch them, one of three things happened:
- The egg was too small: There wasn't enough binder.
- You used dry, natural peanut butter: The lack of oil prevented the dough from bonding.
- You moved them too soon: You must let them cool on the pan!
Dealing with Oily Dough
If you see oil pooling around the cookies as they bake, your peanut butter has separated. The Fix: Next time, ensure you stir your PB vigorously before measuring. For the current batch, you can try blotting the cookies with a paper towel as soon as they come out, though the texture will be slightly more brittle.
The "Too Sweet" Dilemma
Because sugar makes up 1/3 of the recipe, some find these 3 ingredient peanut butter cookies a bit intense. The Fix: Add a generous pinch of kosher salt to the dough. Salt suppresses our perception of bitterness and balances extreme sweetness. You can also reduce the sugar to 3/4 cup, but be aware that the cookies will be softer and less structurally sound.
Elevating the Basic Recipe: Optional Add-ins
Once you’ve mastered the base, it’s time to play. While they are perfect on their own, a few additions can take these from "pantry snack" to "dinner party dessert."
- The Chocolate Chip Upgrade: Fold in 1/2 cup of semi-sweet chocolate chips. The bitterness of the chocolate cuts through the sugar. In my testing, mini-chips work best because they don't disrupt the structure of the flourless dough as much as large chunks.
- Sea Salt and Vanilla: Add 1 teaspoon of pure vanilla extract and a sprinkle of flaky sea salt on top immediately after baking. This transforms the flavor profile into something much more sophisticated.
- Nutty Variations: Roll the dough balls in crushed roasted peanuts before pressing them with the fork. This adds a fantastic texture and reinforces the "crunchy" element.
Dietary Adaptations and Substitutions
Making it Vegan: Flax Egg Testing
I’ve tested this recipe using a "flax egg" (1 tbsp ground flaxseed meal + 3 tbsp water, sat for 5 mins). The results are surprisingly good! The cookies are slightly more delicate and don't rise as much, but the flavor is spot-on. If using a flax egg, I recommend chilling the dough for 1 hour to help the flax fibers set the structure.
Keto-Friendly 3-Ingredient Cookies
To make these keto, use a sugar-free peanut butter (check the label for added sugars!) and a granulated erythritol blend. Because keto sweeteners don't caramelize the same way as real sugar, these cookies won't get as brown. Don't be fooled by the pale color; they are done when the edges feel firm to the touch.
Nut-Free Alternatives
If you have a peanut allergy, you can substitute Sunflower Seed Butter (SunButter). Warning: SunButter contains chlorogenic acid which reacts with leaveners, but since we have no baking soda here, you won't get the "green cookie" effect! However, SunButter is more liquid than peanut butter, so you may need to add an extra tablespoon of flax meal or coconut flour to stiffen the dough.
Storage, Freezing, and Make-Ahead Tips
To keep your cookies fresh, store them in an airtight container at room temperature. They will stay soft for up to 5 days. If they start to get a bit hard, toss a piece of white bread into the container; the cookies will absorb the moisture from the bread and soften right back up.
Freezing the dough: This is my favorite "pro-tip." Roll the dough into balls and place them on a tray in the freezer for 1 hour (this is called "flash freezing"). Once frozen solid, transfer the balls to a freezer bag. When the craving hits, you can bake one or two at a time. Just add 2 minutes to the total baking time—no need to thaw!
Frequently Asked Questions
A: Yes, but almond butter is generally oilier and less "sticky" than peanut butter. You may need to add 1-2 tablespoons of coconut flour to get the right dough consistency.
A: This usually happens if the egg was too large or if the peanut butter was too warm/oily. Try chilling the dough for 30 minutes before baking next time.
A: Patience! Flourless cookies are held together by the egg and sugar "setting" as they cool. Give them at least 15 minutes on the cooling rack before trying to eat them.
Final Thoughts: The Joy of Simple Baking
There is a profound satisfaction in making something delicious from almost nothing. These 3 ingredient peanut butter cookies remind us that cooking doesn't have to be complicated to be extraordinary. They are a testament to the power of basic pantry staples and the fascinating science of the Maillard reaction and egg proteins.
The next time you’re short on time but long on cravings, remember the 1-1-1 ratio. Grab your mixing bowl, preheat that oven, and treat yourself to a batch of flourless perfection. Once you try them, you’ll see why they’ve remained a favorite in my kitchen for over a decade. Happy baking!