Quick Answer
Peanut Butter Cookies (No Flour) is built around practical home-kitchen ratios and simple texture checks. Follow the main method first, then use the variation and troubleshooting notes to adjust sweetness, salt, moisture, or cook time.
CookBuddy Kitchen Note
For Peanut Butter Cookies (No Flour), the most useful home checks are temperature, measuring, resting time, and visible texture. Those details tell you more than guessing, especially before adding extra flour, liquid, heat, or leavening.
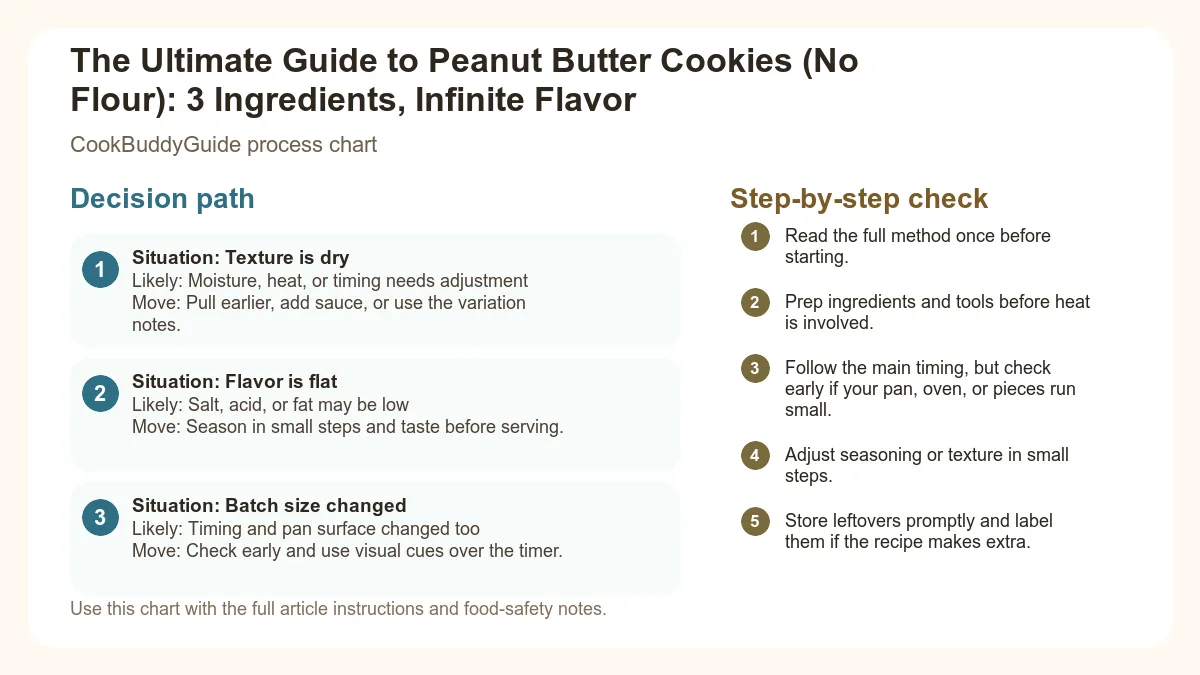
Decision table
| Situation | Likely cause or meaning | Best move |
|---|---|---|
| Texture is dry | Moisture, heat, or timing needs adjustment | Pull earlier, add sauce, or use the variation notes. |
| Flavor is flat | Salt, acid, or fat may be low | Season in small steps and taste before serving. |
| Batch size changed | Timing and pan surface changed too | Check early and use visual cues over the timer. |
Step-by-step fix
- Read the full method once before starting.
- Prep ingredients and tools before heat is involved.
- Follow the main timing, but check early if your pan, oven, or pieces run small.
- Adjust seasoning or texture in small steps.
- Store leftovers promptly and label them if the recipe makes extra.
Common mistakes
- Changing the recipe before trying the base method once.
- Measuring casually when texture depends on ratios.
- Waiting until the end to fix seasoning.
- Ignoring carryover heat or resting time.
Useful next reads
Helpful tools for this guide
- digital kitchen scale
- instant-read thermometer
- rimmed sheet pan
- silicone spatula
Related topic hubs
The Ultimate Guide to Peanut Butter Cookies (No Flour): 3 Ingredients, Infinite Flavor
It’s 8:30 PM on a Tuesday. The kids are finally in bed, the dishwasher is humming in the background, and suddenly, your sweet tooth starts making demands. You head to the pantry, hoping for a hidden bag of chocolate chips or a stray box of brownie mix, only to find the shelves bare of the essentials. No flour. No butter. No baking soda. Before you resign yourself to a sad spoonful of jam, let me introduce you to the absolute holy grail of emergency baking: peanut butter cookies no flour.
In my 15 years of professional recipe testing and home cooking, I have made thousands of cookies. I’ve spent days perfecting 72-hour chilled doughs and sourcing rare single-origin chocolates. But time and again, I return to this specific 3-ingredient wonder. Why? Because it defies the laws of baking physics. It is a recipe that relies on the inherent chemistry of its ingredients rather than the structural crutch of wheat. Whether you are managing a gluten-free household, looking for toddler friendly meal ideas that double as snacks, or simply want a cookie that tastes more like a peanut than a cracker, this guide is for you.
- The Magic of the 3-Ingredient Cookie
- The Science of Flourless Baking
- Choosing the Right Peanut Butter
- The Sweetener Spectrum
- The Master Recipe: Step-by-Step
- The Iconic Crosshatch Technique
- Texture Control: Crispy vs. Chewy
- Gourmet Upgrades and Add-ins
- Troubleshooting Common Mistakes
- Storage and Freezing Tips
Introduction: The Magic of the 3-Ingredient Cookie
Why This Recipe is a Pantry Staple
The beauty of flourless peanut butter cookies lies in their accessibility. Most of us always have a jar of creamy peanut butter, a bag of granulated sugar, and a large egg on hand. This is the "1-1-1" ratio: one cup of peanut butter, one cup of sugar, and one egg. It is a formula so simple that even a child can memorize it, yet it produces a result that rivals high-end bakery offerings. In my testing, I’ve found that this simplicity is actually its greatest strength; without flour to dilute the flavor, the roasted, nutty profile of the peanuts takes center stage.
The History of Flourless Peanut Butter Cookies
While we often associate peanut butter with modern convenience, its culinary history is deeply rooted in American agriculture. George Washington Carver, the famous scientist and inventor, was instrumental in promoting peanuts as a sustainable crop. While he didn't invent peanut butter itself, he published a research bulletin in 1916 titled "How to Grow the Peanut and 105 Ways of Preparing it for Human Consumption," which included several peanut cookie recipes. However, those early versions usually contained flour. The flourless version we love today gained massive popularity during the mid-20th century as a "depression-era" or "ration-friendly" treat, and later became a staple of the gluten-free movement. It is a testament to the versatility of legumes and their ability to provide both fat and protein in a single package.
The Science of Flourless Baking: Why It Works
The Role of Protein and Fat in Structure
When you bake a traditional cookie, flour provides gluten, which acts as the "glue" that holds everything together. In these peanut butter cookies no flour, we are essentially hacking the system. Peanut butter is naturally high in monounsaturated fats and protein. When you mix it with an egg, you are creating a complex protein structure. The egg acts as the primary binder, providing the necessary moisture and proteins that coagulate during the baking process to "set" the cookie dough texture.
According to the 3-ingredient peanut butter cookie ratio, the egg is the unsung hero. It doesn't just hold things together; it also provides emulsification. The lecithin in the egg yolk helps the fats from the peanut butter blend seamlessly with the sugar, preventing the cookies from becoming a greasy mess on your baking sheet.
The Maillard Reaction in Flourless Doughs
You might notice that these cookies brown beautifully despite having no flour. This is due to the Maillard reaction—a chemical reaction between amino acids and reducing sugars that gives browned food its distinctive flavor. Because peanut butter is so high in protein (amino acids) and we are adding a significant amount of sugar, these cookies undergo intense caramelization. This is why they develop that deep, toasted aroma that fills your entire house. Unlike flour-based cookies, which can sometimes taste "dusty" if underbaked, these cookies taste rich and decadent at almost any stage of the baking process.
Ingredient Deep Dive: Choosing the Right Peanut Butter
Commercial vs. Natural Peanut Butter
In my kitchen, I’ve tested this recipe with everything from the cheapest store-brand creamy peanut butter to the most expensive, stone-ground natural peanut butter. The results are vastly different. Commercial brands like Jif or Skippy are "no-stir" because they contain hydrogenated oils and stabilizers. These stabilizers are actually your best friend in flourless baking. They provide a consistent cookie dough texture that holds its shape and doesn't spread excessively.
However, if you prefer the flavor of natural peanut butter (the kind where the oil sits on top), you can still make it work. The key is to stir it extremely well before measuring. If your natural PB is too runny, your cookies will spread into one giant "pancake" on the parchment paper. As noted in this guide on commercial versus natural peanut butter, the added fats in natural varieties can sometimes interfere with the egg's ability to bind the dough, so I recommend adding an extra tablespoon of sugar if using a very oily brand to help soak up that excess moisture.
Creamy vs. Crunchy: Texture Implications
This is purely a matter of personal preference, but it does affect the "mouthfeel." Creamy peanut butter yields a silky, melt-in-your-mouth interior. Crunchy peanut butter adds a delightful contrast, but because the peanuts are legumes that don't melt, they can occasionally cause the cookie to crumble more easily if the dough isn't pressed firmly enough. If you’re a fan of texture, I suggest using creamy PB and adding your own chopped roasted peanuts for more control over the size of the bits.
The Sweetener Spectrum: Beyond White Sugar
Using Brown Sugar for Extra Chew
The standard recipe calls for granulated sugar, which provides a crisp edge and a clean sweetness. However, I often swap half of the white sugar for light brown sugar. Why? Brown sugar contains molasses, which is hygroscopic (it attracts water). This extra moisture results in a much fudgier, chewier center. If you want a cookie that feels almost like a peanut butter truffle, brown sugar is the secret. If you’re looking for more simple kitchen wins, check out our guide on easy five ingredient recipes for more pantry-staple inspiration.
Keto-Friendly Options and Alternative Sweeteners
One of the reasons this recipe is so popular is that it is easily adapted for low-carb diets. To make keto-friendly options, you can substitute the sugar with a granulated erythritol or monk fruit sweetener. In my experience, these sweeteners can sometimes leave a "cooling" sensation on the tongue, so I recommend adding a teaspoon of vanilla extract to round out the flavor. Keep in mind that sugar alcohols don't caramelize the same way real sugar does, so your cookies may stay paler in color even when they are fully cooked.
The Master Flourless Peanut Butter Cookie Recipe
Ingredients:
- 1 cup (250g) Creamy Peanut Butter (commercial brands like Jif/Skippy work best)
- 1 cup (200g) Granulated White Sugar (or 1/2 cup white, 1/2 cup brown)
- 1 Large Egg, room temperature
- Optional: 1 tsp Vanilla Extract and a pinch of Sea Salt
Instructions:
- Preheat and Prep: Position your oven rack in the center and preheat to 350°F (175°C). Line a large baking sheet with parchment paper or a silicone mat. Do not skip this; flourless cookies are sticky!
- The Creaming Step: In a medium bowl, whisk the large egg with the sugar and vanilla until the mixture looks slightly pale and thickened. This ensures the sugar is well-distributed before the heavy peanut butter is added.
- Incorporate PB: Add the creamy peanut butter to the egg mixture. Using a stiff spatula or wooden spoon, stir until the dough is completely smooth. You will notice the dough suddenly "tighten up"—this is the protein structure forming!
- Scoop: Use a small cookie scoop or tablespoon to form 1-inch balls. Place them 2 inches apart on the prepared sheet.
- The Crosshatch: Use a fork to press a 1/2-inch deep crosshatch pattern into each ball, flattening it to about 1/2-inch thickness.
- Bake: Bake for 10-12 minutes. The edges should be just barely golden brown, but the centers will still look soft and slightly "wet."
- Cool: This is the hardest part. Let the cookies rest on the hot baking sheet for 10 minutes before moving them to a cooling rack. They are very fragile when hot!
The Iconic Crosshatch: More Than Just Decoration
Why We Press Peanut Butter Cookies with a Fork
Have you ever wondered why peanut butter cookies always have those little squares on top? It’s not just for aesthetics. Because this dough is so dense and high in fat, it doesn't spread much on its own. If you left them as balls, the outside would burn before the inside ever got warm. Pressing them down ensures even heat distribution. The classic fork crosshatch technique is the industry standard for ensuring these flourless peanut butter cookies bake through to the center.
Tips for the Perfect Pattern
The biggest frustration I hear from home cooks is that the fork sticks to the dough, ruining the pattern. Here is my pro tip: keep a small bowl of extra sugar or water on your workstation. Dip the tines of the fork into the sugar or water before every single press. This creates a non-stick barrier. For a modern look, you can also use a potato masher with a grid pattern or even the bottom of a textured glass to create unique designs.
Texture Control: Achieving Crispy vs. Chewy Results
The Impact of Baking Time and Temperature
I’ve spent a lot of time "over-baking" batches just to see what happens. If you love a crispy, crunchy cookie that you can dunk into a glass of milk, bake these at 350°F for 13-14 minutes. The high sugar content will create a "lace cookie" effect on the edges. However, if you want that classic, fudgy, "Bend-but-don't-break" texture, drop the temperature to 325°F and bake for exactly 10 minutes. The lower heat prevents the sugar from hardening into a glass-like state, keeping the monounsaturated fats in the peanut butter soft and supple.
The Importance of the Cooling Phase
I cannot stress this enough: do not touch these cookies the moment they come out of the oven. Because there is no gluten, the cookies rely entirely on the egg proteins and the cooling sugar to provide structure. When they are hot, they are essentially a liquid-state fat. As they sit on the warm baking sheet, they undergo "carry-over cooking," where the residual heat finishes the center without drying out the edges. After 10 minutes, they will be firm enough to move to a cooling rack, which allows air to circulate and prevents the bottoms from becoming soggy. For more on the science of chewiness, King Arthur Baking has a great deep dive on achieving a chewy cookie texture without flour.
Gourmet Upgrades: Add-ins and Variations
The Chocolate Connection
While the 3-ingredient version is a masterpiece of minimalism, sometimes you need a little something extra. In my testing, I’ve found that adding 1/2 cup of dark chocolate chips (60% cacao or higher) provides a necessary bitterness that cuts through the intense sweetness of the dough. If you add chips, be aware that the dough will be slightly more difficult to press with a fork. I recommend pressing the dough first, then manually poking a few chips into the top.
Adding Texture with Oats and Sea Salt
If you want a "Monster Cookie" vibe without the flour, you can add 1/2 cup of rolled oats to the mixture. This adds a wonderful chew and a boost of fiber. However, my absolute favorite upgrade—and the one that makes people think these are from a high-end bakery—is a generous sprinkle of flaky sea salt (like Maldon) immediately after they come out of the oven. Peanuts are naturally savory, and the salt highlights the roasted notes of the legumes while balancing the sugar. Beyond flavor, peanuts offer significant health benefits of peanuts, including being heart-healthy sources of protein, so adding salt just makes the medicine go down easier!
Troubleshooting Common Mistakes
This is usually caused by one of two things: either you used a "natural" peanut butter that was too dry (the bottom of the jar), or you overbaked them. If the dough feels crumbly before baking, add a teaspoon of water or an extra half-egg (whisk an egg in a bowl and use half) to re-hydrate the cookie dough texture.
This happens when the emulsification breaks. This is common with very oily natural peanut butters. Next time, try chilling the dough for 30 minutes before baking, or stick to a commercial "no-stir" brand which contains stabilizers to prevent this.
Because sugar is a structural component here, you can't simply cut it in half, or the cookies won't set. However, you can reduce it to 3/4 cup and add a tablespoon of cornstarch to help with the binding. Also, using a "no sugar added" peanut butter allows you to control the sweetness more effectively.
In my experience, flax eggs or chia eggs do not work well in this specific flourless recipe. They lack the specific proteins needed to create a strong enough protein structure to hold the heavy fats of the peanut butter. If you must go egg-free, you'll likely need to add a bit of flour or starch to help.
Storage, Freezing, and Make-Ahead Tips
Keeping Cookies Fresh for Days
Flourless cookies have a tendency to absorb moisture from the air, which can make them go from "chewy" to "sticky" overnight. To prevent this, store them in an airtight container with a single piece of white bread. The bread will act as a sacrificial lamb, releasing its moisture to keep the cookies soft without making them wet. These will stay fresh at room temperature for up to 5 days, though they rarely last that long in my house!
Freezing Raw Dough Balls for Instant Cravings
This is my favorite "busy parent" hack. Make a double batch of dough, roll them into balls, and place them on a tray in the freezer for an hour (this is called flash-freezing). Once they are hard, toss them into a freezer bag. When the craving hits, you can bake a single cookie directly from frozen! Just add 2 minutes to the total baking time. You don't even need to thaw them. This ensures you always have a warm, gluten-free treat ready in less than 15 minutes.
Conclusion: The Ultimate Pantry Win
The peanut butter cookies no flour recipe is more than just a convenience; it is a masterclass in how simple ingredients can create complex flavors. By understanding the protein structure of the egg and the monounsaturated fats in the peanut butter, you can manipulate this recipe to be exactly what you want—whether that’s a crispy dunking cookie or a soft, fudgy treat.
Next time you find yourself staring at a half-empty jar of creamy peanut butter and wondering what's for dessert, remember the 1-1-1 ratio. It’s reliable, it’s delicious, and it’s a testament to the fact that you don't need a pantry full of specialized ingredients to create something truly gourmet. Happy baking, and may your crosshatches always be perfect!