Quick Answer
How to Make Bread at Home is built around practical home-kitchen ratios and simple texture checks. Follow the main method first, then use the variation and troubleshooting notes to adjust sweetness, salt, moisture, or cook time.
CookBuddy Kitchen Note
For How to Make Bread at Home, the most useful home checks are temperature, measuring, resting time, and visible texture. Those details tell you more than guessing, especially before adding extra flour, liquid, heat, or leavening.
Decision table
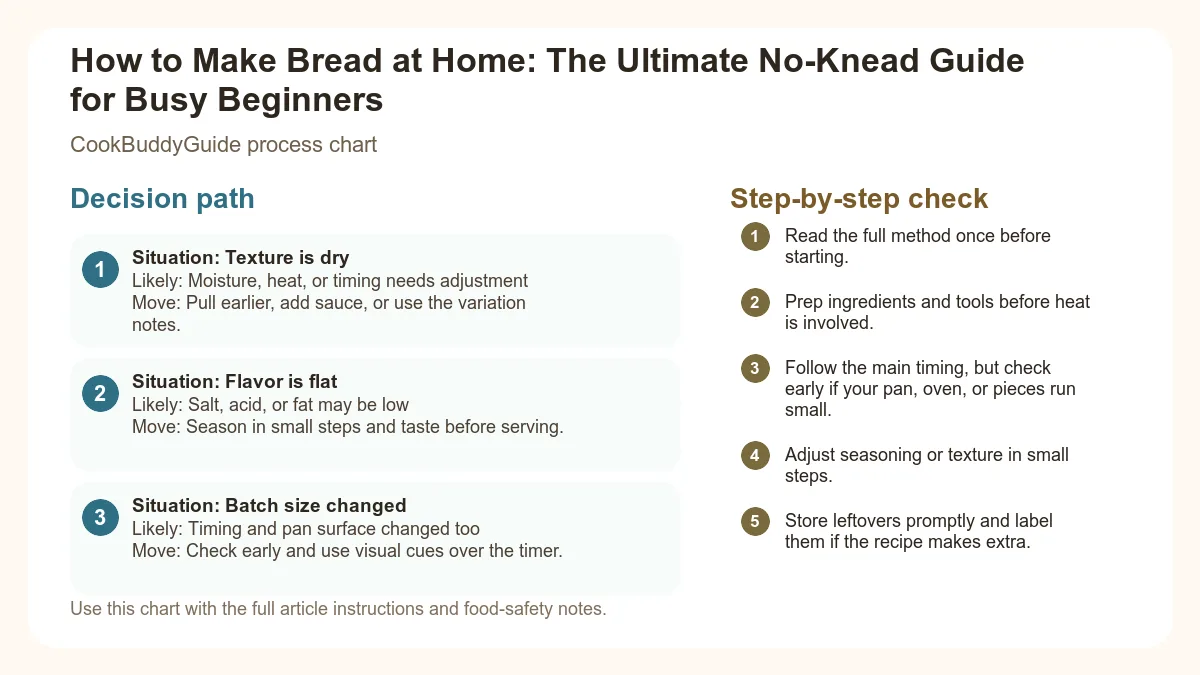
| Situation | Likely cause or meaning | Best move |
|---|---|---|
| Texture is dry | Moisture, heat, or timing needs adjustment | Pull earlier, add sauce, or use the variation notes. |
| Flavor is flat | Salt, acid, or fat may be low | Season in small steps and taste before serving. |
| Batch size changed | Timing and pan surface changed too | Check early and use visual cues over the timer. |
Step-by-step fix
- Read the full method once before starting.
- Prep ingredients and tools before heat is involved.
- Follow the main timing, but check early if your pan, oven, or pieces run small.
- Adjust seasoning or texture in small steps.
- Store leftovers promptly and label them if the recipe makes extra.
Common mistakes
- Changing the recipe before trying the base method once.
- Measuring casually when texture depends on ratios.
- Waiting until the end to fix seasoning.
- Ignoring carryover heat or resting time.
Useful next reads
Helpful tools for this guide
- digital kitchen scale
- instant-read thermometer
- rimmed sheet pan
- silicone spatula
Related topic hubs
How to Make Bread at Home: The Ultimate No-Knead Guide for Busy Beginners
For years, I believed that learning how to make bread at home required the forearm strength of a professional wrestler and the patience of a saint. My early attempts in the kitchen were, quite frankly, embarrassing. I remember one specific Saturday in 2009 when I spent forty-five minutes kneading a wet, sticky ball of dough until my shoulders ached, only to pull a dense, rock-hard disc out of the oven. I almost gave up entirely. But then, I discovered the magic of long-fermentation, and it changed my life. If you are a busy home cook who wants the smell of fresh, artisan bread wafting through your house without the manual labor, this no knead bread recipe guide is for you.
The beauty of the no-knead method lies in its simplicity. By leaning on the science of time rather than physical effort, you can produce a loaf that rivals the best Parisian bakeries. Whether you're looking to pair a fresh loaf with cheap meals under five dollars or you want to elevate your easy five ingredient dinner recipes, mastering this technique is the ultimate kitchen superpower.
Table of Contents
- Why No-Knead is the Best Way to Make Bread at Home
- Essential Ingredients and the Golden Ratios
- Required Equipment: The Dutch Oven Secret
- The Master No-Knead Bread Recipe: Step-by-Step
- Scoring and Baking for Professional Results
- Advanced Adjustments: Crumb and Texture
- Troubleshooting Common Homemade Bread Issues
Why No-Knead is the Best Way to Make Bread at Home
The Science of Time vs. Labor
Traditional bread recipes require kneading to develop a protein network called gluten. When you stir flour and water together, two proteins—glutenin and gliadin—link up. Kneading speeds up this process by physically aligning these proteins. However, as I learned through years of testing, time can do the exact same thing. This is known as the science of no-knead dough.
During a long overnight rise, enzymes in the flour break down starches into sugars, and the yeast activity creates gas bubbles. As these bubbles expand and move through the dough, they gently "knead" the protein strands from the inside out. This slow gluten development not only creates a better structure but also allows for complex flavor molecules to develop, giving your bread that characteristic "tang" and aroma that quick-rise breads lack.
Why Beginners Fail with Traditional Kneading
In my experience, the number one reason beginners fail with traditional bread is "flour creep." Because the dough is sticky, beginners keep adding flour to their work surface. By the time the dough stops sticking, the hydration ratio is completely ruined, resulting in a dry, heavy loaf. The no-knead method eliminates this risk entirely because you don't touch the dough during its most vulnerable, sticky phase. It’s a "set it and forget it" process that fits perfectly into a busy schedule. You mix the dough in five minutes before bed, and it’s ready to shape whenever you have a moment the next day.
Essential Ingredients and the Golden Ratios
Flour Choice: Bread Flour vs. All-Purpose
While you can use all-purpose flour, I strongly recommend using a high-quality bread flour. The primary difference between bread flour vs all-purpose is the protein content. Bread flour typically contains 12-14% protein, whereas all-purpose sits around 10-11%. That extra protein is crucial for creating the strong gluten network needed to trap the gases produced by the yeast. In my side-by-side tests, bread flour consistently produced a taller loaf with a more resilient, crusty bread exterior.
The Role of Hydration: Understanding Water Percentages
In the world of professional baking, we talk about "Baker's Percentages." This means every ingredient is measured as a percentage of the total flour weight. For a beginner-friendly no knead bread recipe, I recommend a 75% hydration level. This means if you have 400g of flour, you use 300g of water. This ratio is the "sweet spot"—it’s wet enough to allow for excellent bulk fermentation and an open crumb, but not so wet that it becomes impossible for a beginner to handle. You can learn more about understanding baker's percentages to customize your future loaves.
Yeast and Salt: The Flavor and Structure Balancers
For this method, instant dry yeast is your best friend. Unlike active dry yeast, it doesn't need to be "bloomed" in warm water; you can mix it directly into the dry ingredients. Don't be tempted to add more yeast to speed things up! A small amount (about 1/4 to 1/2 teaspoon) is all you need for a long rise. Salt is equally vital—not just for flavor, but to regulate yeast activity and strengthen the gluten. Without enough salt, your dough will rise too fast and then collapse, leaving you with a flat, sad loaf.
Required Equipment: The Dutch Oven Secret
Why a Dutch Oven Mimics Professional Steam Ovens
If there is one piece of equipment that transformed my home baking, it’s the Dutch oven. Professional bakeries use steam-injection ovens to keep the surface of the dough moist during the first few minutes of baking. This moisture allows the dough to expand fully (a process called oven spring) before the crust sets. At home, a heavy pot with a tight-fitting lid achieves this by trapping the steam escaping from the dough itself. This is the secret to a thin, crackly crust and a professional-looking loaf. You can read more about the mechanics of baking bread in a Dutch oven to understand why it's so effective.
Budget-Friendly Alternatives and Essential Tools
If you don't own a Dutch oven, a heavy cast iron combo cooker or even a ceramic casserole dish with a lid can work. Beyond the pot, you will need a baking scale. I cannot stress this enough: volume measurements (cups) are notoriously inaccurate for flour. One cup of flour can weigh anywhere from 120g to 160g depending on how tightly it's packed. For consistent results, weigh everything in grams. You'll also want parchment paper to easily drop the dough into the hot pot, and a proofing basket (banneton) if you want that classic spiral pattern on your crust, though a bowl lined with a floured kitchen towel works just as well.
The Master No-Knead Artisan Loaf
This is the reliable, foolproof recipe I have refined over 15 years. It produces a loaf with a shatteringly crisp crust and a soft, airy interior.
Ingredients
- 400g Bread Flour (approx. 3 cups, but use the scale!)
- 300g Room Temperature Water (approx. 1 ¼ cups)
- 8g Sea Salt (approx. 1 ½ tsp)
- 1g Instant Dry Yeast (approx. ¼ tsp)
Instructions
- Mix: In a large bowl, whisk the flour, salt, and yeast. Add the water and stir with a wooden spoon or your hand until no dry flour remains. It will look like a "shaggy mass."
- Bulk Fermentation: Cover the bowl tightly with plastic wrap. Let it sit at room temperature (68°F-72°F) for 12 to 18 hours. The dough is ready when it has doubled in size and the surface is dotted with bubbles.
- Shape: Gently tip the dough onto a lightly floured surface. Fold the edges toward the center to create a round ball. Place it seam-side down on parchment paper or in a floured proofing basket.
- Final Proof: Cover with a towel and let rise for another 1-2 hours. Preheat your Dutch oven in a 450°F oven during this time.
- Score and Bake: Use a sharp blade to make a shallow cut across the top. Carefully lower the dough (on the parchment) into the hot pot. Cover and bake for 30 minutes. Remove the lid and bake for another 15 minutes until deep golden brown.
- Cool: Let the bread cool on a wire rack for at least one hour before slicing.
The Master No-Knead Bread Recipe: Step-by-Step
Step 1: The Rough Shaggy Mass (Mixing)
When you first mix your ingredients, you might be tempted to keep stirring until it looks smooth. Don't. You are looking for a "shaggy mass"—a messy, lumpy ball of dough where all the flour is hydrated but no real structure has formed yet. In my early days, I worried that these lumps would stay in the finished bread. They won't. The long fermentation will dissolve them completely. Just ensure there are no pockets of dry flour at the bottom of the bowl.
Step 2: The Bulk Fermentation (The Long Wait)
This is where the magic happens. Bulk fermentation is the first and longest rise. Ambient temperature is the most significant variable here. If your kitchen is a chilly 65°F, your dough might need the full 18 hours. If you're baking in the heat of summer at 80°F, it might be ready in 8 to 10 hours. Look for visual cues: the dough should be wobbly, significantly increased in volume, and have a slightly sweet, yeasty smell. If it smells like vinegar or has collapsed back down, it has gone too long.
Step 3: Shaping Without Deflating
Shaping no-knead dough requires a gentle touch. You’ve spent 15 hours building up those beautiful air bubbles; don't punch them out! I like to use a "letter fold" technique. Pull the top of the dough down to the middle, the bottom up, and then the sides in. Flip it over so the seams are on the bottom. This creates surface tension on the top of the loaf, which helps it rise upward rather than spreading outward in the oven.
Step 4: The Final Proof
The final proof is the "re-inflation" period. After shaping, the dough needs time to relax and expand again. To know when it's ready, use the "Poke Test." Gently press your finger about half an inch into the dough. If the indentation springs back immediately, it needs more time. If it stays indented and springs back very slowly, it’s perfectly proofed and ready for the oven. You can find a detailed guide on how to tell when dough is proofed for more visual examples.
Scoring and Baking for Professional Results
The Art of the Score: Why We Cut the Dough
Scoring the dough isn't just for aesthetics. When that cold dough hits the 450°F Dutch oven, the yeast goes into a final feeding frenzy, creating a massive burst of gas. If you don't provide a designated "escape hatch" by cutting the surface, the bread will burst at its weakest point, often resulting in an asymmetrical, "blown out" loaf. For the best "ear" (that crispy ridge of crust), hold your blade at a 45-degree angle rather than straight up and down. This allows the crust to peel back beautifully during the Maillard reaction, where sugars and proteins brown to create flavor.
Temperature Control: From Preheating to Cooling
Your oven needs to be screaming hot. I recommend preheating your Dutch oven for at least 45 minutes to an hour. We want the pot to act as a heat sink. When you drop the dough in, the internal temperature of the bread needs to reach approximately 205°F to 210°F to ensure the crumb is fully set.
The hardest part of the entire process is the cooling. I’ve seen so many beginners ruin a perfect loaf by slicing into it while it's still steaming. Inside that hot loaf, the starches are still setting. If you cut it too early, the steam escapes instantly, leaving you with a gummy, sticky interior. Wait at least 60 minutes. Your patience will be rewarded with a much better texture.
Advanced Adjustments: Crumb and Texture
How to Get a Chewier Crust
If you prefer a thicker, more "European-style" chewy crust, you can extend the uncovered baking time. Once you take the lid off the Dutch oven, the direct heat hardens the exterior. You can also try a "cold ferment." After the initial 12-hour rise at room temperature, put the covered bowl in the fridge for another 24 hours. Cold temperatures slow down the yeast but allow the enzymes to continue working, resulting in a deeper color and a much chewier, sourdough-like crust.
Achieving an Airy, Open Crumb (Alveoli)
The "holy grail" for many bakers is the open crumb—those large, irregular holes (alveoli) inside the bread. To achieve this, you need to increase the hydration ratio. Try moving from 75% hydration to 80% (320g water for 400g flour). Be warned: the dough will be much stickier and harder to shape. Use wet hands instead of flour to handle it, as this prevents the dough from sticking to you without adding extra dry ingredients that would close up the crumb.
Adding Flavors: Herbs, Cheese, and Seeds
Once you've mastered the basic loaf, the variations are endless. I love adding 50g of sharp cheddar and a tablespoon of chopped rosemary. The trick is to add these "inclusions" during the initial mixing phase. If you wait until the shaping phase, you'll have to work the dough too much to incorporate them, which can deflate the air bubbles. For seeds like sunflower or pumpkin, try toasting them first to bring out their oils before mixing them in.
Troubleshooting Common Homemade Bread Issues
This is usually a sign of either dead yeast or over-proofing. If the dough didn't bubble during the bulk fermentation, your yeast might be expired. If it rose beautifully but then deflated in the oven, it likely stayed on the counter too long during the final proof and lost its structural integrity.
Dutch ovens get incredibly hot on the bottom. To prevent a burnt base, try placing a room-temperature baking sheet on the rack directly below your Dutch oven. This acts as a heat shield, deflecting the direct intensity of the bottom heating element.
High-hydration dough is naturally sticky. Instead of fighting it with more flour, use a bench scraper and keep your hands slightly damp. Water is a natural non-stick agent for bread dough! Also, ensure you are baking your bread to the correct internal temperature to avoid a gummy center.
A Note on Food Safety
While it’s tempting to taste your creations at every stage, remember that raw flour is a raw agricultural product. Always bake your dough thoroughly and avoid consuming raw dough or batter. You can check the safety of raw flour guidelines for more information on keeping your kitchen safe.
Conclusion: Your Journey to Better Bread Starts Tonight
Learning how to make bread at home is one of the most rewarding skills you can acquire. It turns a few cents worth of flour, water, and salt into something truly nourishing and impressive. Don't be discouraged if your first loaf isn't perfect—even a "failed" loaf of homemade bread usually tastes better than a store-bought one. Start your overnight rise tonight, and by tomorrow afternoon, you'll be tearing into a warm, crusty bread that you made with your own two hands. Happy baking!