Quick Answer
How to Make Banana Bread is built around practical home-kitchen ratios and simple texture checks. Follow the main method first, then use the variation and troubleshooting notes to adjust sweetness, salt, moisture, or cook time.
CookBuddy Kitchen Note
For How to Make Banana Bread, the most useful home checks are temperature, measuring, resting time, and visible texture. Those details tell you more than guessing, especially before adding extra flour, liquid, heat, or leavening.
Decision table
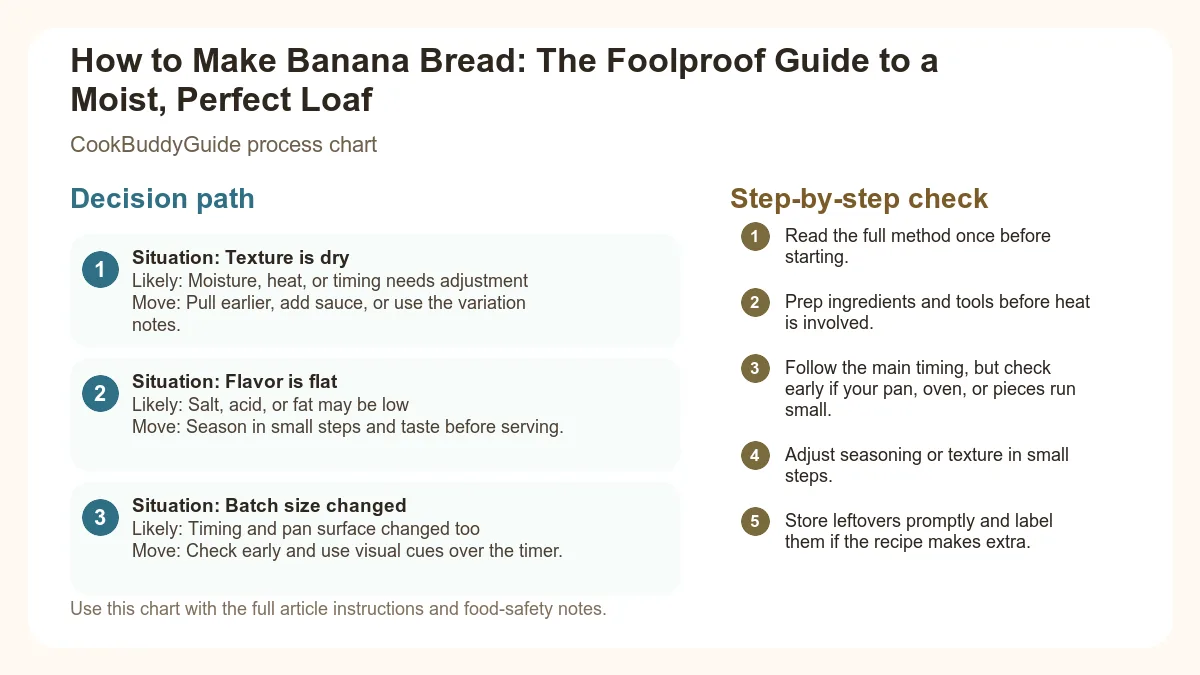
| Situation | Likely cause or meaning | Best move |
|---|---|---|
| Texture is dry | Moisture, heat, or timing needs adjustment | Pull earlier, add sauce, or use the variation notes. |
| Flavor is flat | Salt, acid, or fat may be low | Season in small steps and taste before serving. |
| Batch size changed | Timing and pan surface changed too | Check early and use visual cues over the timer. |
Step-by-step fix
- Read the full method once before starting.
- Prep ingredients and tools before heat is involved.
- Follow the main timing, but check early if your pan, oven, or pieces run small.
- Adjust seasoning or texture in small steps.
- Store leftovers promptly and label them if the recipe makes extra.
Common mistakes
- Changing the recipe before trying the base method once.
- Measuring casually when texture depends on ratios.
- Waiting until the end to fix seasoning.
- Ignoring carryover heat or resting time.
Useful next reads
Helpful tools for this guide
- digital kitchen scale
- instant-read thermometer
- rimmed sheet pan
- silicone spatula
Related topic hubs
How to Make Banana Bread: The Foolproof Guide to a Moist, Perfect Loaf
We’ve all been there: you open the pantry to find a cluster of bananas that have transitioned from vibrant yellow to a depressing, spotted brown. Your first instinct might be to toss them, but in the world of a seasoned home cook, those "ugly" fruits are pure gold. However, knowing how to make banana bread that actually tastes like the bakery version—rather than a dry, flavorless brick—is an art form I’ve spent over 15 years perfecting. After testing dozens of iterations in my own kitchen for CookBuddyGuide.com, I’ve discovered that the difference between a mediocre loaf and a masterpiece lies in the intersection of chemistry and patience.
In my early years of testing, I made every mistake in the book. I used bananas that weren't ripe enough, I over-mixed the batter until it was rubbery, and I pulled loaves out of the oven far too early because the crust looked "done." This guide is the culmination of those failures. We aren't just making a classic banana bread recipe; we are engineering the perfect crumb. Whether you are looking for breakfast meal prep ideas or a comforting snack, this foolproof method will ensure a moist texture and intense flavor every single time.
Table of Contents
- The CookBuddyGuide Philosophy
- The Science of the Banana: Why Ripeness is Non-Negotiable
- Essential Equipment for the Perfect Bake
- The Anatomy of Ingredients: A Deep Dive
- Step-by-Step: How to Make Banana Bread Like a Pro
- The Secret to Texture: Avoiding the Gummy Center
- Baking and Doneness: Beyond the Toothpick Test
- Troubleshooting Common Banana Bread Failures
- Customizing Your Classic Banana Bread Recipe
- Storage and Longevity: Keeping it Moist for Days
Introduction: Why This is the Only Banana Bread Recipe You’ll Ever Need
The CookBuddyGuide Philosophy
At CookBuddyGuide, we believe that recipes should be more than just a list of instructions; they should be a roadmap to success. When I first started writing about food 15 years ago, I realized that most home cooks struggle because recipes don't explain the "why." Why does the temperature of your eggs matter? Why does the type of sugar change the moisture level? In this guide, I’m stripping away the mystery. This recipe has been refined through 20+ test batches to ensure it works in any kitchen, with any oven.
What Makes a "Foolproof" Loaf?
A foolproof loaf must achieve three things: a deeply caramelized, golden-brown crust (thanks to the Maillard reaction), a tender, moist crumb that doesn't fall apart, and an assertive banana flavor that isn't masked by too much flour or spice. We achieve this by balancing the hygroscopic properties of our sweeteners with the structural integrity of all-purpose flour. By the end of this article, you won’t just know how to follow a recipe; you’ll understand the mechanics of quick bread.
The Science of the Banana: Why Ripeness is Non-Negotiable
The Starch-to-Sugar Conversion
The most common reason for bland banana bread is using underripe fruit. As a banana ages, amylase enzymes break down complex starches into simple sugars. This process is vital because it increases the liquid sugar content of the fruit, which directly contributes to a moist texture. Scientific research into the science of banana ripening shows that overripe bananas provide the essential sweetness and moisture required for a high-quality loaf that underripe ones simply cannot match.
How to Spot the Perfect Baking Banana
In my kitchen, the "Blacker is Better" rule is law. You aren't looking for "yellow with a few spots." You are looking for bananas that are soft to the touch, with skins that are at least 50% to 75% black or dark brown. These bananas have reached peak caramelization potential. Furthermore, they are a powerhouse of potassium and antioxidants, as detailed in the nutritional profile of bananas. When the peel is thin and the fruit inside is almost translucent and mushy, you’ve hit the jackpot.
Emergency Ripening Hacks
If you have a craving but your bananas are stubbornly yellow, don't despair. You can mimic the ripening process in the oven. Place unpeeled bananas on a baking sheet and bake at 300°F (150°C) for 15-20 minutes until the skins turn completely black. Let them cool before peeling. Alternatively, place them in a brown paper bag with an apple or a tomato for 24 hours; the concentrated ethylene gas will speed up the process significantly.
Essential Equipment for the Perfect Bake
Choosing the Right Loaf Pan
I have tested this recipe in glass, ceramic, and metal pans. For the most consistent results, a standard 9x5-inch loaf pan made of heavy-gauge aluminized steel is the winner. Metal conducts heat more efficiently than glass, leading to better gluten development on the edges and a more even rise. If you use a glass pan, be aware that it retains heat longer, which can lead to over-browning the exterior before the middle is set. I recommend reducing your oven temperature by 25°F if using glass.
The Importance of a Digital Scale
If there is one piece of advice I can give to elevate your baking, it’s this: stop using measuring cups. A "cup" of flour can vary by as much as 20% depending on how tightly it's packed. For a classic banana bread recipe, consistency is key. Using a digital scale to measure your all-purpose flour ensures that you don't accidentally add too much, which is the number one cause of a dry, crumbly loaf.
Mixing Tools: Whisk vs. Spatula
Leave the electric mixer in the cupboard. High-speed mixing introduces too much air and agitates the proteins in the flour, leading to tough bread. I use a sturdy balloon whisk for the wet ingredients and a flexible silicone spatula for folding in the dry ingredients. This manual approach gives you total control over the batter's consistency.
The Anatomy of Ingredients: A Deep Dive
Flour Choice: All-Purpose vs. Alternatives
While bread flour has more protein and cake flour has less, all-purpose flour sits in the "Goldilocks" zone for quick breads. It provides enough structure to support the heavy banana mash without making the loaf chewy. In my 15+ years of experience, I’ve found that sifting the flour with your baking soda and salt is a small step that yields a much lighter crumb.
The Fat Factor: Butter vs. Oil
This is a debated topic in the baking world. Melted butter provides an incomparable richness and flavor, while oil provides a more consistent moist texture over several days. My "foolproof" secret? I use melted butter for the flavor, but I ensure the bananas are extremely overripe to provide the necessary moisture. The fat also helps coat the flour particles, inhibiting excessive gluten formation.
Sweeteners: Why Brown Sugar Wins
I always use a combination of granulated sugar and brown sugar. Brown sugar contains molasses, which is hygroscopic—meaning it attracts and holds onto water molecules. This is the secret to a loaf that stays moist for four or five days. It also contributes to a deeper color and a subtle caramel note that complements the bananas perfectly.
Leavening Agents: Baking Soda vs. Powder
Most banana bread recipes rely on baking soda. Because bananas are slightly acidic, they react with the soda to create carbon dioxide bubbles, causing the bread to rise. However, if your bananas aren't ripe enough, there might not be enough acid to trigger the reaction. This is why I sometimes add a pinch of baking powder as "insurance" for a reliable lift.
Step-by-Step: How to Make Banana Bread Like a Pro
The Ultimate Foolproof Banana Bread
Yields: 1 Loaf (9x5 inch)
Ingredients:
- 2 cups (250g) all-purpose flour
- 1 tsp baking soda
- 1/2 tsp salt
- 1/2 cup (115g) melted butter (unsalted), slightly cooled
- 3/4 cup (150g) brown sugar, packed
- 1/4 cup (50g) granulated sugar
- 2 large room temperature eggs, lightly beaten
- 1 tsp vanilla extract
- 2 cups (approx. 450g) mashed overripe bananas (about 3-4 large)
Instructions:
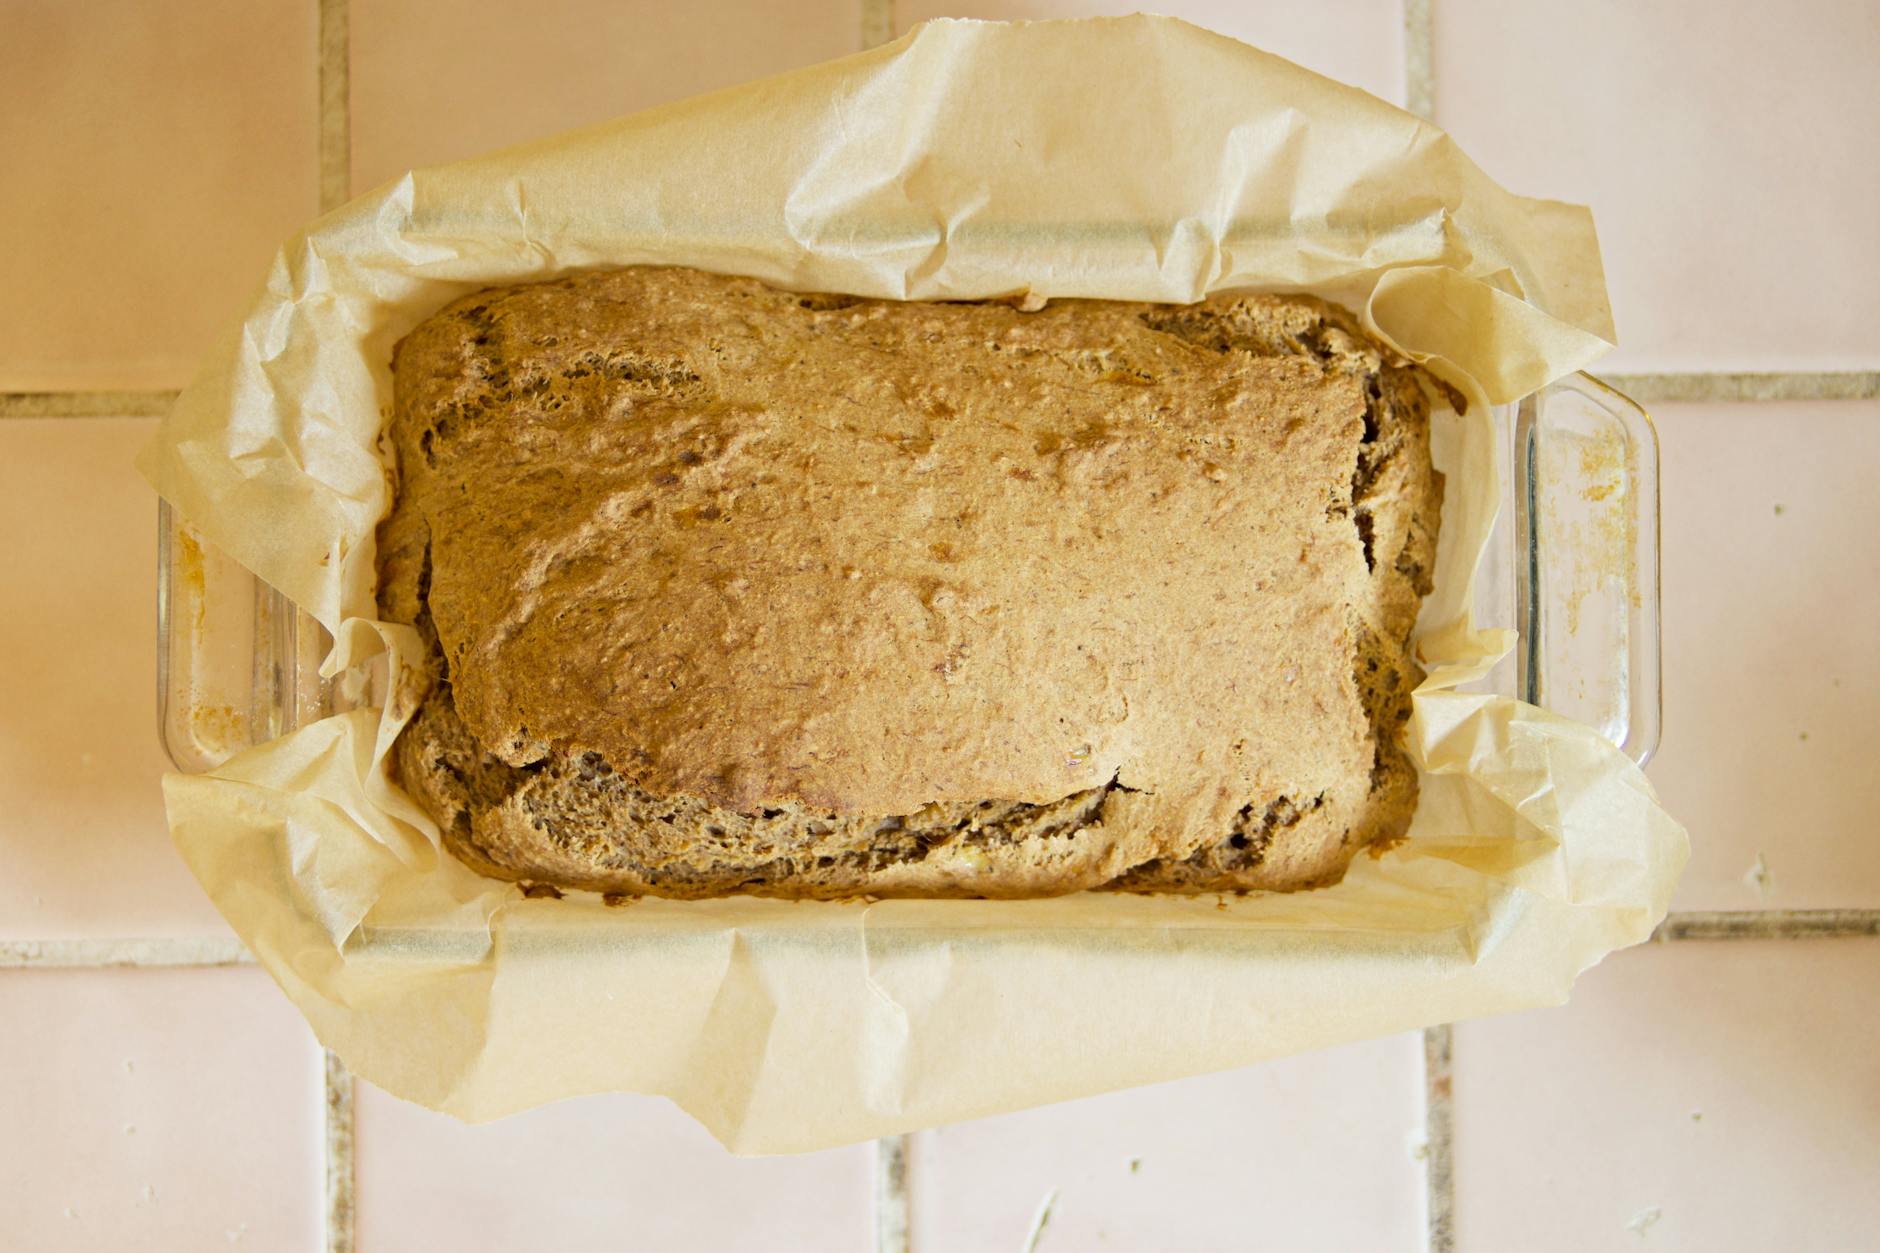
- Preheat and Prep: Preheat your oven to 350°F (175°C). Grease your loaf pan with butter or non-stick spray, and line the bottom with parchment paper for easy removal.
- The Mashing Technique: In a medium bowl, mash the bananas with a fork or potato masher. I recommend leaving some small chunks (about the size of a pea) to create pockets of moisture and flavor in the finished loaf.
- Creaming the Wet Ingredients: In a large bowl, whisk together the melted butter and both sugars until well combined. Add the room temperature eggs and vanilla extract, whisking until the mixture is smooth and slightly pale. Stir in the mashed bananas.
- Sifting the Dry Ingredients: In a separate bowl, whisk together the flour, baking soda, and salt. This ensures the leavening agents are evenly distributed.
- The Gentle Fold: Pour the dry ingredients into the wet ingredients. Using a spatula, fold the mixture gently. Stop the moment you no longer see streaks of dry flour. Remember: over-mixing is the enemy of a tender loaf!
- Bake: Pour the batter into the prepared pan. Bake for 60 to 65 minutes.
Step 1: The Mashing Technique
In my testing, I found that pureeing bananas in a blender makes the bread too dense. You want the texture of a hand-mash. The varying sizes of the banana pieces ensure that the moisture is released at different stages of the bake, keeping the crumb hydrated throughout.
Step 2: Creaming the Wet Ingredients
While we aren't "creaming" in the traditional sense (since the butter is melted), the goal is to emulsify the fats and sugars. Using eggs at room temperature is critical here. If you use cold eggs, they will cause the melted butter to seize and clump, resulting in an uneven batter. If you're in a rush, place cold eggs in a bowl of warm water for 5 minutes.
Step 3: Sifting the Dry Ingredients
Don't skip the salt! Salt doesn't just make things salty; it enhances the sweetness of the bananas and the richness of the butter. Sifting also breaks up any clumps in the baking soda, preventing those bitter, soapy-tasting spots that can occur if the leavener isn't distributed well.
Step 4: The Gentle Fold
This is where most people fail when learning how to make banana bread. You must use a "Wet into Dry" or "Dry into Wet" method with extreme care. Every stroke of the spatula develops gluten. For a classic banana bread recipe, we want minimal gluten development. I usually count my strokes—if I’m over 20, I know I’m pushing it. For more on this, check out this guide on how to avoid over-mixing the batter.
The Secret to Texture: Avoiding the Gummy Center
The Danger of Over-Mixing
When you over-mix, you create a strong web of gluten that traps air too efficiently at first, causing the bread to rise rapidly and then collapse. This collapse creates a dense, gummy layer, usually near the bottom or center of the loaf. Visual cue: stop mixing when the last streak of flour disappears. The batter should look lumpy and thick, not smooth like cake batter.
Temperature Accuracy and Oven Calibration
I once spent an entire week wondering why my loaves were raw in the middle, only to realize my oven was running 25 degrees cold. Invest in an oven thermometer. Most home ovens are notoriously inaccurate. If your oven is too hot, the outside will undergo the Maillard reaction and harden before the inside has had a chance to rise, leading to a "volcano" crack and a raw center.
The Role of Room Temperature Ingredients
As mentioned, room temperature eggs are vital. But so is the temperature of your banana mash. If you’ve been storing overripe bananas in the fridge or freezer, let them come to room temperature before adding them to the batter. Cold ingredients inhibit the chemical reaction of the leavening agents, leading to a heavy, leaden loaf.
Baking and Doneness: Beyond the Toothpick Test
The Visual Cues of a Done Loaf
A perfectly baked banana bread should have a deep golden-brown color and a prominent crack down the center. The edges should be beginning to pull away from the sides of the loaf pan. If the top is browning too quickly, you can loosely "tent" the pan with aluminum foil after the 45-minute mark.
The Internal Temperature Target
The toothpick test is classic, but it can be misleading. Sometimes the toothpick hits a piece of moist banana and comes out wet, even if the bread is done. Or it comes out clean from the top while the bottom is still gooey. For 100% accuracy, use an instant-read thermometer. You are aiming for an internal temperature for doneness between 200°F and 205°F (93°C-96°C). This ensures the starches are fully set.
The Carryover Cooking Effect
Do not cut into the bread immediately! This is the hardest part of the process. The bread continues to cook from residual heat once it's out of the oven. Let it sit in the pan on a cooling rack for exactly 10 minutes. This allows the structure to firm up. If you remove it too soon, the loaf may collapse or break.
Troubleshooting Common Banana Bread Failures
This usually happens for two reasons: under-baking or expired baking soda. If the internal structure hasn't set, the air bubbles will pop and the loaf will cave. Always check the expiration date on your leaveners; baking soda loses its potency after about 6 months to a year.
Your oven is likely too hot. Use an oven thermometer to verify the temperature. If this happens mid-bake, use the foil tenting trick mentioned earlier to protect the crust while the center finishes.
You likely used too much flour or over-baked the loaf. Remember to measure flour by weight (250g) and start checking for doneness 5-10 minutes before the recipe suggests.
Customizing Your Classic Banana Bread Recipe
The Best Mix-ins: Nuts, Chocolate, and Fruit
While a plain loaf is a thing of beauty, mix-ins add texture. If adding walnuts or pecans, toast them in a dry pan for 3-5 minutes first to unlock their oils. For chocolate chips, I recommend dark chocolate (60% cacao or higher) to balance the sweetness of the bananas. If you're looking for cheap meals under five dollars, adding a handful of raisins or sunflower seeds is a cost-effective way to bulk up the nutritional value.
Spicing it Up: Beyond Cinnamon
Cinnamon is the standard, but I love adding 1/4 teaspoon of ground cardamom or a grating of fresh nutmeg. These spices highlight the floral notes of the banana. A teaspoon of espresso powder can also deepen the chocolate flavor if you're using chips.
Making it Vegan or Gluten-Free
To make this vegan, replace the eggs with "flax eggs" (1 tbsp ground flaxseed + 3 tbsp water per egg) and use melted coconut oil instead of butter. For a gluten-free version, a high-quality 1-to-1 gluten-free flour blend works remarkably well because the banana mash provides so much moisture and structure.
Storage and Longevity: Keeping it Moist for Days
The Countertop Method
Banana bread is actually better on day two. As it sits, the moisture from the bananas redistributes, and the flavors meld. Store it in an airtight container or wrap it tightly in plastic wrap at room temperature. According to official guidelines on storing banana bread safely, it will stay fresh for about 3 to 4 days on the counter.
How to Freeze Banana Bread Properly
Banana bread freezes beautifully. I recommend slicing the loaf first, then freezing the slices on a baking sheet before transferring them to a zip-top bag. This allows you to grab a single slice for a quick breakfast. It will keep in the freezer for up to 3 months.
The Best Way to Reheat
While the microwave works in a pinch (15-20 seconds), the "Butter Toasted" method is superior. Heat a small pat of butter in a skillet over medium heat and toast the slice for 1-2 minutes per side. This creates a crispy, caramelized exterior that contrasts perfectly with the moist texture of the interior.
Conclusion: Your Journey to the Perfect Loaf Starts Now
Learning how to make banana bread is a rite of passage for every home cook. It’s a recipe that rewards patience, observation, and the willingness to embrace those blackened bananas at the bottom of the fruit bowl. By following this classic banana bread recipe and paying attention to the science—from the hygroscopic nature of brown sugar to the precision of internal temperatures—you are guaranteed a loaf that will be the star of your kitchen.
I’ve spent 15 years refining these steps so that you don't have to experience the "gummy center" or the "dry crumb" ever again. Now, go preheat your oven, grab those spotted bananas, and start baking. Your house is about to smell incredible.