Quick Answer
Easy Roasted Vegetables is built around practical home-kitchen ratios and simple texture checks. Follow the main method first, then use the variation and troubleshooting notes to adjust sweetness, salt, moisture, or cook time.
CookBuddy Kitchen Note
For Easy Roasted Vegetables, this guide centers on Bare Metal, Parchment Paper, Silicone Mats (Silpat). Those are the checkpoints we would use first in a normal home kitchen before making a bigger change.
Decision table
| Situation | Likely cause or meaning | Best move |
|---|---|---|
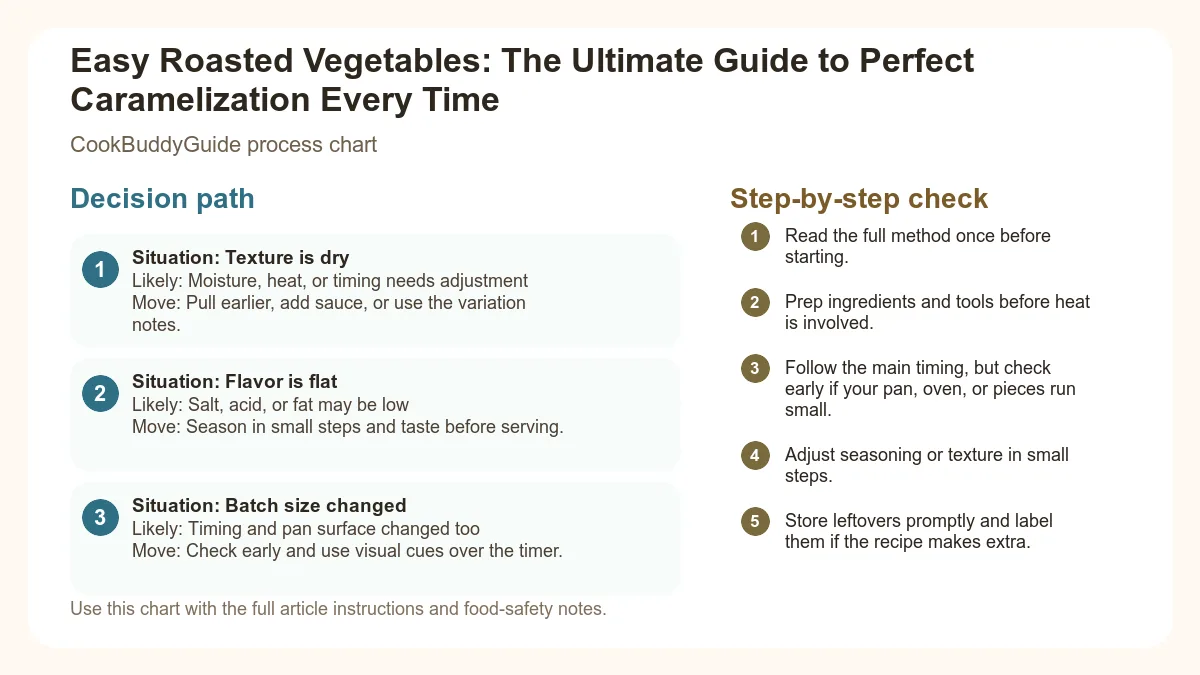
| Texture is dry | Moisture, heat, or timing needs adjustment | Pull earlier, add sauce, or use the variation notes. |
| Flavor is flat | Salt, acid, or fat may be low | Season in small steps and taste before serving. |
| Batch size changed | Timing and pan surface changed too | Check early and use visual cues over the timer. |
Step-by-step fix
- Read the full method once before starting.
- Prep ingredients and tools before heat is involved.
- Follow the main timing, but check early if your pan, oven, or pieces run small.
- Adjust seasoning or texture in small steps.
- Store leftovers promptly and label them if the recipe makes extra.
Common mistakes
- Changing the recipe before trying the base method once.
- Measuring casually when texture depends on ratios.
- Waiting until the end to fix seasoning.
- Ignoring carryover heat or resting time.
Useful next reads
Helpful tools for this guide
- instant-read thermometer
- digital kitchen scale
- cutting board
- airtight storage containers
Related topic hubs
Easy Roasted Vegetables: The Ultimate Guide to Perfect Caramelization Every Time
You’ve been there: it’s 6:15 PM on a Tuesday, you’re tired, and you’ve got a crisper drawer full of produce that’s seen better days. You chop them up, toss them in the oven, and hope for the best. But thirty minutes later, you’re met with a tray of sad, grey, steaming mush instead of those golden, crispy-edged delights you see in magazines. After 15 years of testing thousands of recipes in my own kitchen for CookBuddyGuide.com, I can tell you that making easy roasted vegetables isn't just about heat—it’s about the physics of moisture and the chemistry of flavor. In this comprehensive oven roasted vegetables guide, I’m going to share the professional secrets I’ve learned to ensure you never serve a soggy sprout again.
Table of Contents
- Why Roasting is the Ultimate Kitchen Superpower
- Essential Equipment for Success
- The Golden Rules of Prep
- The Master Ratio: Oil and Seasoning
- The Temperature Matrix: Timing by Vegetable Type
- The Cardinal Sin: Overcrowding the Pan
- Achieving Perfect Caramelization
- 5 Signature Seasoning Combinations
- Meal Prep Mastery
- Troubleshooting Common Mistakes
Why Roasting is the Ultimate Kitchen Superpower
The Science of the Maillard Reaction
When we talk about the deep, savory "umami" flavor of a perfectly roasted carrot or the nutty sweetness of a charred floret of broccoli, we are talking about the Maillard reaction. This is a chemical reaction between amino acids and reducing sugars that gives browned food its distinctive flavor. Unlike boiling, which caps your cooking temperature at 212°F (100°C), roasting utilizes high heat—usually 400°F and above—to trigger this reaction. According to the science of roasting vegetables, this process transforms simple starches into complex aromatic compounds that our brains are hardwired to crave.
In my testing, I’ve found that the 400°F threshold is the "magic line." Anything below that, and you’re mostly baking the vegetables, which dries them out without creating that sought-after crust. When you hit that high heat, the natural sugars caramelize, creating a natural sweetness that balances the earthy notes of the produce.
Why Roasting Beats Steaming or Boiling
If you have picky eaters or children who refuse to touch "green things," roasting is your secret weapon. Steaming and boiling often highlight the sulfurous compounds in vegetables like Brussels sprouts or cabbage, which can result in a bitter, unpleasant taste. Roasting, however, mellows these flavors. The crispy edges provide a textural contrast that mimics the satisfaction of fried foods but remains a staple of healthy side dishes. I discovered that even my most vegetable-averse friends would devour a whole tray of roasted cauliflower simply because the texture was more like popcorn than a vegetable.
Essential Equipment for Success
The Best Sheet Pans for Even Heat
Your choice of sheet pan is the most underrated factor in roasting success. I’ve tested everything from thin, dollar-store tins to heavy cast iron. The gold standard for any home cook is a heavy-gauge aluminum rimmed baking sheet, specifically the "half-sheet" size (roughly 13x18 inches). These pans conduct heat incredibly evenly, which prevents the dreaded "half-burnt, half-raw" tray. In my kitchen, I swear by Nordic Ware or similar commercial-grade brands.
If you use a convection oven, you have a distinct advantage. The fan circulates hot air more efficiently, which helps strip away surface moisture even faster. If you’re using convection, I recommend dropping the temperature by 25°F from the standard recipe to prevent burning the outsides before the insides are tender.
Parchment Paper vs. Silicone Mats vs. Bare Metal
This is a debate I see constantly on cooking forums. Here is my professional take after years of side-by-side testing:
- Bare Metal: Provides the absolute best browning. The direct contact between the vegetable and the aluminum creates the most intense sear. However, cleanup is a nightmare.
- Parchment Paper: The best middle ground. It allows for excellent caramelization while ensuring nothing sticks to the pan. It’s my daily go-to for easy roasted vegetables.
- Silicone Mats (Silpat): Avoid these for roasting. Silicone is an insulator; it actually prevents the bottom of the vegetable from getting hot enough to brown properly. You’ll end up with soft, pale bottoms.
The Golden Rules of Prep
Uniform Cutting for Even Cooking
The biggest mistake I see home cooks make is "rustic" chopping. If you have some 2-inch chunks of potato mixed with 1/2-inch slivers, the small pieces will turn to carbon before the large ones are fork-tender. Vegetable prep should be precise:
- Root vegetables: Aim for 1-inch cubes.
- Brussels sprouts: Halve them through the root to keep them intact.
- Broccoli/Cauliflower: Cut into bite-sized florets, but keep a flat side for maximum pan contact.
- Carrots: Slice on a bias (diagonal) to increase the surface area for browning.
The Importance of Drying Your Vegetables
Moisture is the mortal enemy of the roast. If your vegetables are wet from being washed, that water will turn into steam the moment it hits the hot oven. This "steam effect" will cook the vegetable from the inside out, making it mushy before it ever has a chance to crisp. I always wash my veggies at least 30 minutes before I plan to roast them and pat them dry with a clean kitchen towel or paper towels. If you’re in a rush, a salad spinner is a fantastic tool for drying more than just lettuce—I use it for broccoli and sliced zucchini too.
The Master Ratio: Oil and Seasoning
How Much Oil Do You Actually Need?
You need enough oil to coat every surface of the vegetable, but not so much that they’re sitting in a puddle. A light sheen is what we’re going for. The Master Ratio: 1 to 2 tablespoons of oil per 1 pound (approx. 450g) of vegetables. In my 15+ years of experience, I’ve found that tossing the vegetables in a large bowl with the oil before putting them on the pan is far superior to drizzling the oil over them once they're already on the tray. This ensures 100% coverage.
For high-heat roasting, you need an oil with a high smoke point. Olive oil (specifically refined or "pure" olive oil, not necessarily your most expensive extra virgin) is great up to 400°F. For the 425°F+ range, I recommend Avocado oil or Grapeseed oil. These oils won't break down or create "off" flavors at high temperatures.
Salt: The Flavor Multiplier
Don’t be shy with the salt. Salt doesn't just add flavor; it helps draw out internal moisture, allowing the surface to crisp up more effectively. I prefer using Kosher salt because the larger grains are easier to pinch and distribute evenly. According to the step-by-step guide to roasting, seasoning should happen immediately after oiling to ensure the salt adheres to the surface.
The Temperature Matrix: Timing by Vegetable Type
Not all vegetables are created equal. Some can stand the heat of a 450°F oven for 40 minutes, while others will vanish into a puff of smoke in ten. Here is my tried-and-true timing matrix for a standard 425°F (220°C) oven.
The Roasting Time Guide (at 425°F)
- Root Vegetables (Potatoes, Carrots, Beets, Parsnips): 35–45 minutes. These are dense and need time for the internal temperature to reach a point where the starches soften.
- Cruciferous Vegetables (Broccoli, Cauliflower, Brussels Sprouts): 20–25 minutes. You want the tips of the florets to be dark brown, almost charred.
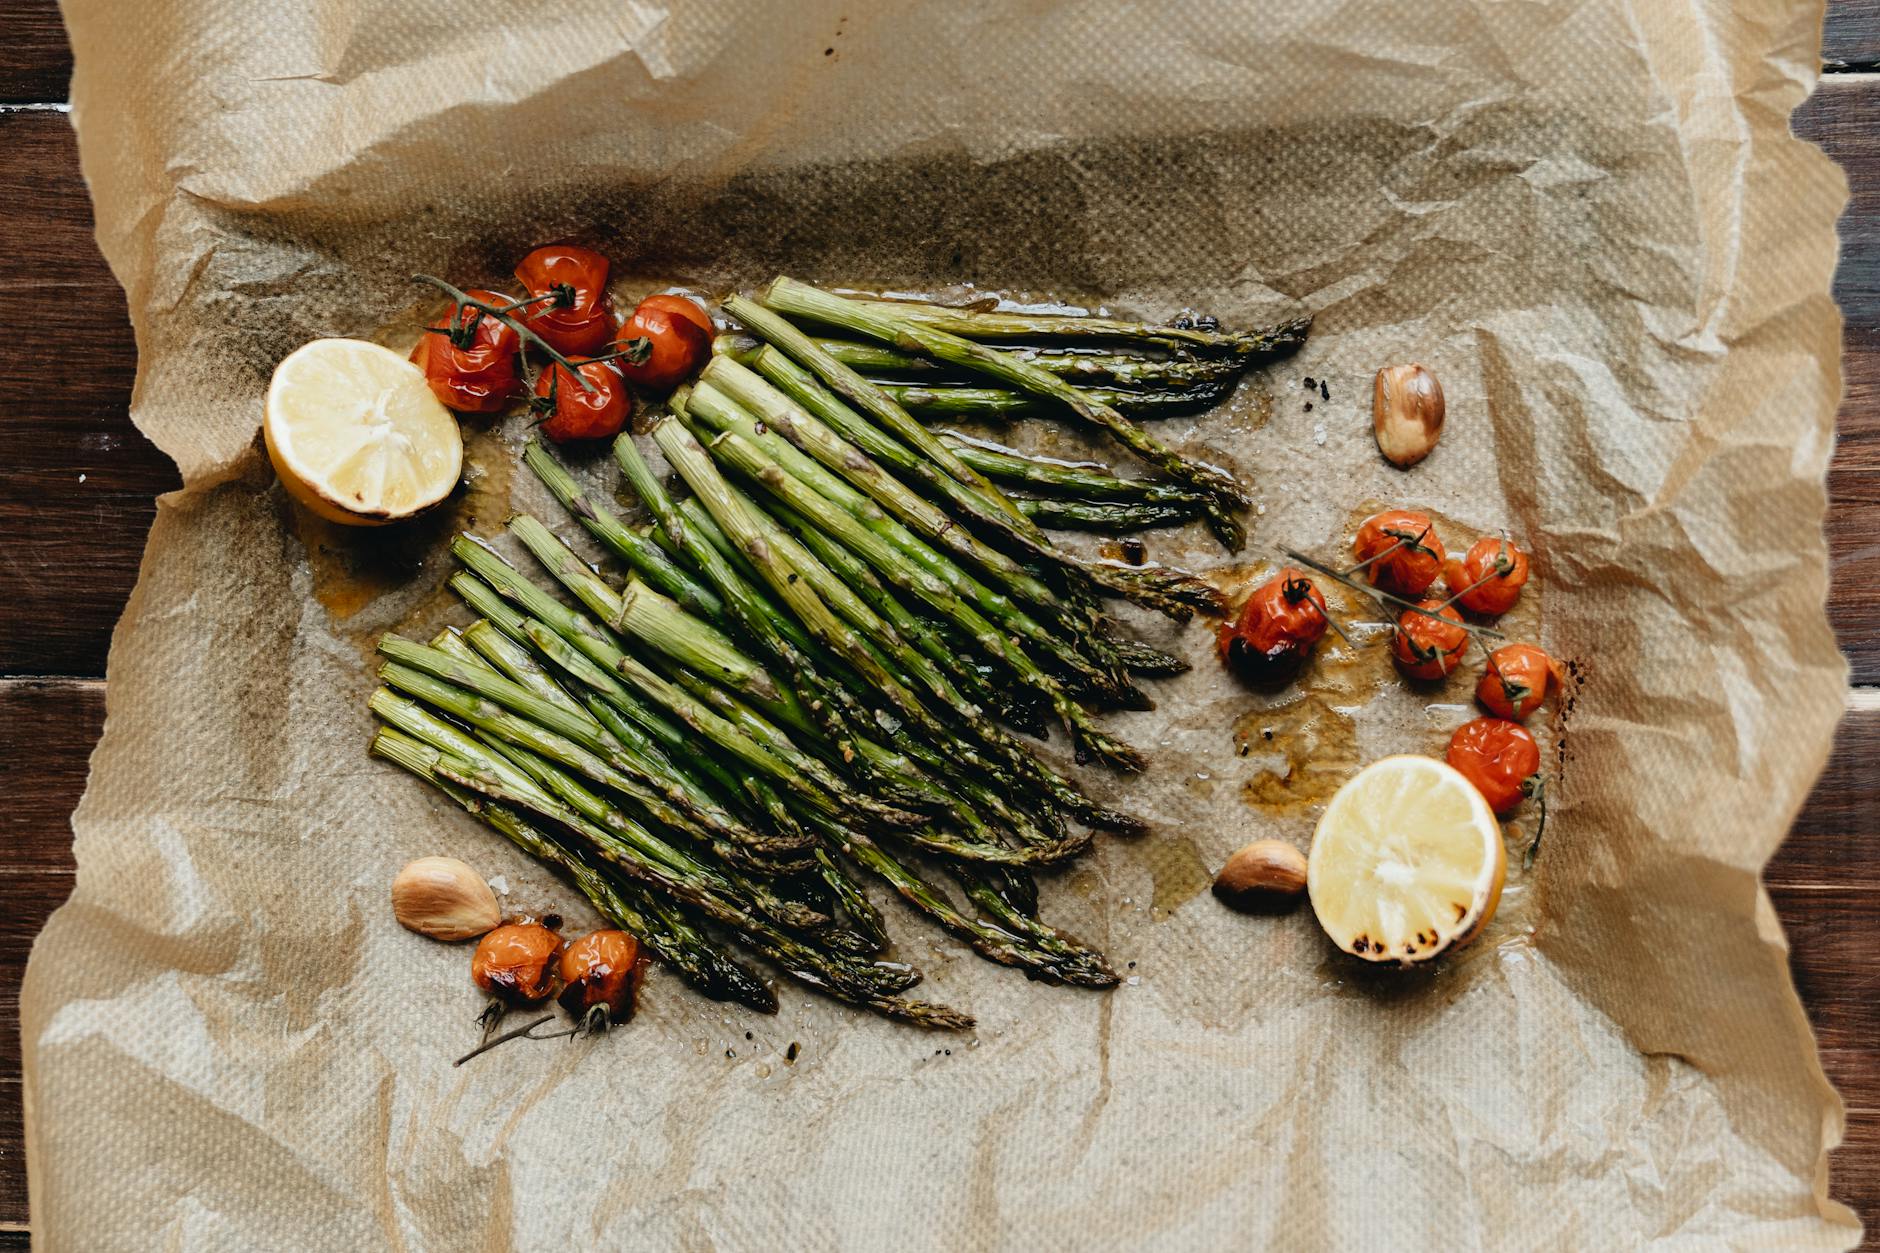
- Soft & Delicate Vegetables (Zucchini, Bell Peppers, Asparagus): 10–15 minutes. These have high water content and can go from perfect to mushy very quickly.
- Leafy Greens (Kale, Swiss Chard): 5–8 minutes. These turn into "chips" almost instantly. Watch them like a hawk!
If you’re looking to combine these into a full meal, check out our guide on simple sheet pan dinners. The key is to start the root vegetables first and add the quicker-cooking items to the pan later.
The Cardinal Sin: Overcrowding the Pan
Why Airflow Matters
If there is one thing you take away from this oven roasted vegetables guide, let it be this: Do not overcrowd the pan. When vegetables roast, they release steam. If they are packed tightly together or overlapping, that steam gets trapped between the pieces. Instead of roasting, they end up steaming each other. This is the primary reason for "soggy" roasted vegetables.
The "One-Inch Rule" for Spacing
I always aim for at least one inch of space between each piece of vegetable. If I have more vegetables than will fit on one pan with that spacing, I use two pans. Pro Tip: If you are using two pans at once, place them on the upper-middle and lower-middle racks and swap their positions halfway through the cooking time. This ensures that the pan on the bottom doesn't get too much direct heat from the heating element while the top pan gets all the browning from the rising heat.
Achieving Perfect Caramelization
When to Flip (and When to Leave Them Alone)
Patience is a virtue in roasting. I’ve found that many home cooks flip their vegetables too early. You want to wait until the underside has developed a deep, golden-brown crust. This usually happens about 60-70% of the way through the total cook time. I call this the "sear and release" method. If you try to flip a potato and it’s sticking to the parchment paper or the pan, it’s not ready. When the caramelization is complete, the vegetable will naturally "release" from the surface. If you force it, you’ll leave that delicious crispy skin stuck to the pan.
The Middle vs. Bottom Rack Debate
In my testing, I’ve discovered that for extra-starchy vegetables like potatoes or squash, starting the pan on the very bottom rack of the oven for the first 15 minutes can produce an incredible crust. The bottom of the oven is usually the hottest part. After that initial sear, move them to the middle rack to finish cooking through without burning the bottoms. This is a pro move that separates "good" roasted veggies from "restaurant-quality" ones.
5 Signature Seasoning Combinations
While salt and pepper are great, these five blends are what I use when I want to elevate a meal. Remember: add dried spices before roasting, but save fresh herbs and balsamic glaze for after they come out of the oven to prevent them from burning.
1. The Classic Mediterranean
Best for: Zucchini, Peppers, Onions
- 1 tsp dried oregano
- 1/2 tsp garlic powder
- A pinch of red pepper flakes
- Finish with: A squeeze of fresh lemon juice
2. Zesty Lemon-Garlic-Parmesan
Best for: Broccoli, Asparagus
- 2 cloves minced garlic (add in the last 10 mins to prevent burning)
- 1/4 cup grated Parmesan cheese (add in the last 5 mins)
- Lemon zest (added after roasting)
3. Smoky Maple-Chipotle
Best for: Sweet Potatoes, Carrots
- 1 tbsp maple syrup
- 1/2 tsp smoked paprika
- 1/4 tsp chipotle powder
4. Everything Bagel Blend
Best for: Cauliflower, Brussels Sprouts
- 2 tbsp "Everything Bagel" seasoning
- Ensure you use a bit extra oil so the seeds stick to the vegetables!
5. Balsamic & Rosemary
Best for: Beets, Red Potatoes, Mushrooms
- 1 tbsp chopped fresh rosemary
- 2 tbsp balsamic glaze (drizzled over the hot veggies after they leave the oven)
Meal Prep Mastery: Using Roasted Veggies All Week
One of the reasons I love easy roasted vegetables is that they are the ultimate meal prep ideas. I often roast three or four pans on a Sunday evening to use throughout the week. Not only is this a great way to hit your health benefits of vegetables targets, but it also saves massive amounts of time on busy weeknights.
Storage Tips to Prevent Sogginess
The biggest hurdle with meal prepping roasted vegetables is that they tend to get soft in the fridge. To minimize this:
- Cool completely: Never put hot vegetables into a sealed container. The residual heat will create condensation, which leads to soggy veggies. Let them sit on the counter for at least 30 minutes.
- Use glass: Glass containers tend to keep roasted vegetables crisper than plastic.
- Reheating: Avoid the microwave if possible. A quick 5-minute toss in a dry skillet or a 400°F toaster oven will bring back a lot of that original texture.
Creative Ways to Repurpose Leftovers
Don't just eat them as a side dish! Here is how I use them in my house:
- Grain Bowls: Toss roasted sweet potatoes and kale with quinoa and a tahini dressing.
- Omelets/Frittatas: Fold roasted peppers and onions into your morning eggs.
- Pasta: Toss roasted broccoli and garlic with penne, olive oil, and extra Parmesan.
- Blended Soups: If they finally do get too soft, throw them in a blender with some vegetable broth for an instant "roasted" soup.
Troubleshooting Common Roasting Mistakes
Your oven temperature is too high for the size of the vegetable. This often happens with large chunks of potatoes or whole carrots. Lower the temperature to 400°F and cut the vegetables into smaller, more uniform pieces. Also, ensure you aren't using a dark-colored non-stick pan, which can absorb too much heat and burn the bottoms.
This is almost always due to overcrowding or not drying the vegetables properly before roasting. Refer back to the "One-Inch Rule." Additionally, check your oil ratio—too much oil can essentially "confit" the vegetable rather than roasting it, leading to a soft texture.
You likely didn't use enough oil, or your oven temperature was too low (below 375°F). Without enough oil to conduct heat and protect the surface, the moisture inside the vegetable evaporates before the outside can brown, leading to a "leathery" texture.
For more foundational tips, I highly recommend checking out how to roast any vegetable, which provides excellent baseline charts for beginners.
Conclusion: Your Path to Roasting Perfection
Mastering easy roasted vegetables is one of the most valuable skills you can develop as a home cook. It takes the "chore" out of eating healthy and turns simple ingredients into something truly spectacular. Remember the core pillars: high heat (425°F is your friend), plenty of space on the pan, and the right oil-to-vegetable ratio. In my 15 years of cooking, I’ve found that the most successful meals aren't the most complicated ones—they’re the ones where simple ingredients are treated with the right techniques. Grab a sheet pan, preheat your oven, and start experimenting with those crispy edges today. Your dinner table will thank you!