Quick Answer
The Ultimate Chili Without Beans is built around practical home-kitchen ratios and simple texture checks. Follow the main method first, then use the variation and troubleshooting notes to adjust sweetness, salt, moisture, or cook time.
CookBuddy Kitchen Note
For The Ultimate Chili Without Beans, this guide centers on Ancho chiles, Guajillo chiles, Pasilla chiles. Those are the checkpoints we would use first in a normal home kitchen before making a bigger change.
Decision table
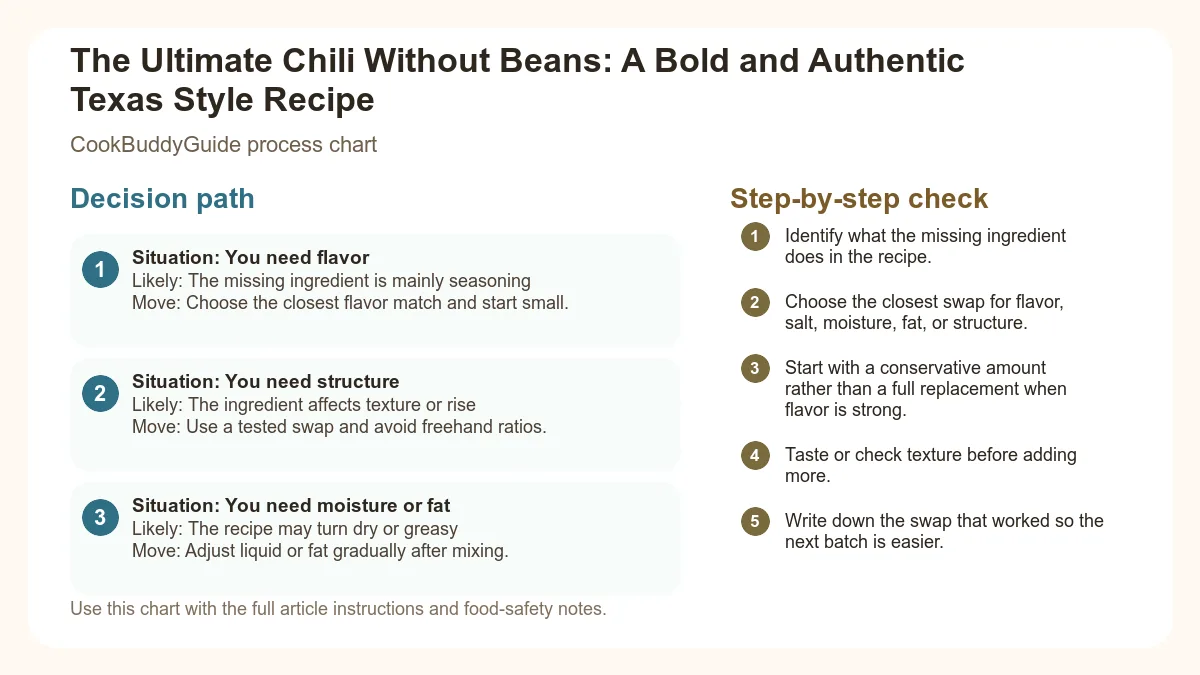
| Situation | Likely cause or meaning | Best move |
|---|---|---|
| You need flavor | The missing ingredient is mainly seasoning | Choose the closest flavor match and start small. |
| You need structure | The ingredient affects texture or rise | Use a tested swap and avoid freehand ratios. |
| You need moisture or fat | The recipe may turn dry or greasy | Adjust liquid or fat gradually after mixing. |
Step-by-step fix
- Identify what the missing ingredient does in the recipe.
- Choose the closest swap for flavor, salt, moisture, fat, or structure.
- Start with a conservative amount rather than a full replacement when flavor is strong.
- Taste or check texture before adding more.
- Write down the swap that worked so the next batch is easier.
Common mistakes
- Replacing a strong ingredient 1:1 before tasting.
- Choosing a flavor match when the recipe actually needs structure.
- Forgetting that salty swaps can change the whole dish.
- Adding extra liquid before the batter, dough, or sauce has time to hydrate.
Useful next reads
Helpful tools for this guide
- instant-read thermometer
- digital kitchen scale
- cutting board
- airtight storage containers
Related topic hubs
The Ultimate Chili Without Beans: A Bold and Authentic Texas Style Recipe
There is a specific, intoxicating aroma that fills a kitchen when a true "Bowl of Red" has been simmering for three hours. It’s not the smell of a quick weeknight soup; it’s the scent of rendered beef fat, toasted cumin, and rehydrated smoked chiles melding into something primal. In my 15 years of testing recipes for CookBuddyGuide.com, I’ve learned that the most controversial topic in American cooking isn't pineapple on pizza—it’s whether beans belong in chili. If you ask a Texan, the answer is a resounding "no."
Making a chili without beans is an exercise in patience and flavor extraction. When you strip away the fillers like kidney beans or pinto beans, you are left with the pure essence of the meat and the spice. This Texas style chili recipe focuses on building layers of complexity that a standard ground-beef-and-packet-seasoning version simply cannot match. Whether you are looking for a keto friendly chili recipe, a robust low carb dinner, or the ultimate comfort food for a cold Sunday, this guide will walk you through the professional techniques required to master chili con carne.
Table of Contents
Why Authentic Texas Chili Means No Beans
The History of the "Bowl of Red"
The origins of chili con carne (literally "chili with meat") are rooted in the working-class history of San Antonio, Texas. In the late 19th century, the "Chili Queens" would set up stands in the city's plazas, serving up piquant bowls of meat stewed in a red sauce made from dried peppers. Crucially, these original versions never contained beans. Beans were considered a side dish, a way to stretch a meal for a large family, but they were never part of the "red."
In my research and travels, I’ve looked into the standards set by the Chili Appreciation Society International (CASI). For competition-grade authentic Texas chili con carne, beans are strictly forbidden. The focus is entirely on the "gravy" and the tenderness of the beef. This isn't just about tradition; it's about the purity of the smoky chili flavor that defines the dish.
The Culinary Science: Why Beans Can Dilute Flavor
From a culinary standpoint, beans are starchy and neutral. While they provide bulk, they also absorb the precious oils and fats that carry the flavor of your spices. When you make chili without beans, every spoonful is a concentrated hit of beefy umami and chile heat. The texture profile changes from "chunky and soft" to "silky and meaty." By removing the beans, you allow the Maillard reaction products from the seared beef to take center stage. This makes it an ideal keto friendly chili recipe for those monitoring their glycemic index while still craving a hearty, filling meal.
The Secret to Success: Choosing the Right Meat
Why Chuck Roast Beats Ground Beef
In my early days of cooking, I used ground beef for everything. It was fast and cheap. However, after making this recipe 20+ times, I discovered that ground beef lacks the structural integrity needed for a long simmer. For the best meat for chili, you must use Chuck roast. Chuck is high in collagen and connective tissue. During a 3-hour simmer, that collagen breaks down into gelatin, which gives the chili a rich, mouth-coating texture that you simply can't get from a lean 90/10 ground beef blend.
If you are looking for quick ground beef recipes, there are plenty of options, but for an authentic Texas Red, the knife is your best friend. If you must use ground meat, ensure it is a coarse "chili grind" and check the ground beef safety guidelines for proper handling and internal temperatures.
The Importance of Hand-Cutting Your Beef
I recommend hand-cutting your chuck roast into 1/2-inch cubes. This might seem tedious, but the mouthfeel of tender, individual cubes of beef is vastly superior to the "pebbly" texture of ground meat. When you cut the meat yourself, you can also trim away any excessive hard gristle while keeping the intramuscular fat (marbling) that provides flavor. Aim for a total fat ratio of about 80/20. While some people prefer leanest cuts of beef like sirloin for health reasons, sirloin will often turn tough and dry during the long cooking process required for chili.
The Maillard Reaction: Mastering the Sear
The most common mistake I see home cooks make is crowding the pan. When you dump three pounds of cold meat into a Dutch oven at once, the temperature drops, the meat releases moisture, and it begins to steam rather than sear. You miss out on the Maillard reaction—the chemical reaction between amino acids and reducing sugars that gives browned meat its distinctive flavor.
To do it right, work in at least three batches. Heat your oil until it’s shimmering and just starting to smoke. Add the meat in a single layer with space between the cubes. Let it sit undisturbed for exactly 3 to 4 minutes until a deep, dark brown crust forms. Flip and repeat. For more on this technique, check out this guide on browning meat for stew. This foundation of flavor is what separates a "good" chili from a "legendary" one.
Building the Flavor Profile: Chiles and Spices
Working with Whole Dried Chiles
If you want to move beyond the grocery store "chili powder" (which is often mostly salt and garlic powder), you need to make a dried chili paste. In my kitchen, I use a "Holy Trinity" of dried peppers:
- Ancho chiles: Dried poblanos that provide a sweet, raisin-like base and deep color.
- Guajillo chiles: These add a bright, tangy, and slightly floral note.
- Pasilla chiles: These offer a rich, smoky undertone without overwhelming heat.
To prepare them, remove the stems and seeds. Toast the dry skins in a hot skillet for 30 seconds per side until they become fragrant—be careful not to burn them, or they will turn bitter. Rehydrate them in hot water for 20 minutes, then blend them with a little of the soaking liquid to create a smooth, vibrant red paste. This is the soul of your Texas style chili recipe.
The Role of Cumin, Oregano, and Smoked Paprika
While the chiles provide the bulk of the flavor, your homemade chili seasoning needs supporting actors. Cumin is non-negotiable; it provides that "earthy" scent we associate with Tex-Mex. I always toast my cumin seeds and grind them fresh. Mexican oregano (which is related to lemon verbena) adds a citrusy, herbal high note that cuts through the richness of the beef. Smoked paprika enhances that smoky chili flavor, especially if you aren't using a smoker to cook the meat.
Adding Heat: Chipotle in Adobo vs. Cayenne
Control your heat carefully. I discovered that using a tablespoon of minced chipotle peppers in adobo sauce adds both heat and a "slow burn" smokiness. If you prefer a sharper, more immediate heat, a pinch of cayenne pepper will do the trick. Remember: you can always add more heat at the end, but you can't take it away once it's in the pot!
The Liquid Base and Aromatics
Beef Broth vs. Water: Choosing Your Foundation
Some purists use only water to let the beef and chiles speak for themselves. However, I’ve found that using a high-quality, low-sodium beef broth adds a layer of savory depth that water lacks. Using low-sodium broth is essential because as the chili simmers and reduces, the salt concentration increases. You want to be the one in control of the salt, not the broth manufacturer.
The Tomato Debate: Paste, Crushed, or None?
This is where Texas chili enthusiasts get heated. A strict "Texas Red" contains zero tomatoes. However, for the home cook, a small amount of tomato paste (about 2 tablespoons) adds umami and a subtle sweetness that balances the heat of the chiles. I avoid crushed tomatoes or diced tomatoes because they turn the dish into a "vegetable beef soup" and distract from the meat-centric goal of a chili without beans.
Using Onions and Garlic to Build Depth
Aromatics are the unsung heroes here. I use one large yellow onion, finely diced, and at least six cloves of fresh garlic. Sauté the onions in the leftover beef fat in your Dutch oven until they are translucent and just starting to caramelize around the edges. This takes about 8 to 10 minutes. Add the garlic only in the last 60 seconds of sautéing to prevent it from burning and becoming acrid.
The Low and Slow Simmer
Stovetop vs. Slow Cooker vs. Dutch Oven
While you can certainly make a slow cooker beef chili, I firmly believe the heavy-bottomed Dutch oven on the stovetop is the superior vessel. The Dutch oven allows for better evaporation, which thickens the sauce and concentrates the flavors. If you are in a rush, a slow cooker works well for a "set it and forget it" meal, but you will miss out on the flavor development that occurs with a gentle stovetop simmer.
If you do choose the slow cooker route, I have several crockpot freezer meal recipes that follow similar principles of browning the meat first before adding it to the ceramic pot.
The 'Masa Harina' Trick for Thickening
Since we aren't using beans, which naturally release starch to thicken the liquid, we need a secret weapon. Enter Masa harina. Masa harina is the corn flour used to make tortillas. In the last 30 minutes of cooking, whisk 2 tablespoons of masa harina with a little water or broth to create a slurry, then stir it into the pot. Not only does it provide the perfect consistency for thickening chili without beans, but it also adds a faint, delicious toasted corn flavor that screams "authentic."
The Complete Texas Style Chili Recipe
Authentic Texas Red: Chili Without Beans
This recipe yields a thick, rich, and deeply flavored chili that focuses on the quality of the beef and the complexity of the chiles. It is a perfect game day recipe or a low carb dinner for the whole family.
Ingredients
- 3 lbs Chuck roast, cut into 1/2-inch cubes
- 3 dried Ancho chiles, stems and seeds removed
- 2 dried Guajillo chiles, stems and seeds removed
- 1 dried Pasilla chile, stems and seeds removed
- 2 cups hot beef broth (low sodium)
- 2 tbsp vegetable oil or lard
- 1 large yellow onion, finely diced
- 6 cloves garlic, minced
- 1 tbsp ground cumin (preferably freshly toasted)
- 1 tsp Mexican oregano
- 1 tsp smoked paprika
- 1-2 tbsp chipotle in adobo (depending on heat preference)
- 2 tbsp tomato paste
- 1 bottle (12 oz) dark lager beer (optional, or replace with more broth)
- 2 tbsp Masa harina
- Kosher salt and black pepper to taste
Step-by-Step Instructions
- Prepare the Chile Paste: In a dry skillet over medium heat, toast the dried chile skins for 30-60 seconds per side. Place them in a bowl and cover with 1 cup of the hot beef broth. Let soak for 20 minutes. Transfer the chiles and liquid to a blender and process until completely smooth. Set aside.
- Sear the Beef: Pat the cubed beef dry with paper towels. Season generously with salt and pepper. Heat oil in a large Dutch oven over medium-high heat. Brown the beef in 3 batches, ensuring each piece gets a dark crust (about 3-4 mins per side). Remove beef and set aside on a plate.
- Sauté Aromatics: Reduce heat to medium. Add the onions to the pot, scraping up the browned bits (fond) from the bottom. Cook until translucent (8 mins). Add garlic, cumin, oregano, and paprika. Cook for 1 minute until fragrant.
- Build the Base: Stir in the tomato paste and chipotle. Cook for 2 minutes until the paste darkens. Pour in the beer (if using) to deglaze the pan, followed by the prepared chile paste and the remaining beef broth.
- The Long Simmer: Return the beef and any accumulated juices to the pot. Bring to a boil, then immediately reduce to a very low simmer. Cover with a lid slightly ajar. Maintain a "lazy bubble" for 2.5 to 3 hours. The meat is done when it can be easily smashed with a spoon but still holds its cube shape.
- Thicken: Whisk the Masa harina with 3 tbsp of water. Stir into the chili. Simmer uncovered for another 20-30 minutes until the sauce is thick and glossy.
- Final Seasoning: Taste and adjust salt. Sometimes a teaspoon of apple cider vinegar or a squeeze of lime at the end can brighten the flavors.
Nutrition Information (Per Serving)
Calories: 410 | Net Carbs: 8g | Protein: 38g | Fat: 24g
Keto Modification: Omit the beer and use an extra 1/2 cup of beef broth. Reduce Masa harina to 1 tbsp or omit entirely for a thinner, zero-carb sauce.
The Ultimate Toppings Guide
Classic Garnishes
While the chili itself is the star, the toppings provide necessary contrast. I always set up a "Chili Bar" for game day recipes. The classics include:
- Sharp Cheddar Cheese: The saltiness cuts through the rich beef.
- Sour Cream or Mexican Crema: Essential for cooling down the heat of the chiles.
- Sliced Scallions or Red Onion: Adds a fresh, sharp bite to the heavy stew.
Unexpected Additions for Texture
In my testing, I’ve found that adding a bit of crunch makes the experience more dynamic. Pickled jalapeños add acidity and heat, while fresh cilantro provides a floral finish. And of course, you can't mention a Texas style chili recipe without mentioning the "Frito Pie." Serving this beanless chili over a bed of Fritos (corn chips) is a Texas tradition that adds a salty, corn-heavy crunch that is undeniably satisfying.
Make-Ahead, Storage, and Freezing Tips
Why Chili Tastes Better the Next Day
It is a scientific fact in the culinary world: chili is better on day two. As the dish cools and sits in the refrigerator, the spices continue to permeate the meat, and the flavors "marry." The harsh edges of the chiles soften, and the gelatin in the sauce sets, creating an even richer mouthfeel when reheated. If you are hosting a party, I highly recommend making this 24 to 48 hours in advance.
How to Freeze and Reheat Without Losing Texture
This chili without beans freezes exceptionally well because there are no vegetables to turn mushy.
- Storage: Keep in an airtight container in the fridge for 3-4 days.
- Freezing: Use heavy-duty freezer bags or glass containers. It will stay fresh for up to 3 months. To prevent freezer burn, ensure there is minimal air in the bag.
- Reheating: For the best results, thaw overnight in the fridge. Reheat in a saucepan over medium-low heat, adding a splash of beef broth or water if it has thickened too much in the cold. Avoid the microwave if possible, as it can cause the beef to become rubbery.
Frequently Asked Questions
A: Yes, but the flavor won't be as complex. Use 1/4 cup of high-quality chili powder and add a little extra beef broth to compensate for the lack of chile paste volume.
A: As written, it is a "medium" heat. The Ancho and Guajillo chiles are more about flavor than heat. To make it milder, remove all seeds carefully and omit the chipotle.
A: Every cow is different! If the beef is tough, it simply hasn't finished breaking down the collagen. Give it another 30-45 minutes. Low and slow is the only way.
Conclusion
Mastering a chili without beans is a rite of passage for any serious home cook. By focusing on the quality of your Chuck roast, taking the time to create a dried chili paste, and allowing the pot to simmer until the meat is butter-tender, you are creating a dish that transcends the average weeknight meal. This Texas style chili recipe isn't just a recipe; it's a celebration of bold, smoky, and authentic flavors. So, grab your Dutch oven, put on some music, and get ready to serve the best "Bowl of Red" your friends and family have ever tasted. Happy cooking!